Learning how to tie a bow tie might seem like a daunting task at first glance, a sartorial Everest that only the most seasoned gentlemen can conquer. The intricate loops, the elusive symmetry, and the fear of ending up with a lopsided knot can deter many from embracing this timeless accessory. However, the truth is far less intimidating than it appears, and with the right guidance, anyone can master the art of tying a perfect bow tie.
Forget the notion that this skill is reserved for a select few. Our easy guide is designed to teach you how to tie a bow tie in a few simple steps, transforming a seemingly complex process into an achievable feat. We'll walk you through each stage, providing clear, concise instructions that build confidence with every loop and tug. Get ready to elevate your style and wear your self-tied bow tie with pride, knowing you’ve mastered a true mark of elegance.
Table of Contents
- Why Master the Art of Tying Your Own Bow Tie?
- Essential Tools and Preparations Before You Begin
- The Seven Steps to a Perfectly Tied Bow Tie
- Visual Learning: The Power of Tutorials
- Common Pitfalls and How to Avoid Them
- Practice Makes Perfect: Your Journey to Mastery
- Beyond the Knot: Styling Your Bow Tie
- Conclusion: Embrace Your Inner Sartorialist
Why Master the Art of Tying Your Own Bow Tie?
In an age where convenience often trumps craftsmanship, the self-tied bow tie stands as a testament to personal style and attention to detail. While pre-tied options offer undeniable ease, they simply cannot replicate the unique charm and character of a hand-tied knot. A self-tied bow tie possesses an inherent asymmetry, a subtle imperfection that speaks volumes about authenticity and effort. It’s a quiet declaration of confidence, signaling that you value tradition and personal expression over mere convenience.
- Dunkirk Observer
- Four Seasons Westlake Village
- Syndicated Bar Theater Kitchen
- Martha Stewart Daughter
- Taco Rico
When you learn how to tie a bow tie yourself, you gain more than just a skill; you gain a deeper appreciation for menswear. The fabric drapes differently, the knot sits more naturally, and the slight variations in its form throughout an evening add to its appeal. This classic look is not just about formality; it’s about making a statement. Whether you're attending a black-tie event, a wedding, or simply aiming for a sophisticated casual ensemble, a self-tied bow tie elevates your entire appearance. It’s a skill that, once mastered, will serve you well for a lifetime of stylish occasions, distinguishing you from the crowd and cementing your status as a true connoisseur of classic elegance.
Essential Tools and Preparations Before You Begin
Before you dive into the intricacies of how to tie a bow tie, ensuring you have the right tools and a conducive environment can make all the difference in your learning journey. Fortunately, the requirements are minimal, focusing more on readiness and a clear space than on specialized equipment. Your primary tool, of course, will be the bow tie itself. Opt for a standard, self-tie bow tie, preferably one that is adjustable in length. This adjustability is crucial, especially when you are first learning, as it allows you to customize the fit around your neck and experiment with different lengths for the ends.
Next, a good mirror is indispensable. You’ll be working with your hands in front of you, and a clear reflection will allow you to observe your progress, make precise adjustments, and catch any errors early on. Some menswear experts even suggest practicing in front of a full-length mirror initially, or even using a camera to record yourself, to get a better understanding of the movements. Beyond the physical tools, mental preparation is key. Approach the task with patience and a positive attitude. Tying a bow tie is an art that requires a little practice, and initial attempts might not be perfect. Don't get discouraged; persistence is your best ally. Clear your workspace, ensure good lighting, and set aside a few uninterrupted minutes. Remember, this isn't a race; it's an enjoyable process of acquiring a valuable sartorial skill.
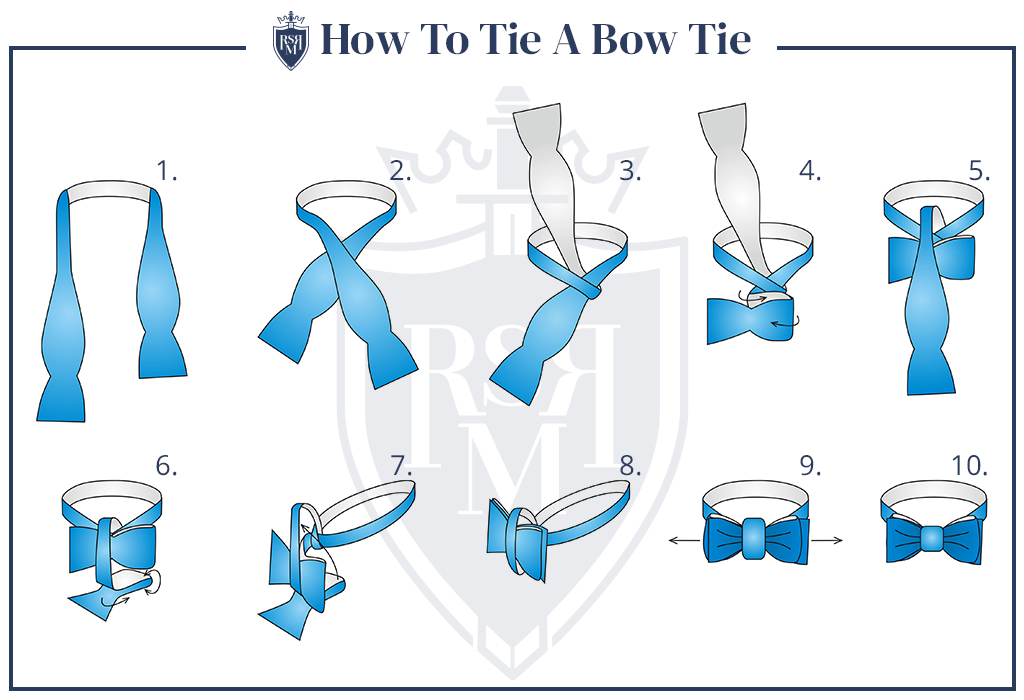
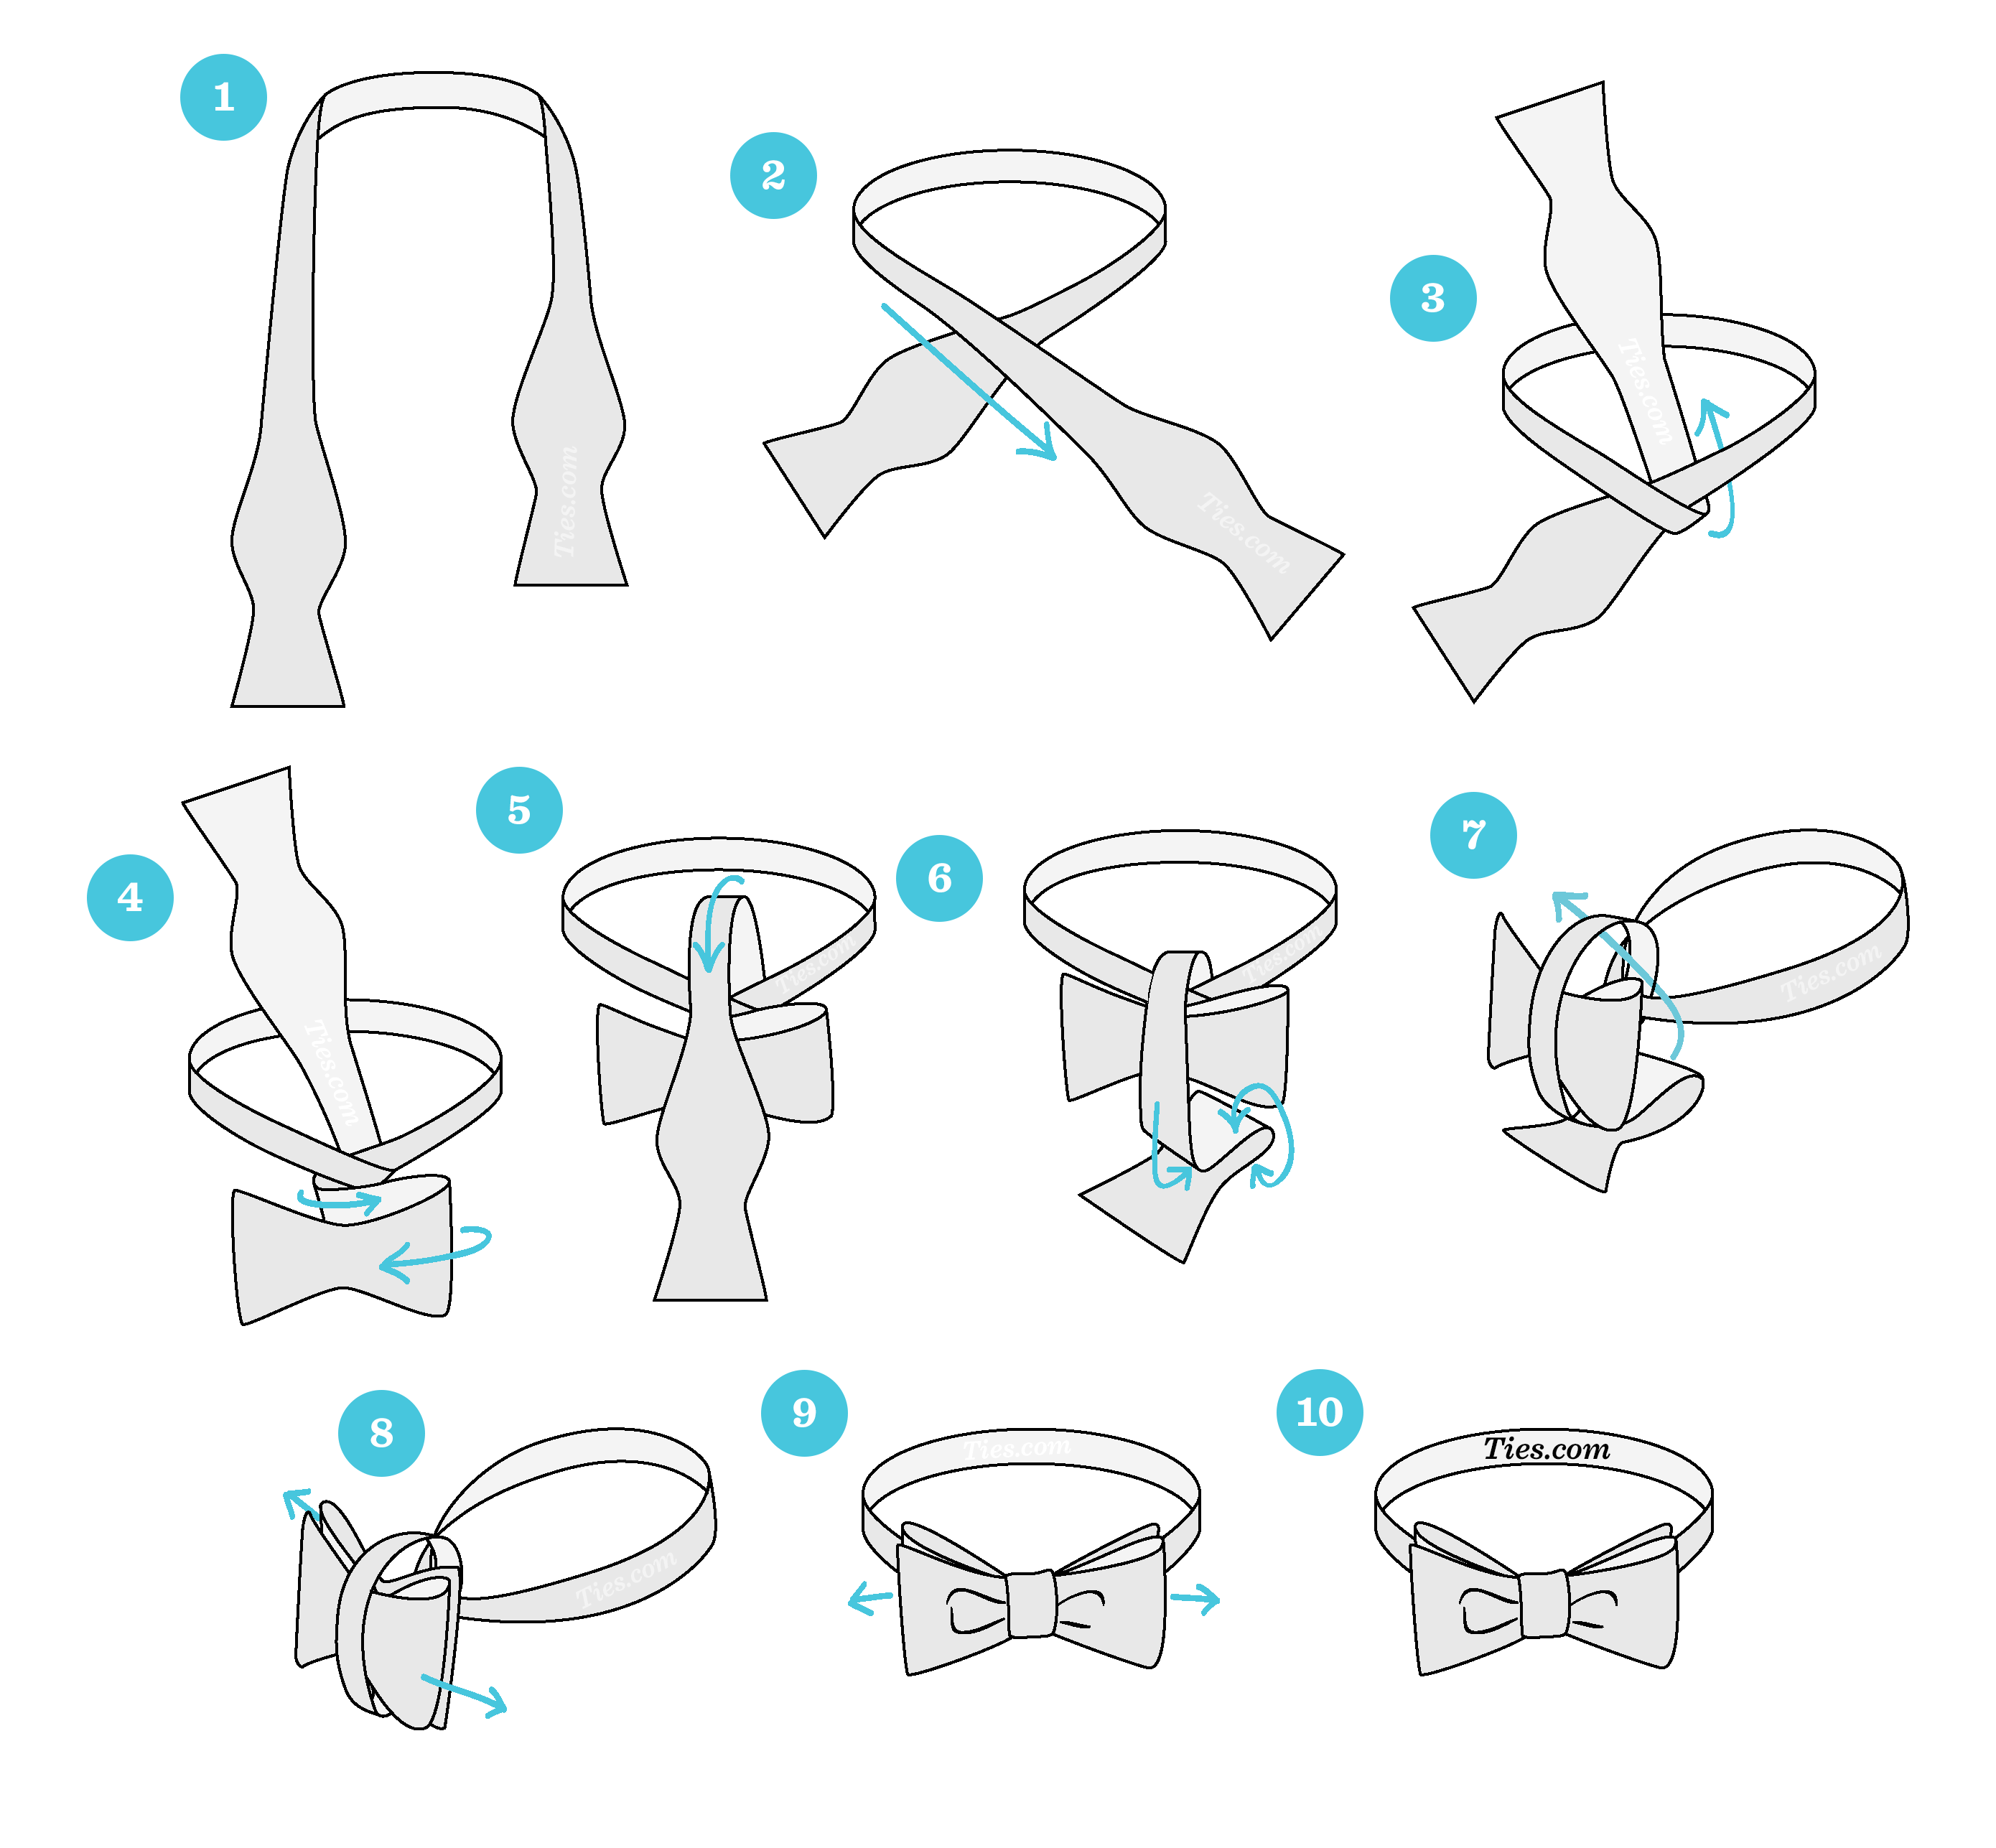
The Seven Steps to a Perfectly Tied Bow Tie
This is where the magic happens. Menswear experts have broken down the process of how to tie a bow tie into seven easy steps, making it accessible to everyone. Follow their advice, and you'll be a pro yourself in no time. While it does take a little practice to master the art of the perfect bow tie knot, our bow tie tutorial will guide you with step-by-step instructions that will make the entire process clear and manageable. Let's begin:
Step 1: The Initial Drape and Alignment
The foundation of a good bow tie knot begins with proper placement around your neck. Start by aligning the bow tie around your neck so that one end is a couple of inches longer than the other. This initial asymmetry is crucial for the subsequent steps, as it allows for the necessary length to form the loops and knot. Generally, having the right side (if you're right-handed) slightly longer is a common approach, but feel free to experiment with which side feels more natural for you to work with. Ensure the bow tie sits comfortably against your collar, ready for the next move.
Step 2: The Cross-Over Foundation
With the bow tie correctly aligned, the next step is to create the fundamental structure of the knot. Cross the long end over the shorter end. This is similar to the first step in tying a shoelace or a regular necktie. Ensure this crossover is snug but not overly tight, as you’ll need some room for manipulation in the following steps. This forms the base of your knot and dictates how the rest of the bow tie will sit. It’s a simple action, but its precision is vital for a well-formed knot.
Step 3: The First Loop and Tightening
Now, take the long end that you just crossed over and bring it up through the neck loop from underneath. This action creates the initial knot that secures the bow tie around your neck. Once it's threaded through, pull it down to tighten the knot gently. The goal here is to create a firm, central knot that will support the bow, without choking yourself or making it too loose that it slips. This step establishes the core of your bow tie, and a well-formed central knot is essential for symmetry and stability.
Step 4: Forming the First Bow Loop
With the central knot in place, it's time to create the first of your two bow loops. Take the shorter end (which is now hanging down) and fold it horizontally across your neck, forming a loop. This loop will be one half of your finished bow tie. Position it carefully, ensuring it's roughly the size you desire for your final bow. This step requires a bit of foresight, as the size of this loop will influence the overall dimensions of your bow tie.
Step 5: The Crucial Second Loop
Now, take the longer end that is still hanging down and drape it straight down over the center of the loop you just formed in Step 4. This is a critical move that sets up the second half of the bow. Ensure it lies flat and neatly over the first loop. This creates a sort of 'cross' shape over the initial loop, preparing it for the final threading that will complete the knot. Precision here is key to avoiding a messy or lopsided bow.
Step 6: Threading Through the Knot
This is often considered the trickiest part, but with a little patience, it becomes intuitive. Fold the long end you just draped over the first loop, bringing it back up and pushing it through the small loop or hole that has formed behind the first bow. This action creates the second half of your bow. You'll be pushing the fabric through a relatively tight space, so take your time and guide it gently. This is where the magic of the knot truly comes together, transforming loose fabric into a structured bow.
Step 7: Adjusting and Perfecting the Knot
Congratulations, you’ve completed the basic knot! Now comes the art of refinement. Gently pull on the ends of the bow tie loops and the hanging tails to adjust the symmetry and tightness of the knot. Tug one side, then the other, until both loops are roughly the same size and the knot is centered. Don't be afraid to manipulate the fabric; the beauty of a self-tied bow tie lies in its slight imperfections and unique character. This final adjustment phase is where you personalize your bow tie, ensuring it sits perfectly and complements your overall look. You'll soon master this traditional knot and enjoy the classic look that only a self-tied bow tie can provide.
Visual Learning: The Power of Tutorials
For many, especially those who are more of a visual learner, reading instructions alone might not be enough to fully grasp the nuances of how to tie a bow tie. This is where video tutorials become incredibly powerful. Seeing each step demonstrated in real-time, observing the subtle movements of the hands, and understanding the precise angles can significantly accelerate your learning curve. Reputable sources like Ties.com often provide a full walkthrough and video in their guides, offering a dynamic complement to written instructions. These visual aids allow you to pause, rewind, and replay sections as many times as needed, ensuring you don't miss a single detail.
Beyond commercial sites, countless helpful video tutorials exist online. You might find a heartwarming and informative video where a father teaches his son the art of tying a bow tie, illustrating the process with patience and clear explanations. Such personal narratives can make the learning experience even more relatable and encouraging. Watching someone else perform the steps can demystify the process, showing you exactly how the fabric should fold and where your fingers should be placed. So, if you find yourself struggling with the written guide, remember that a visual aid can be your best friend in mastering this elegant skill. Don't hesitate to search for "how to tie a bow tie video tutorial" and watch a few different approaches to find the one that clicks best with your learning style.
Common Pitfalls and How to Avoid Them
As with any new skill, learning how to tie a bow tie comes with its own set of common challenges. Recognizing these pitfalls beforehand can help you navigate them more effectively and reduce frustration. One of the most frequent issues beginners face is uneven ends. If one side of your bow tie consistently ends up significantly longer or shorter than the other, it usually stems from the initial alignment in Step 1. Ensure that the difference in length between the two ends is just a couple of inches, and be consistent with which side you designate as the "long" end throughout the process.
Another common problem is a knot that is either too tight or too loose. A knot that’s too tight can be uncomfortable and difficult to adjust, while one that’s too loose will look sloppy and might unravel. The key is gentle, consistent tension throughout the tying process, especially in Step 3 when you pull the long end through the neck loop. Aim for snugness, not strangulation. Asymmetry in the loops is also a frequent culprit for a less-than-perfect bow tie. This often happens in Steps 4 and 6. Pay close attention to making both the first and second loops roughly the same size and shape. Finally, perhaps the biggest pitfall is a lack of patience. Tying a bow tie is a tactile skill that improves with repetition. Don't expect perfection on your first try. Embrace the learning curve, view each attempt as practice, and remember that even experienced wearers sometimes need to re-tie their bow ties for the perfect look. Persistence truly pays off when it comes to mastering this classic knot.
Practice Makes Perfect: Your Journey to Mastery
The adage "practice makes perfect" holds particularly true when it comes to learning how to tie a bow tie. While our tutorial provides clear, step-by-step instructions, the real mastery comes from repetition and muscle memory. Don't be discouraged if your first few attempts don't result in a flawless knot. This is entirely normal. Think of it as developing a new dexterity, much like learning to play a musical instrument or ride a bicycle. Each time you go through the motions, your hands become more accustomed to the feel of the fabric, the necessary tension, and the sequence of steps.
At men's suit shops like Pursuit, where they teach guys how to tie bow ties every day, they've perfected the technique over thousands of lessons. Their experience confirms that consistent practice is the most effective way to build confidence and speed. Dedicate a few minutes each day to tying and untying your bow tie. You can even practice in front of a mirror, or simply while watching TV, to get the feel of it without the pressure of an imminent event. With each attempt, you'll find the process becoming more intuitive, less about memorizing steps and more about a fluid, natural motion. Before you know it, you’ll be able to tie a bow tie with ease, even without looking. You'll soon master this traditional knot and enjoy the classic look with effortless confidence, ready for any occasion.
Beyond the Knot: Styling Your Bow Tie
Once you've mastered how to tie a bow tie, the world of sartorial possibilities truly opens up. A self-tied bow tie isn't just for black-tie affairs; its versatility allows it to transcend formal boundaries and enhance various outfits. Understanding how to style your bow tie involves considering factors like fabric, pattern, and the occasion. For traditional formal events, silk or satin bow ties in classic colors like black, navy, or burgundy are timeless choices. These fabrics provide a luxurious sheen that complements tuxedos and formal suits beautifully.
However, whether you’re wearing a bow tie for a semi-formal gathering or even a smart-casual look, experimenting with different textures and patterns can add significant character. Wool, tweed, or even cotton bow ties can lend a more relaxed, yet still sophisticated, vibe. Patterns like polka dots, stripes, or subtle paisleys can inject personality into your ensemble, making a statement without being overtly flashy. For a more contemporary approach, consider pairing a patterned bow tie with a crisp dress shirt and a well-fitting blazer, even without a full suit. The beauty of the bow tie lies in its ability to instantly elevate an outfit, adding a touch of whimsy or gravitas depending on your choice. Don't be afraid to experiment with different styles and colors to find what best expresses your personal aesthetic and suits the specific event.
Conclusion: Embrace Your Inner Sartorialist
Learning how to tie a bow tie is more than just acquiring a new skill; it's an initiation into a timeless tradition of elegance and personal craftsmanship. We've walked through the essential steps, from the initial drape to the final adjustments, showing that what once seemed complex is, in fact, entirely achievable with patience and practice. Remember, every master was once a beginner, and the unique charm of a self-tied bow tie lies in its authentic, slightly imperfect knot, a testament to your effort and style.
So, take out your bow tie, stand in front of the mirror, and give it a try. Use our easy guide to learn how to tie a bow tie, and don't hesitate to watch a video tutorial if you're a visual learner. With a little perseverance, you'll soon be tying your bow tie with confidence and flair, ready to make a sophisticated statement at any event. We encourage you to share your experiences in the comments below – what was the trickiest part for you? What tips would you offer to fellow learners? And if you're looking to further refine your wardrobe, be sure to explore our other guides on classic menswear essentials!
Related Resources:

Detail Author:
- Name : Katelynn Prohaska
- Username : lea.purdy
- Email : joshuah64@gmail.com
- Birthdate : 1995-10-10
- Address : 22896 Steve Groves Apt. 050 Beierland, IL 12679-4539
- Phone : (254) 346-6369
- Company : Jerde LLC
- Job : Rough Carpenter
- Bio : Voluptatibus ullam reprehenderit excepturi laudantium. Sint quibusdam consequatur quasi optio non et. Modi incidunt distinctio minima. Vel et qui ab consequatur vitae at.
Socials
twitter:
- url : https://twitter.com/diego_id
- username : diego_id
- bio : Possimus asperiores quis odio et non. Et quia atque officiis nemo qui et officiis dolorem. Magnam qui illo suscipit illo dolores cupiditate velit.
- followers : 390
- following : 2407
instagram:
- url : https://instagram.com/dgoodwin
- username : dgoodwin
- bio : Dolorem accusamus amet impedit saepe. At voluptatem est sunt pariatur odit.
- followers : 5291
- following : 480
tiktok:
- url : https://tiktok.com/@diego.goodwin
- username : diego.goodwin
- bio : Qui vitae ratione debitis optio. Qui laudantium sapiente facere amet quis.
- followers : 2938
- following : 98
linkedin:
- url : https://linkedin.com/in/goodwin1971
- username : goodwin1971
- bio : Est repudiandae est voluptas minus voluptatem.
- followers : 2707
- following : 2943
facebook:
- url : https://facebook.com/diego.goodwin
- username : diego.goodwin
- bio : Officia perferendis enim maxime suscipit consequatur officiis suscipit.
- followers : 1220
- following : 2415
