Have you ever scrolled through countless images of stunning henna art, admiring the intricate patterns, but felt a pang of intimidation? Perhaps you love the look of henna designs on hands but are too scared to give it a go or don’t even know where to start. You’re not alone. Many aspiring henna enthusiasts feel overwhelmed by the perceived complexity of this ancient art form. But what if we told you that achieving beautiful, eye-catching henna doesn't require years of practice or an artistic degree?
This comprehensive guide is designed for beginners to learn how to create simple and elegant henna designs, proving that everyone can embrace the beauty of this temporary body art. We've curated a collection of easy henna designs, featuring everything from delicate floral patterns to trendy geometric motifs, and more. Forget the fear of imperfection; this post is your perfect starting point to explore the world of easy henna designs and adorn yourself with confidence.
Table of Contents:
- Why Embrace Easy Henna Designs?
- Getting Started: Your Easy Henna Toolkit
- Mastering the Basics: Foundational Strokes for Easy Henna
- Popular Easy Henna Design Categories
- Finger Henna Designs: Small Details, Big Impact
- Front Hand Henna Designs: Bold and Beautiful
- Back Hand Henna Designs: Subtle Elegance
- Making Your Easy Henna Designs Last Longer
- Troubleshooting Common Henna Challenges
- Conclusion: Your Henna Journey Begins Now
Why Embrace Easy Henna Designs?
The allure of henna lies in its intricate beauty and cultural significance, but for many, the thought of creating those elaborate patterns is daunting. This is precisely why focusing on easy henna designs is a game-changer. Firstly, they are incredibly forgiving. Unlike complex patterns that demand precision, simple designs allow for minor imperfections, making the learning process less stressful and more enjoyable. Think of it like learning to cook; you start with quick dinner ideas from Food Network, like easy ground beef recipes, before tackling a multi-course meal. Similarly, mastering basic henna elements builds confidence.
Secondly, easy henna designs are versatile. They can be applied quickly for a casual look, or serve as a foundation for more elaborate patterns as your skills grow. They are perfect for spontaneous adornment, adding a touch of elegance without a significant time commitment. Whether you're looking for a quick artistic expression or a way to test the waters before committing to more complex work, these simple designs are your best friend. They prove that you don't need to be an expert to enjoy the beauty of henna, much like how everyone needs a simple chocolate chip cookie recipe in their repertoire for guaranteed deliciousness.
Getting Started: Your Easy Henna Toolkit
Before you dive into creating stunning easy henna designs, it's essential to gather the right tools. A well-prepared toolkit makes the process smoother and more enjoyable, especially for beginners. The most crucial item is, of course, the henna cone. Always ensure you are using natural henna, which is typically brown or reddish-brown. Avoid "black henna" or any product advertised as such, as these often contain harmful chemicals (like PPD) that can cause severe allergic reactions and permanent skin damage. Look for reputable suppliers who clearly state their ingredients and source their henna ethically. Think of choosing your henna like selecting the best ingredients for a recipe; quality matters for a safe and beautiful outcome.
- Natural History Museum Of Utah
- Blake Lively Height
- Cgv Buena Park
- Fj Cruiser For Sale
- Living Room Theater In Portland
Beyond the cone, a few other items will be beneficial. Practice sheets or plain paper are invaluable for honing your strokes before applying to skin. A damp cloth or cotton swabs are essential for wiping away mistakes or smudges quickly. Some people find a fine-tipped pen or pencil useful for sketching out their design lightly on the skin before applying henna. Lastly, a comfortable, well-lit workspace is key. Just as you'd set up your kitchen for those easy breakfast ideas from Food Network, preparing your henna station ensures a pleasant and productive experience. Having everything within reach will help you maintain focus and flow as you create your easy henna designs.
Mastering the Basics: Foundational Strokes for Easy Henna
Every complex henna design is built upon a foundation of simple strokes. By mastering these basic elements, you unlock the ability to create countless easy henna designs. It's like learning the alphabet before writing a novel. Practice these on paper until you feel comfortable and confident. The key is consistent pressure on the cone and a steady hand. Don't rush; allow the henna to flow smoothly. Remember, even expert chefs started with simple rice recipes before creating gourmet meals; patience and practice are paramount.
Dots and Dashes
Dots are the simplest element. Apply light, consistent pressure, then lift the cone straight up. Vary the size by adjusting pressure and how long you hold the cone down. Dashes are essentially elongated dots or very short lines. These are perfect for creating borders, filling small spaces, or adding texture. A series of dots can form a delicate line, while dashes can create a subtle, almost beaded effect. These are fundamental for almost all easy henna designs.
Lines and Curves
Lines form the backbone of many designs. Practice drawing straight lines, varying their thickness by adjusting pressure. Then move on to curves – C-shapes, S-shapes, and spirals. The trick with curves is to move your hand smoothly and fluidly. These elements are fantastic for creating borders, framing other designs, or forming the initial structure of a pattern. Think of how important clean lines are in geometric designs; the same applies here for elegant, easy henna designs.
Simple Petals and Leaves
Floral patterns are among the most beloved easy henna designs. Start with simple teardrop shapes for petals. Group them together to form flowers. For leaves, draw a simple oval or teardrop shape and add a central vein. These basic shapes can be combined in endless ways to create beautiful, organic patterns. Once you master these, you can easily create intricate-looking floral motifs that are surprisingly simple to execute.
Popular Easy Henna Design Categories
Once you've got a handle on the basic strokes, you're ready to explore some of the most popular categories of easy henna designs. The beauty of these categories is their adaptability; you can scale them up or down, combine elements, and personalize them to your heart's content. We've found 43 stunning and simple henna designs that fall into these broad categories, making it easier for you to find inspiration and get started. From the timeless elegance of nature-inspired motifs to the clean lines of modern art, there's something for everyone, regardless of your artistic inclination. These designs are your go-to options for quick, satisfying results, much like those reliable lunch recipes for work that are easily prepared in advance and hold up through a long commute.
One of the most classic and universally loved categories is floral patterns. These can range from a single delicate flower to a vine trailing up a finger. Simple floral patterns often involve repeating basic petal shapes and adding dots or leaves for embellishment. They offer a soft, feminine touch and are incredibly versatile. Another trending category includes geometric designs. These feature clean lines, triangles, squares, and circles, often arranged in symmetrical or abstract patterns. They offer a modern, chic aesthetic and can be surprisingly easy to execute once you get the hang of drawing straight lines and consistent shapes. Leaf henna designs, often incorporated into floral or vine patterns, also stand alone as elegant, simple motifs, adding an organic touch to any design. The trick is to keep the elements minimal and repetitive, which makes them easy to master and apply beautifully.
Finger Henna Designs: Small Details, Big Impact
Finger henna designs are perfect for beginners looking for easy henna designs that still make a statement. They require less surface area and can be completed relatively quickly, making them ideal for a first attempt or when you're short on time. Despite their small scale, finger designs can be incredibly impactful, adding a touch of elegance and intrigue to your hands. Think of them as the perfect accessory – subtle yet noticeable. We've included many examples of these in our curated list of 43 designs, showcasing how a few simple strokes can transform your fingers.
Some popular easy finger henna designs include simple rings, often made of a single line or a series of dots encircling the finger. You can add a small heart, a tiny flower, or a simple leaf motif on top of the ring for added flair. Another common approach is to create a delicate trail of dots or small petals running down the side of a finger, or a minimalist design on the tip of the finger. Chevron patterns or small geometric shapes also work wonderfully on fingers, offering a modern edge. The key is to keep the design contained and not too cluttered. These designs are fantastic for building confidence, as they allow you to practice your control and precision on a smaller canvas, preparing you for larger easy henna designs on the hand.
Front Hand Henna Designs: Bold and Beautiful
The front of the hand offers a larger canvas for expressing your creativity with easy henna designs. While it might seem intimidating at first, many beautiful and impactful designs are surprisingly simple to create. The front hand is where traditional mehndi patterns often flourish, but you don't need to be an expert to achieve a stunning look. The trick is to break down the design into manageable, repetitive elements, much like assembling a complex dish from simple, well-understood ingredients.
For front hand easy henna designs, consider starting with a central motif on the palm, such as a simple mandala or a large flower. From this central point, you can extend lines, dots, and simple vine patterns towards the fingers and wrist. Leaf henna designs are particularly effective here, creating flowing, organic lines. Another popular approach is to create a "bracelet" design around the wrist, then connect it to a simple finger design with a few lines or dots. Trendy geometric designs also look fantastic on the front hand, offering a modern, structured aesthetic. Remember, even a few well-placed, simple elements can create a cohesive and impressive look. The goal is to fill the space aesthetically without overcomplicating the individual components, making it a perfect area for practicing your easy henna designs.
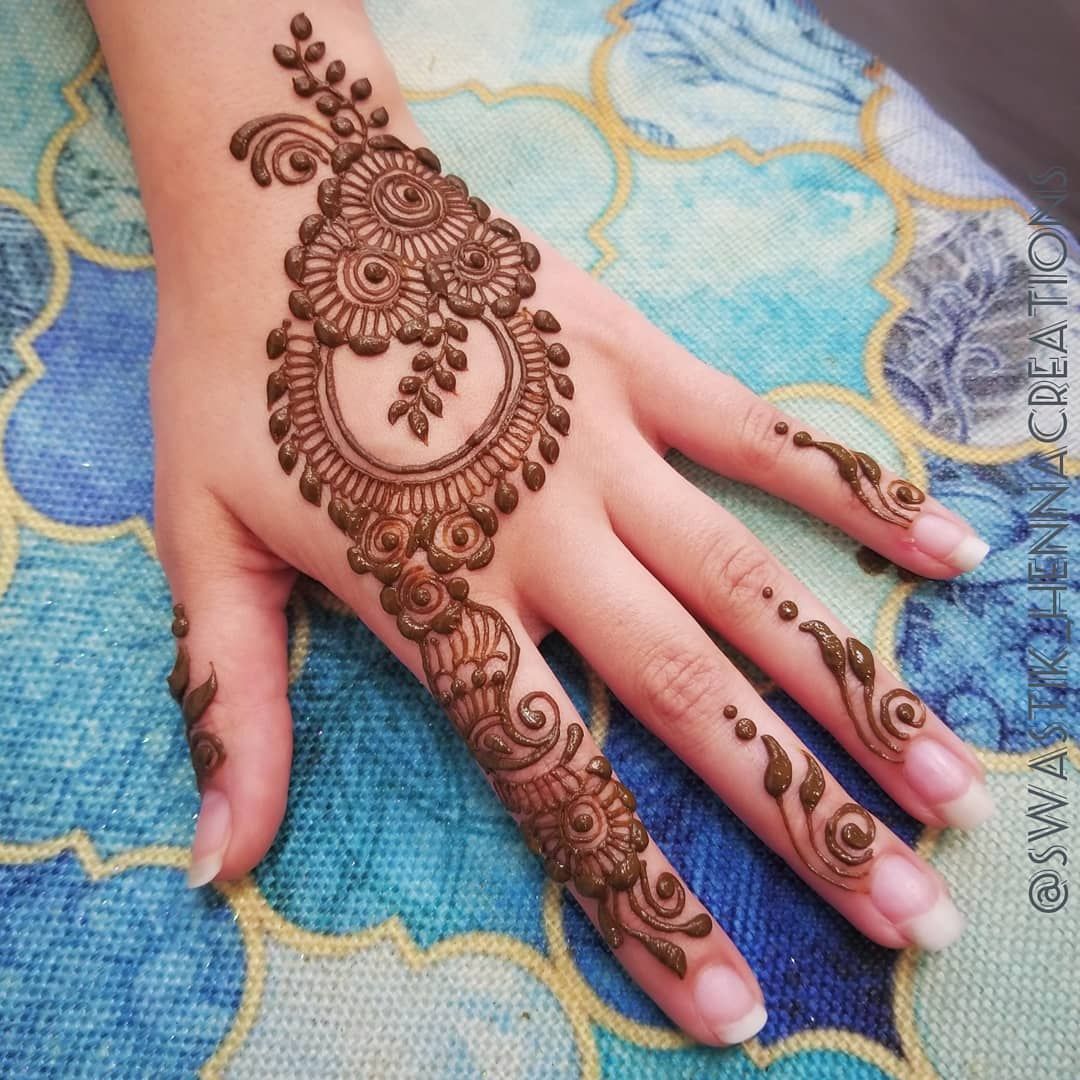
Back Hand Henna Designs: Subtle Elegance
The back of the hand provides an excellent space for elegant and often more subtle easy henna designs. This area is perfect for those who prefer a delicate touch or want a design that complements their attire without being overly elaborate. Back hand henna designs often feature motifs that flow from the wrist towards the fingers, or a single, striking element placed centrally. The visibility of the back of the hand makes it a popular choice for showcasing beautiful, yet simple, artistry.
Common easy henna designs for the back of the hand include vine patterns that gracefully curve along the side of the hand and up a finger. These can be adorned with simple leaves, dots, or small floral patterns. A minimalist "glove" effect, where simple lines and dots outline the hand's shape, is also a beautiful and easy option. Consider a single, large floral pattern placed on the back of the hand, with minimal detailing extending outwards. Geometric designs with clean lines and repetitive shapes can also create a striking modern look. Because the back of the hand is often more exposed, these designs tend to be more visible, so even a simple pattern can make a significant impact. Experiment with symmetry and negative space to create truly captivating easy henna designs that exude subtle elegance.
Making Your Easy Henna Designs Last Longer
While you can find thousands of henna designs online, the trick is to make them last longer on your body. The longevity of your easy henna designs depends on several factors, from the quality of the paste to your aftercare routine. A well-cared-for henna stain can last anywhere from one to three weeks, gradually fading over time. Maximizing the stain's lifespan ensures you get the most enjoyment out of your beautiful creation, much like ensuring your favorite rice recipes from Food Network turn out perfectly every time.
Here are expert tips to help your easy henna designs last longer:
- Keep it Moist: Once the henna paste is applied, keep it on for as long as possible – ideally 6-8 hours, or even overnight. As it dries, it may crack and flake. You can keep it moist by dabbing a sugar-lemon juice mixture over it periodically. The sugar helps the paste stick, and the lemon juice helps deepen the stain.
- Avoid Water: After the paste has flaked off, avoid washing the area with water for at least 12-24 hours. Water, especially hot water, can lighten the stain. If you must wash your hands, use a gentle, oil-based cleanser and pat dry.
- Apply Balm or Oil: Before showering or coming into contact with water, apply a natural oil (like olive oil, coconut oil, or specialized henna balm) to the stained area. This creates a barrier that repels water and protects the stain.
- Limit Exfoliation: Avoid scrubbing or exfoliating the area where your henna is applied, as this will accelerate fading.
- Stay Warm: Henna stains deepen with warmth. After the paste is removed, keeping the area warm (e.g., by covering it or staying in a warm environment) can help intensify the color.
By following these simple aftercare steps, you can significantly extend the life and vibrancy of your easy henna designs, ensuring they remain stunning for longer.
Troubleshooting Common Henna Challenges
Even with easy henna designs, beginners might encounter a few common challenges. Don't be discouraged! Just like mastering any new skill, from baking fluffy and tender chocolate chip cookies to preparing a satisfying meal fast, a little troubleshooting can go a long way. Understanding these issues and how to address them will help you refine your technique and achieve better results with your easy henna designs.
- Uneven Stain: If your stain looks patchy or uneven, it could be due to inconsistent paste application (some areas were thicker than others) or uneven drying. Ensure you apply the paste with consistent pressure and thickness. For aftercare, try to keep the entire design moist for the same duration.
- Light Stain: A light stain can be caused by poor quality henna, not leaving the paste on long enough, or insufficient aftercare. Always use fresh, natural henna. Leave the paste on for at least 6-8 hours. Ensure you follow the aftercare tips for longevity, especially avoiding water immediately after paste removal.
- Smudging: Smudges often occur if the paste is touched or rubbed before it's fully dry. Work slowly and carefully. If you do smudge, immediately wipe it away with a damp cotton swab or cloth before it stains. For very delicate easy henna designs, consider working on smaller sections at a time.
- Cone Clogging: If your henna cone clogs, it might be due to dried paste at the tip or impurities in the paste. Try snipping a tiny bit more off the tip of the cone. If the issue persists, gently knead the cone to redistribute the paste. Always store your henna cones properly to prevent drying.
- Design Not Flowing: If your lines aren't smooth, or your design feels stiff, it might be a matter of pressure or hand movement. Practice on paper to get a feel for consistent pressure and fluid strokes. Relax your hand and arm. Sometimes, the paste might be too thick; a good quality, fresh paste should flow easily.
Remember, practice makes perfect. Every attempt, even with minor issues, is a learning opportunity. Keep experimenting with different easy henna designs, and you'll quickly improve your technique.
Conclusion: Your Henna Journey Begins Now
You've now got the insights and inspiration to embark on your own henna adventure, focusing on easy henna designs that are both beautiful and achievable. We've explored why simple designs are perfect for beginners, what tools you need, and the fundamental strokes that form the backbone of all henna art. From delicate finger henna designs to more expansive front and back hand patterns, the possibilities are endless, and surprisingly accessible.
Remember, the goal isn't immediate perfection, but the joy of creation and self-expression. Just like those easy and delicious strawberry dessert recipes from Food Network are sure to have you going back for more, the satisfaction of creating your own stunning henna will keep you coming back to this beautiful art form. Don't be afraid to experiment, make mistakes, and most importantly, have fun. Your hands are a canvas, and with these easy henna designs, you have everything you need to adorn them with confidence and beauty. Which easy henna design will you try first? Share your thoughts and experiences in the comments below, or better yet, share your creations with us! Happy Henna-ing!
Related Resources:


Detail Author:
- Name : Aisha Herman
- Username : jkonopelski
- Email : ottilie96@gmail.com
- Birthdate : 1980-04-04
- Address : 4664 Little Vista Suite 518 Trevermouth, MS 91189
- Phone : 805.349.5304
- Company : Adams, Kautzer and Grady
- Job : Gas Pumping Station Operator
- Bio : Corporis quo voluptas perferendis. Sit ullam placeat quis libero magni architecto. Exercitationem fuga perferendis autem quasi eaque ducimus sit.
Socials
twitter:
- url : https://twitter.com/smith1982
- username : smith1982
- bio : Officia velit et odio quibusdam. Natus debitis aliquid maxime adipisci. Maxime recusandae voluptas nobis ad voluptatem aut.
- followers : 1196
- following : 1263
instagram:
- url : https://instagram.com/smith2023
- username : smith2023
- bio : Dolore atque cumque hic et natus ab rerum doloremque. Id enim cumque ipsam.
- followers : 6179
- following : 959
linkedin:
- url : https://linkedin.com/in/maryam1741
- username : maryam1741
- bio : Nesciunt est sint dicta itaque.
- followers : 1764
- following : 1670
tiktok:
- url : https://tiktok.com/@maryam_real
- username : maryam_real
- bio : Itaque est et perspiciatis repellat quae voluptatibus.
- followers : 5328
- following : 2132
facebook:
- url : https://facebook.com/maryam.smith
- username : maryam.smith
- bio : Accusamus perferendis tempora tempore in beatae qui hic.
- followers : 1144
- following : 2663
