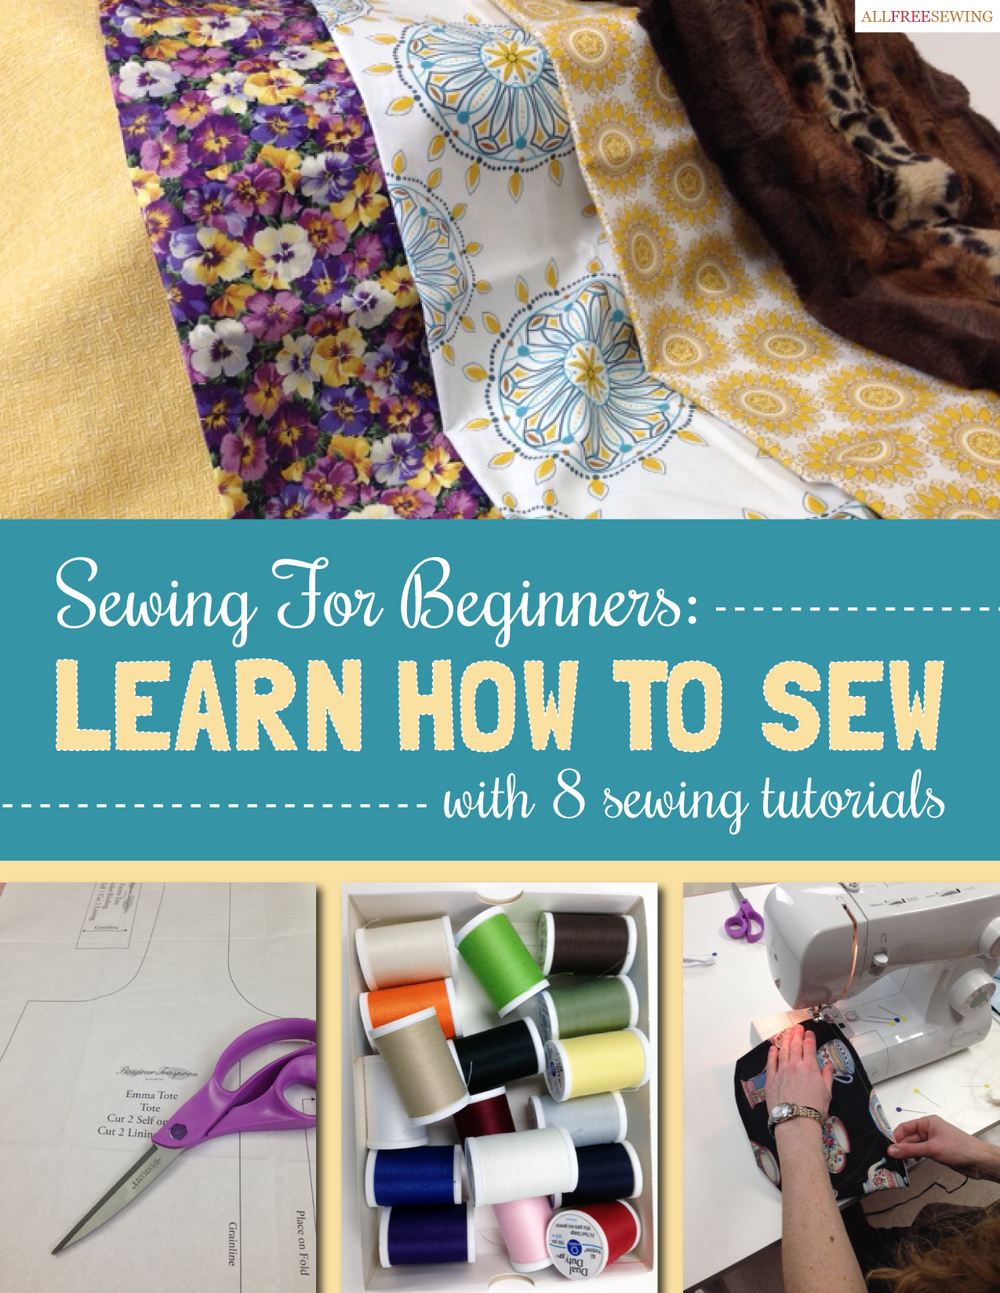
Ever dreamed of creating your own clothes, repairing beloved items, or crafting unique gifts? Learning how to sew is a rewarding skill that opens up a world of creativity and practicality. It's more than just stitching fabric; it's about transforming ideas into tangible realities, expressing your personal style, and even saving money.
This comprehensive guide will walk you through everything you need to know to begin your sewing journey, from the essential tools and basic techniques to tackling your first projects. Whether you're a complete beginner or looking to refresh your skills, prepare to unlock the satisfying joy of making things with your own hands and discover the incredible potential of knowing how to sew.
Table of Contents
- Why Learn to Sew? The Rewarding Journey Begins
- Essential Tools and Materials for Beginners
- Understanding Fabrics: Your First Step to Smart Sewing
- Mastering the Basics: Hand Stitching Techniques
- Getting Started with a Sewing Machine: Your New Best Friend
- Your First Sewing Projects: Simple Steps to Success
- Overcoming Common Sewing Challenges: Learning from Every Stitch
- Safety First: Sewing Smart and Securely
- Beyond the Basics: Expanding Your Sewing Horizons
- Resources for Continued Learning and Inspiration
Why Learn to Sew? The Rewarding Journey Begins
Embarking on a journey to learn how to sew offers a myriad of benefits that extend far beyond simply making or mending clothes. At its core, sewing is a profound act of creation. It empowers you to bring your unique visions to life, whether that’s a custom-fitted dress, a personalized quilt, or a quirky plush toy. The ability to design and construct items from scratch is incredibly satisfying, fostering a sense of accomplishment with every finished piece.
Beyond creativity, sewing promotes sustainability. In an era of fast fashion, knowing how to repair, alter, or upcycle garments reduces waste and lessens your environmental footprint. Imagine extending the life of a beloved pair of jeans with a creative patch or transforming an old curtain into a stylish tote bag. This practical skill also translates into significant cost savings. Instead of buying new, you can mend, modify, or even create unique items that would otherwise be expensive to purchase. It’s an investment in self-sufficiency that pays dividends over time.
Furthermore, sewing can be a deeply meditative and mindful activity. The rhythmic motion of the needle, the focus required for precise cuts, and the quiet concentration involved can be incredibly therapeutic, offering a welcome escape from the daily grind. It’s a hobby that engages your hands and mind, reducing stress and fostering patience. For many, it becomes a passion, a way to connect with a community of makers, and a continuous learning experience. So, if you're wondering how to sew, you're not just picking up a craft; you're opening the door to a fulfilling new dimension of personal expression and practical skill.
Essential Tools and Materials for Beginners
To begin your adventure in how to sew, you don't need to invest in a vast array of expensive equipment. A few fundamental tools will suffice to get you started and help you master the basic techniques. Think of these as your core toolkit, designed to make your initial projects manageable and enjoyable.
- Fabric Scissors: These are paramount. Dedicate a pair solely for fabric to keep them sharp. Using them on paper or other materials will dull them quickly, making clean cuts on fabric difficult.
- Pins: Essential for holding fabric pieces together before stitching. Opt for sharp, fine pins that won't snag your fabric. A magnetic pin cushion or a traditional tomato pin cushion will keep them organized and within reach.
- Measuring Tape: A flexible tape measure (preferably fiberglass, not cloth, as cloth can stretch) is crucial for accurate body measurements, fabric lengths, and pattern adjustments.
- Seam Ripper: This small, but mighty tool will become your best friend for correcting mistakes. Every sewer makes errors, and a good seam ripper allows you to undo stitches cleanly without damaging the fabric.
- Hand Sewing Needles: A variety pack is useful, offering different sizes for various fabrics and threads. Sharper, finer needles are for delicate fabrics, while stronger ones are for heavier materials.
- Thread: All-purpose polyester thread is a great starting point, suitable for most fabrics. Choose a color that matches or complements your fabric. Quality thread reduces breakage and machine issues.
- Fabric Markers/Chalk: For transferring pattern markings onto fabric. Washable fabric markers or tailor's chalk are ideal as they disappear or brush off easily.
- Iron and Ironing Board: Pressing seams as you sew is crucial for professional-looking results. An iron helps set stitches and flatten fabric, making subsequent steps easier and more accurate.
- Thimble: Protects your finger when hand sewing, especially with thicker fabrics.
- Basic Sewing Machine: While hand sewing is fundamental, a sewing machine significantly speeds up the process. For beginners, a simple mechanical machine with basic stitches (straight and zigzag) is more than enough. Brands like Brother, Singer, and Janome offer reliable entry-level models.
Having these tools ready will set you up for success as you learn how to sew, ensuring you have everything you need for your first exciting projects.
Understanding Fabrics: Your First Step to Smart Sewing
Before you even make your first stitch, understanding the basics of fabric is crucial for anyone learning how to sew. Different fabrics behave in unique ways, affecting everything from how they cut and drape to how they hold a stitch. Choosing the right fabric for your project can make all the difference between a frustrating experience and a satisfying one.
Fabrics are broadly categorized into natural fibers and synthetic fibers. Natural fibers, derived from plants or animals, include cotton, linen, wool, and silk. Cotton is a popular choice for beginners due to its ease of handling, breathability, and affordability. Linen is strong and absorbent but wrinkles easily. Wool offers warmth and resilience, while silk is known for its luxurious feel and beautiful drape. Synthetic fibers, like polyester, nylon, and rayon, are man-made. Polyester is durable, wrinkle-resistant, and holds color well. Rayon drapes beautifully but can be slippery to work with.
Another key distinction is between woven and knit fabrics. Woven fabrics (like quilting cotton, denim, and broadcloth) are made by interlacing two sets of yarns at right angles, resulting in stable, non-stretchy material. They are generally easier for beginners to work with because they don't shift or stretch much. Knit fabrics (like jersey, fleece, and rib knit) are made by interlocking loops of yarn, giving them elasticity and stretch. While comfortable to wear, they can be more challenging for new sewers as they tend to curl and stretch during sewing.
When selecting fabric for a project, always consider its weight, drape, and stretch. A lightweight cotton is perfect for a simple tote bag, while a medium-weight denim might be better for an apron. Always check the pattern recommendations for fabric types. A critical step before cutting your fabric is pre-washing and drying it the same way you intend to wash the finished garment. This prevents shrinkage after your project is complete, ensuring your hard work doesn't go to waste. Understanding these fabric fundamentals will greatly enhance your success as you learn how to sew.
Mastering the Basics: Hand Stitching Techniques
While a sewing machine can speed up your projects, knowing how to sew by hand is an indispensable skill. Hand stitches are perfect for small repairs, delicate finishes, basting, and situations where a machine just won't do. Mastering a few basic hand stitches will give you confidence and versatility in your sewing journey.
- Running Stitch: This is the most basic and common hand stitch. It's used for gathering, basting (temporary stitches), and simple seams. To make a running stitch, weave the needle in and out of the fabric in a straight line, creating small, even stitches on both sides.
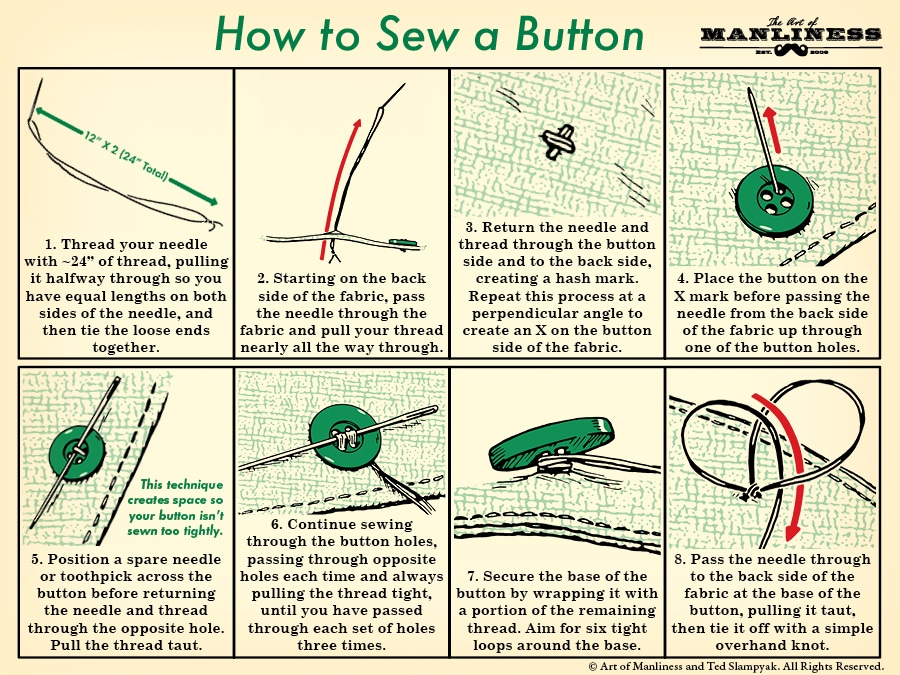
- Backstitch: Considered the strongest hand stitch, the backstitch mimics the look and strength of a machine stitch. It's ideal for seams that need durability, like repairing a ripped seam or attaching a button. To create a backstitch, bring the needle up, then go back one stitch length and bring it up again, repeating the motion to create a continuous, strong line.
- Slip Stitch (or Ladder Stitch): This nearly invisible stitch is perfect for closing openings, hemming, or attaching linings. It's made by catching just a few threads of fabric from each side of the seam allowance, making the stitches disappear into the fold.
- Whip Stitch: Used for joining two finished edges, appliqué, or finishing raw edges. The whip stitch involves wrapping the thread over the edge of the fabric, creating small, angled stitches that bind the edges together.
Practice these stitches on scrap fabric until you feel comfortable. Pay attention to keeping your stitches even in length and tension. The neatness of your hand stitches will significantly impact the final appearance of your projects. These foundational hand sewing skills are a vital part of learning how to sew effectively.
Getting Started with a Sewing Machine: Your New Best Friend
For many, the sewing machine is the gateway to more complex and efficient projects. It might seem intimidating at first, but with a little patience and practice, it will quickly become your most valuable tool in learning how to sew. Understanding its basic components and how to operate them is the key to unlocking its potential.
Anatomy of a Sewing Machine
Familiarize yourself with the main parts of your machine:
- Needle: The sharp point that pierces the fabric and carries the top thread.
- Presser Foot: Holds the fabric firmly against the feed dogs while you sew. Different presser feet are used for various tasks (e.g., zipper foot, buttonhole foot).
- Feed Dogs: The small, jagged teeth located under the presser foot that move the fabric forward as you sew.
- Bobbin: Holds the bottom thread. It can be a drop-in bobbin (top loading) or a front-loading bobbin.
- Tension Dial: Controls the tightness of the thread. Correct tension is crucial for balanced stitches.
- Stitch Selector: Allows you to choose different stitch types (straight, zigzag, decorative) and often adjust stitch length and width.
- Handwheel: Located on the side, it allows you to manually raise and lower the needle. Always turn it towards you.
Threading Your Machine
Correct threading is perhaps the most common hurdle for beginners. Your machine's manual is your best friend here, as threading paths vary. Generally, you'll thread the top thread through a series of guides, tension discs, and the take-up lever before finally threading the needle. For the bobbin, you'll either wind thread onto an empty bobbin using the machine's bobbin winder, then insert it into its casing, or simply drop it into a top-loading compartment. Always ensure both the top and bobbin threads are pulled under the presser foot and towards the back before you start sewing.
Basic Stitches and Settings
Start with the most fundamental stitches:
- Straight Stitch: This is your workhorse stitch, used for most seams. Adjust the stitch length (typically 2.5mm for general sewing) to suit your fabric and project. Longer stitches are for basting; shorter for strong, permanent seams.
- Zigzag Stitch: Ideal for finishing raw edges to prevent fraying, or for sewing stretchy fabrics. You can adjust both the stitch length and width.
Practice sewing straight lines on scrap fabric. Draw lines on the fabric with a fabric marker and try to follow them. Pay attention to keeping your seam allowance consistent (the distance from the needle to the edge of the fabric). This practice will build muscle memory and confidence, making your journey to truly how to sew much smoother.
Your First Sewing Projects: Simple Steps to Success
Once you've familiarized yourself with your tools and basic stitches, it's time to tackle your first sewing projects! Starting with simple, achievable items is key to building confidence and honing your skills. Don't jump straight into a complex garment; small successes will motivate you to keep learning how to sew.
Here are some excellent beginner-friendly projects:
- Pillowcase: A classic first project. It involves sewing straight seams, understanding fabric grain, and finishing edges. You can make a simple envelope-style pillowcase or one with a cuff.
- Simple Tote Bag: Perfect for practicing straight seams, turning corners, and adding straps. A basic tote bag is incredibly useful and a great way to show off your new skills.
- Scrunchie: A quick and satisfying project that teaches you how to sew a tube, insert elastic, and close an opening. It’s a small win that feels great.
- Basic Apron: Introduces you to curves, ties, and possibly a simple pocket. It's a practical item that makes a wonderful gift.
When choosing your first project, look for patterns specifically labeled "beginner" or "easy." These patterns often have detailed instructions and fewer complex steps. Always read through the entire pattern before you start cutting fabric. This helps you understand the flow of the project and anticipate any challenging parts. Don't be afraid to make mistakes; they are part of the learning process. The most important thing is to enjoy the journey of creating something with your own hands and celebrate every stitch as you learn how to sew.
Overcoming Common Sewing Challenges: Learning from Every Stitch
Learning how to sew is an incredibly rewarding journey, but like any new skill, it comes with its share of challenges. You'll encounter moments of frustration, confusion, and perhaps even a few stitches that need unpicking. The key is to view these as learning opportunities, not failures. Understanding common pitfalls and how to troubleshoot them will save you a lot of headaches and help you grow as a sewer.
The Unraveling Thread
One of the most common issues beginners face is thread breaking or tangling, leading to a messy "bird's nest" of thread on the underside of the fabric. This is almost always a tension issue or incorrect threading. Double-check your machine's threading path for both the top thread and the bobbin. Ensure the thread is properly seated in all guides and tension discs. Also, check your needle: is it inserted correctly? Is it the right size and type for your fabric? A dull or bent needle can cause skipped stitches and thread breakage. Sometimes, simply re-threading your entire machine can solve the problem.
Crooked Seams and Uneven Stitches
Achieving perfectly straight seams takes practice. Many beginners struggle with fabric shifting or veering off course. The solution lies in consistent guiding and a steady hand. Use the seam allowance guides on your sewing machine's needle plate as a visual reference. Keep your eyes on the guide, not the needle. Avoid pulling or pushing the fabric; let the machine's feed dogs do the work. You can also use pins more frequently to hold layers together, removing them just before the needle reaches them. Practice sewing straight lines on scrap fabric until you develop a feel for guiding the material smoothly.
The Metaphorical "Random Program"
Sometimes, despite your best efforts, things just don't go right, and it feels like an inexplicable glitch. It's like when you're new to Windows 11 Pro and you're struggling mightily with an issue that seems simple but just won't resolve, or when you get a new laptop from work and a random, unknown program appears in your startup apps list, located deep in `c:\windows\installer` – those moments of "what on earth is going on?" are perfectly normal in sewing too. Your machine might suddenly jam, your stitches might inexplicably skip, or your fabric might refuse to feed correctly, and you can't pinpoint why. It feels like a hidden, rogue program messing with your progress.
In these moments, the best approach is to pause. Take a deep breath. Just like you might restart your computer, sometimes stepping away and coming back with fresh eyes helps. Re-read your machine's manual. Consult online forums or YouTube tutorials for common issues. Don't be afraid to unpick stitches and start that section again. Sewing, much like troubleshooting a tech problem, requires patience, methodical thinking, and a willingness to learn from every "bug." Remember, every experienced sewer has faced these challenges; it's part of the journey of truly learning how to sew.
Safety First: Sewing Smart and Securely
While sewing is a generally safe hobby, it involves sharp objects, hot irons, and powerful machinery. Prioritizing safety is crucial to prevent accidents and ensure your sewing experience remains enjoyable. Knowing how to sew safely is just as important as knowing the techniques themselves.
- Needle Safety: Always use a thimble when hand sewing to protect your fingers. When using a sewing machine, keep your fingers clear of the needle path. Never sew over pins; remove them just before the needle reaches them. Store needles and pins in a secure pin cushion or container when not in use.
- Scissor Safety: Fabric scissors are extremely sharp. Always cut away from your body. Keep them closed when not in use and store them safely. Never run with scissors.
- Iron Safety: An iron gets very hot. Always place it on its heel or an appropriate iron rest when not in use. Keep the cord out of the way to prevent tripping. Be mindful of steam, which can cause burns. Unplug the iron when you're finished.
- Sewing Machine Safety: Always turn off and unplug your sewing machine when changing needles, presser feet, or performing any maintenance. Keep your workspace clear of clutter to prevent fabric or other items from getting caught in the machine. If your machine makes an unusual noise or smells strange, turn it off immediately and consult your manual or a professional.
- Proper Posture: Maintain good posture while sewing to prevent back and neck strain. Ensure your chair is comfortable and your work surface is at an appropriate height. Take breaks to stretch and rest your eyes.
By following these simple safety guidelines, you can ensure that your time spent learning how to sew is productive, creative, and most importantly, safe.
Beyond the Basics: Expanding Your Sewing Horizons
Once you've mastered the fundamentals of how to sew, a vast and exciting world of possibilities opens up. You'll find yourself eager to tackle more intricate projects and learn advanced techniques. This is where your creativity truly takes flight, and you can begin to customize and create items that perfectly suit your style and needs.
Consider exploring different areas of sewing:
- Garment Construction: Move beyond simple aprons to making your own dresses, shirts, trousers, or even outerwear. This involves understanding pattern drafting, fitting, and specialized techniques like inserting zippers, creating buttonholes, and working with various types of closures.
- Quilting: A beautiful art form that involves piecing together fabric scraps to create intricate designs, often resulting in blankets, wall hangings, or decorative items. Quilting introduces you to precision cutting, chain piecing, and machine quilting techniques.
- Home Decor: Create custom curtains, throw pillows, tablecloths, or upholstery. This allows you to personalize your living space and save money on expensive store-bought items.
- Bag Making: From simple pouches to structured handbags, bag making often involves working with interfacing, hardware, and specialized techniques for sturdy construction.
- Embroidery: Add decorative stitches and designs to fabric, either by hand or using an embroidery machine. This can elevate simple projects into unique works of art.
As you advance, you'll learn about different types of interfacing (to add structure), specialty threads, and a wider range of presser feet for your machine. Don't be afraid to experiment with new fabrics and techniques. The journey of how to sew is continuous, with endless opportunities for growth and creative expression.
Resources for Continued Learning and Inspiration
The beauty of learning how to sew in the digital age is the abundance of resources available at your fingertips. Whether you prefer visual demonstrations, detailed written instructions, or a community to share your progress with, there's a resource out there for you.
- Online Tutorials and Videos: YouTube is a treasure trove of sewing tutorials for every skill level. Channels like "Made to Sew," "Melody Lane," and "Professor Pincushion" offer clear, step-by-step instructions for a wide range of projects and techniques.
Related Resources:

Detail Author:
- Name : Jules Kohler
- Username : kmarks
- Email : lhills@gmail.com
- Birthdate : 2002-08-24
- Address : 74732 Blanda Mountains Maurineshire, VA 91770
- Phone : 580.703.2178
- Company : Hagenes-Homenick
- Job : Coaches and Scout
- Bio : Voluptatem magnam incidunt culpa at. Ipsa eum aut harum occaecati incidunt. Sint possimus molestiae sapiente ipsum. Reprehenderit eos impedit reiciendis vel et. Magnam consectetur ut eum enim ex.
Socials
facebook:
- url : https://facebook.com/arjun9087
- username : arjun9087
- bio : Delectus rerum eaque rerum occaecati. Quae nobis corrupti neque et aut.
- followers : 3704
- following : 1828
tiktok:
- url : https://tiktok.com/@aprice
- username : aprice
- bio : Enim est consequatur ut minima asperiores a optio.
- followers : 2739
- following : 495
linkedin:
- url : https://linkedin.com/in/arjun5939
- username : arjun5939
- bio : Autem voluptatem harum iure hic.
- followers : 4296
- following : 354
