**Embarking on the artistic journey of learning how to draw a flower can be an incredibly rewarding experience, opening up a world of vibrant colors and intricate forms right at your fingertips. Whether you're a complete novice picking up a pencil for the first time or an aspiring artist looking to refine your botanical illustrations, the charm of capturing nature's delicate blossoms is undeniable. This comprehensive guide is designed to demystify the process, transforming what might seem like a complex task into a series of enjoyable, manageable steps that anyone can follow.** From the cheerful simplicity of a daisy to the majestic complexity of a rose, flowers are a vital and beloved part of the art world, offering endless inspiration. Many believe that drawing flowers requires a special talent, but thankfully, by using some basic shapes and putting in a little bit of practice, you can draw any kind of flower in nature in just a few steps. Discovering how to draw a flower is a lot simpler than you think with these helpful steps, making art accessible and fun for everyone.
Table of Contents
- Why Learn How to Draw a Flower?
- The Foundational Steps: How to Draw a Flower for Beginners
- Mastering Specific Blooms: From Roses to Sunflowers
- Drawing Flowers for Younger Artists and Preschoolers
- Advanced Techniques for Realistic Floral Art
- Overcoming Challenges and Fostering Creativity
- The Art of Observation: Drawing Flowers from Nature
- Your Journey Continues: Beyond the Basic Flower Drawing
Why Learn How to Draw a Flower?
Learning how to draw a flower isn't just about creating pretty pictures; it's about developing a keen eye for detail, understanding organic forms, and expressing creativity. Flowers are everywhere, in gardens, parks, and even in the cracks of pavements, making them an accessible subject for artists of all levels. For centuries, artists have been captivated by their beauty, from the detailed botanical illustrations of the Renaissance to the vibrant impressionistic paintings of Monet. This enduring appeal highlights the importance of flower drawing as a foundational skill in the art world. Beyond their aesthetic appeal, drawing flowers can be a meditative and calming activity. It encourages patience, focus, and a deeper appreciation for the natural world. For beginners, it offers a forgiving subject where "imperfections" often add to the charm. Mastering how to draw a flower also builds confidence, as you see tangible progress with each stroke. It’s a skill that translates well into other artistic endeavors, whether you're interested in landscape art, still life, or even design. The principles of form, light, and shadow that you learn while drawing a simple tulip or a complex lily are universal to all drawing.The Foundational Steps: How to Draw a Flower for Beginners
For anyone just starting, the key to success in learning how to draw a flower lies in breaking down complex forms into simpler, more manageable shapes. These easy flower drawing tutorials are perfect for kids and beginners, providing a solid foundation. You don't need expensive materials – a pencil, an eraser, and a piece of paper are all you need to begin your artistic journey. The aim is to build confidence and understanding before moving on to more intricate details.Starting Simple: Basic Shapes for Petals and Stems
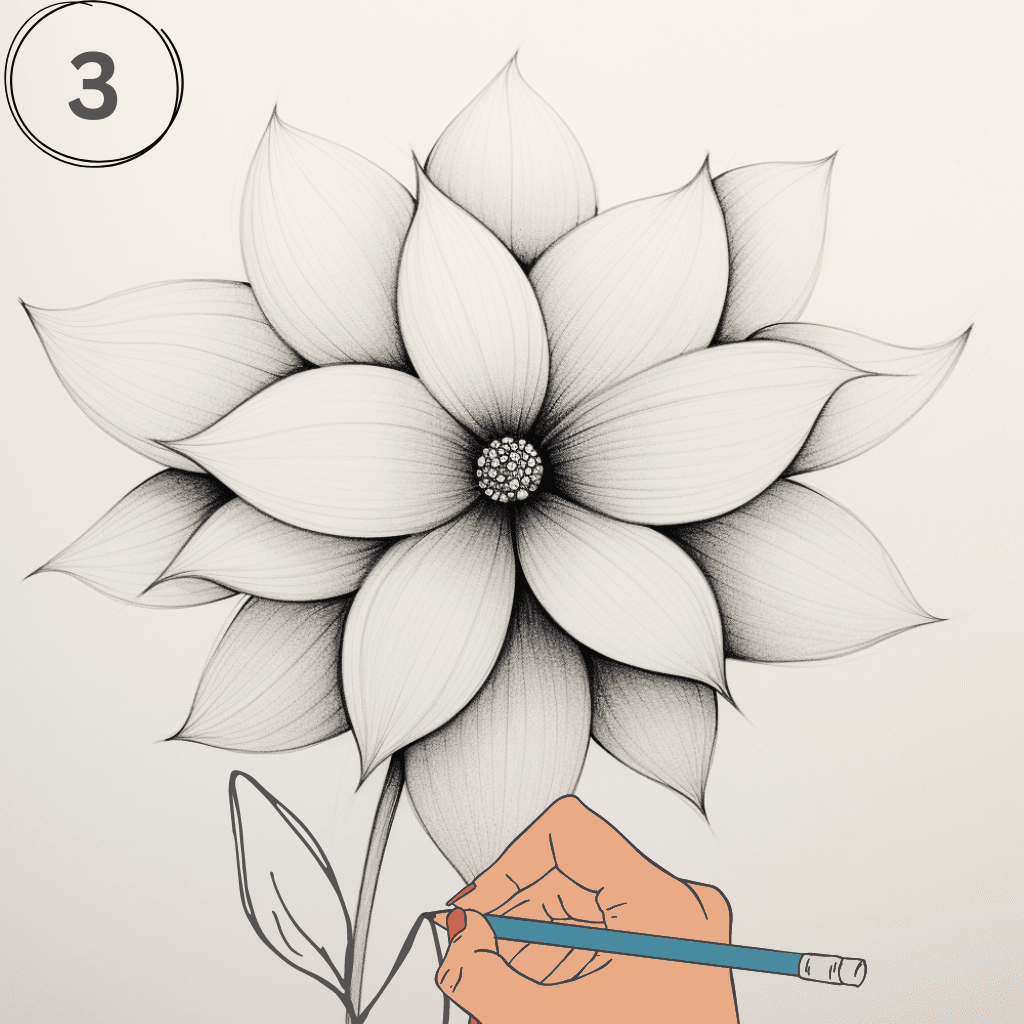
Every beautiful flower begins with a few basic shapes. Think of a flower as a collection of circles, ovals, and lines. For instance, to draw a flower with a stem and a pair of leaves using examples done in a simple style, you would typically start with a small circle for the center of the flower. Around this central circle, you'd sketch a larger, lighter circle or an oval to guide the overall shape of the petals. * **Step 1: The Core and Guide.** Lightly draw a small circle for the flower's center. This will be your guide for where the petals originate. Around this, draw a larger, very light circle or oval to establish the outer boundary of your flower head. This helps ensure your petals are evenly sized and spaced. * **Step 2: Petal Placement.** Begin to draw the petals. Instead of drawing perfect, detailed petals right away, think of them as simple U-shapes or curved teardrop shapes radiating from the central circle, extending to your outer guide circle. Overlap them slightly to give a sense of depth. For a simple flower, you might draw five or six petals. Remember, flowers are organic, so don't strive for absolute symmetry; a little variation adds character. * **Step 3: The Stem.** From the bottom of your flower head, draw two parallel lines extending downwards to form the stem. Keep it slightly curved to give it a natural feel, rather than perfectly straight. The stem should be proportionate to the size of your flower head. * **Step 4: Erase Guidelines.** Once you have your basic shapes in place, gently erase the initial guide circles. You should now have a clear outline of your flower head and stem. This traditional simplified method is an excellent way to learn how to draw a flower, making the process accessible and enjoyable.Adding Detail: Leaves and Texture
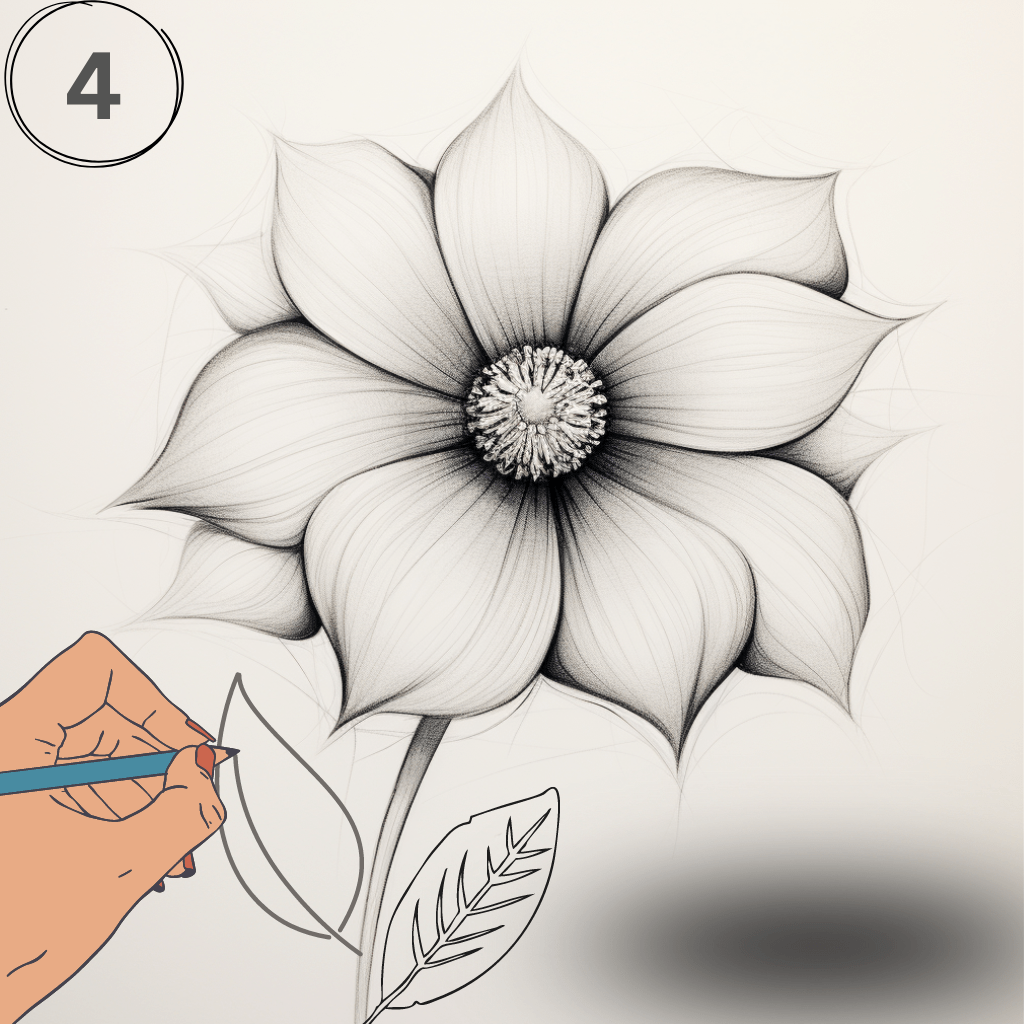
Once the basic structure is in place, it's time to bring your flower to life by adding leaves and texture. These elements add realism and depth to your drawing. * **Step 5: Drawing Leaves.** Leaves are often overlooked but are crucial for a complete flower drawing. Start by drawing a central vein line extending from the stem. Then, draw two curved lines from the stem, meeting at a point to form the leaf shape. Leaves can be oval, heart-shaped, or elongated, depending on the type of flower you're aiming for. Add smaller veins branching out from the central vein for more detail. Place them strategically along the stem, often in pairs or alternating. * **Step 6: Refining Petals and Center.** Go back to your petals and refine their edges. Make them slightly wavy or jagged, as natural petals are rarely perfectly smooth. For the flower's center, you can add small dots, spirals, or a textured pattern to mimic seeds or pollen. This adds visual interest and makes your flower look more realistic. * **Step 7: Shading and Depth.** To give your flower a three-dimensional look, add some light shading. Identify a light source (e.g., from the top left). Areas opposite the light source, such as the underside of petals or where petals overlap, will be darker. Use light, consistent strokes to build up your shading. This step transforms your flat outline into a vibrant drawing. These illustrated tutorials are easy to follow and will help you draw beautiful roses, lilies, and more, by building on these fundamental steps.Mastering Specific Blooms: From Roses to Sunflowers
Once you're comfortable with the basic structure, you can start exploring the vast diversity of flowers. With over 60 different flowers to choose from, you are sure to find the perfect inspiration and tutorial for your artwork. Each flower has its unique characteristics, and understanding these will help you draw a perfect flower.The Allure of the Rose: A Step-by-Step Approach
The rose, often considered the queen of flowers, can seem intimidating to draw due to its numerous overlapping petals. However, with a systematic approach, it becomes much more manageable. * **Start with the Core:** Unlike other flowers, a rose often begins with a tight spiral or a small, enclosed "cup" shape in the center. This represents the innermost, tightly furled petals. * **Layering Petals:** From this central core, begin to draw petals in layers, working outwards. Each layer of petals will be larger and more open than the last. Think of them as soft, curved shapes that gently overlap. Avoid drawing sharp points; roses have soft, rounded edges. * **Varying Size and Shape:** As you move outwards, vary the size and slight curvature of the petals. Some might fold back, revealing their undersides. This creates a natural, organic look. * **Adding Sepals and Stem:** Below the flower head, draw the sepals – the small, leaf-like structures that cup the base of the rose. Then, add the thorny stem and characteristic rose leaves, which are typically compound (multiple leaflets on one stem). These step-by-step guides, created by artists, show you how to draw a flower like a rose with detail and accuracy.Cheerful Sunflowers and Delicate Lotuses
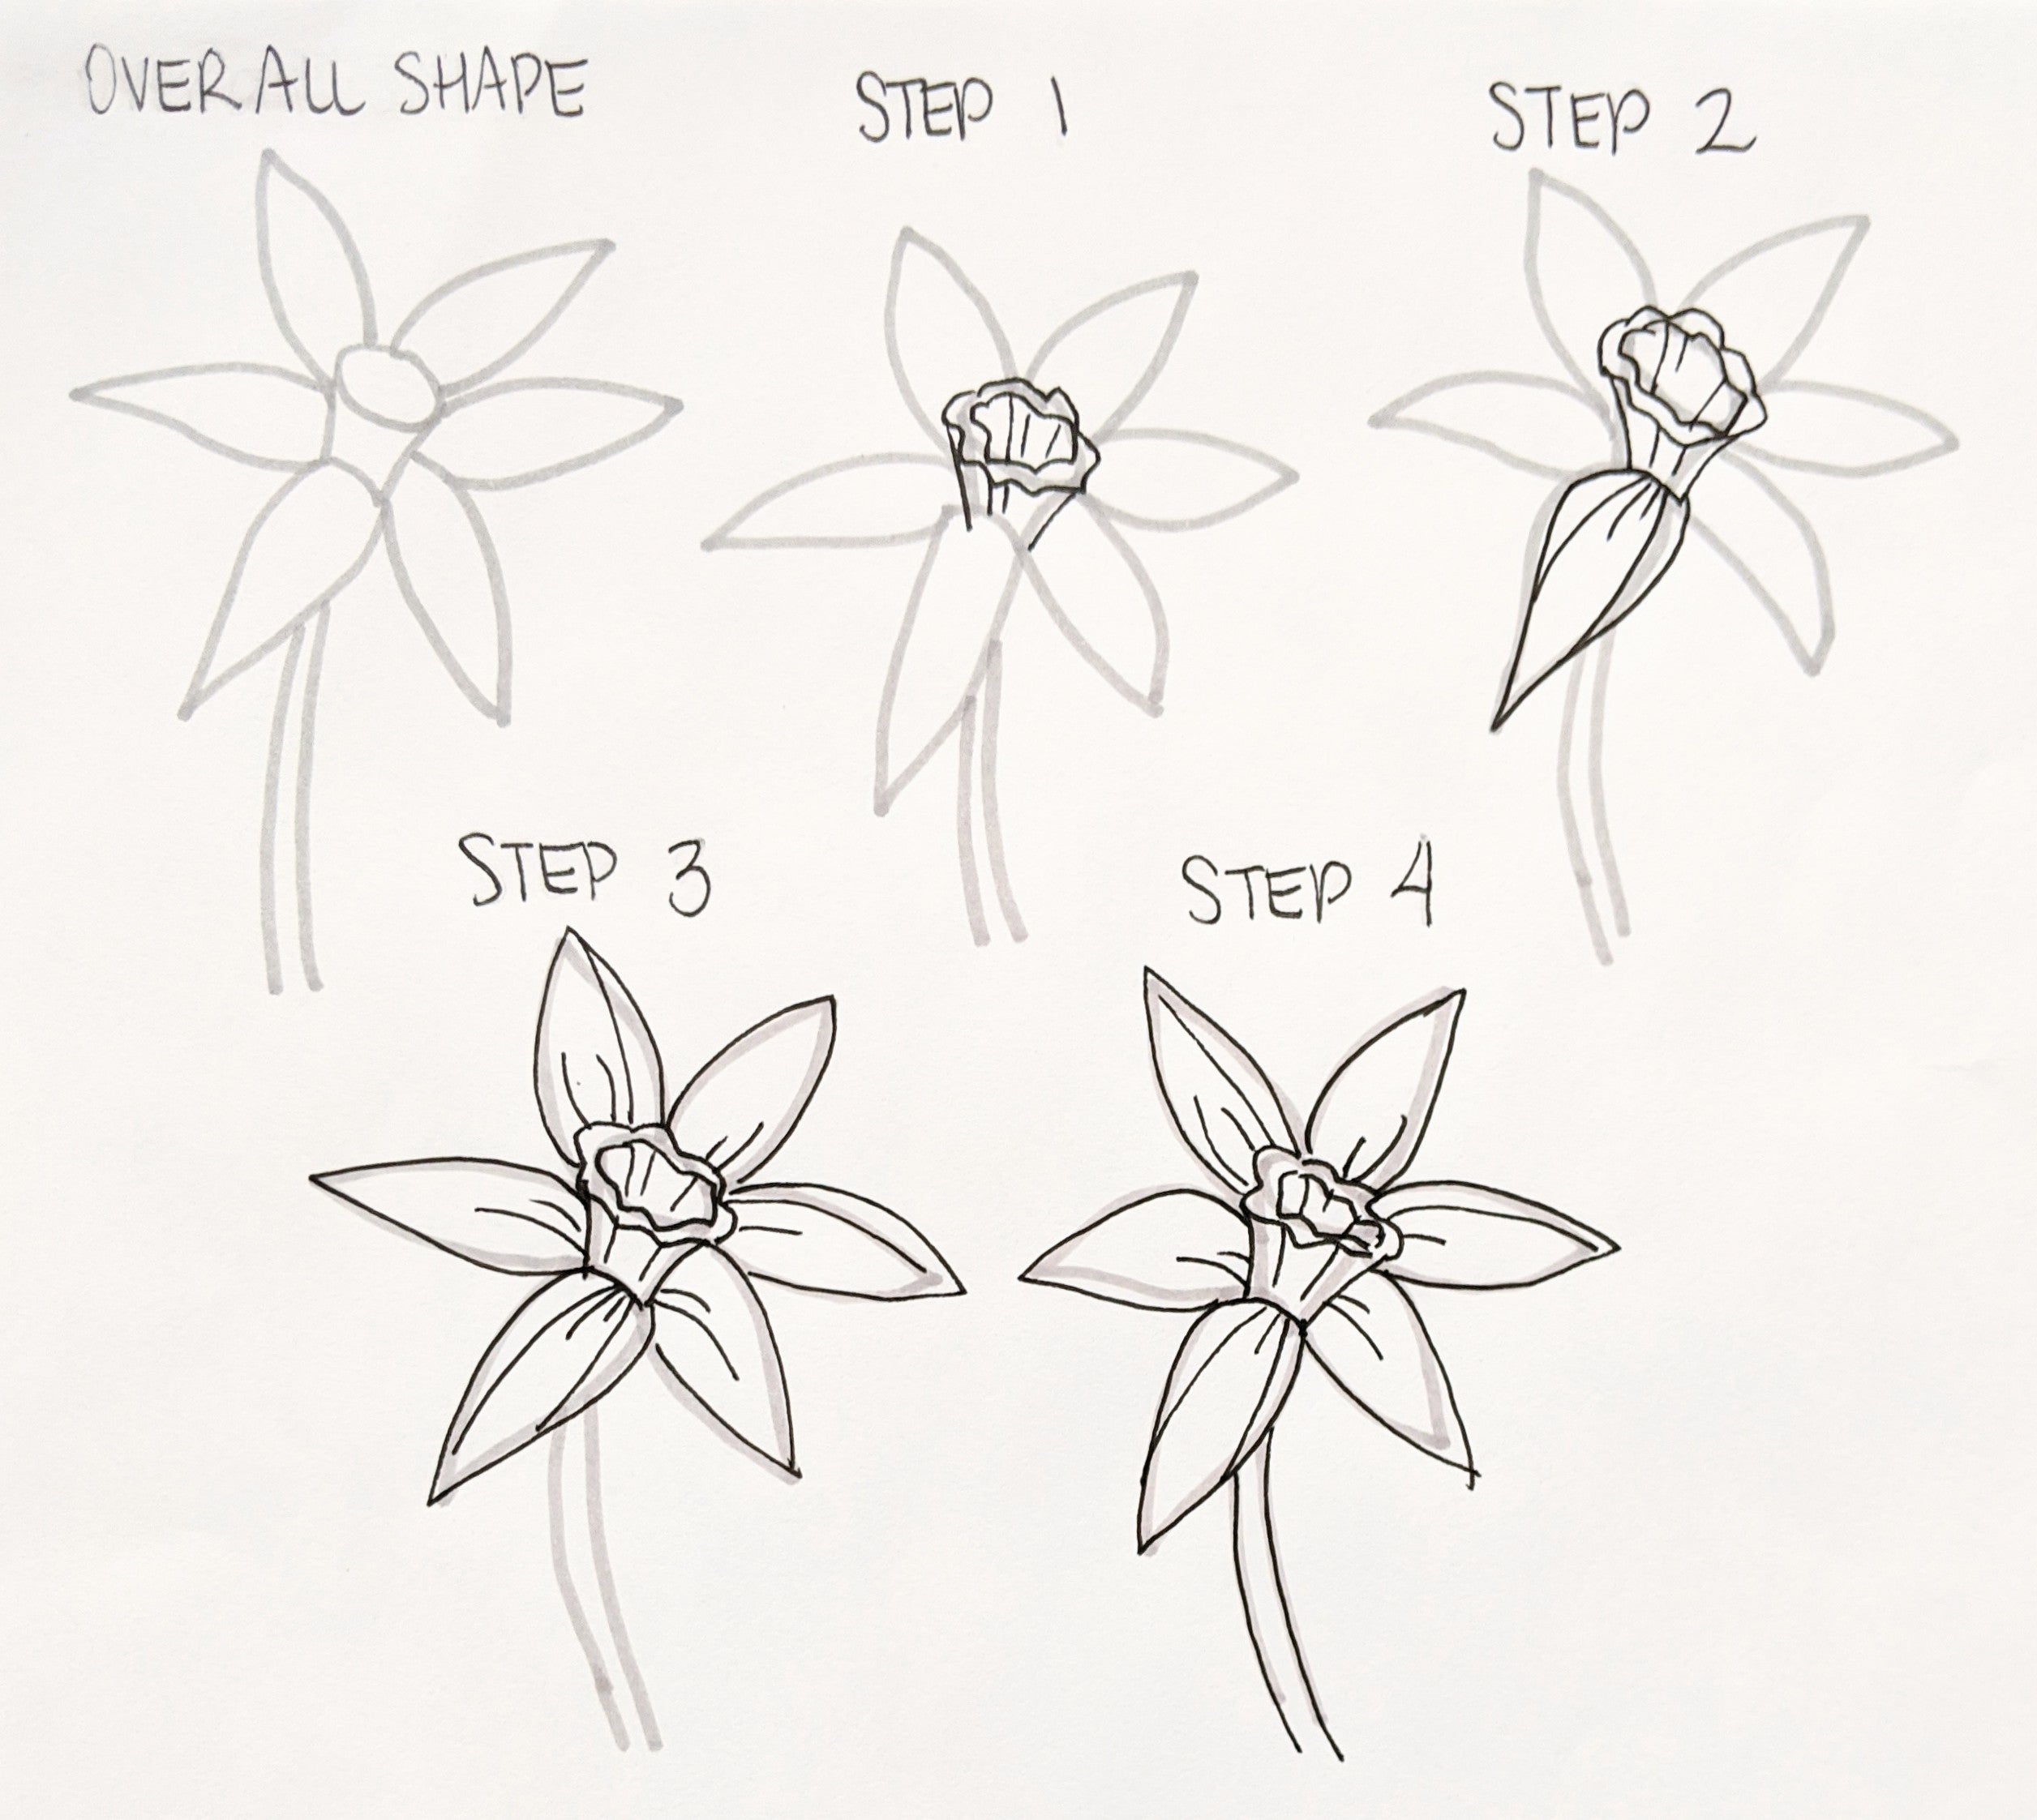
Beyond roses, there are countless other flowers that offer unique drawing challenges and rewards. You can draw sunflowers, lotuses, and many more, each requiring a slightly different approach. * **Sunflowers:** These cheerful giants are characterized by their large, circular centers packed with seeds and their radiating, bright yellow petals. * Start with two concentric circles for the center. * Draw many long, somewhat pointed petals radiating outwards from the inner circle, overlapping them to create a full look. * Add texture to the center with a cross-hatching pattern or small spirals to mimic the seeds. * Don't forget the thick, sturdy stem and large, broad leaves. * **Lotuses:** Symbolizing purity and beauty, lotuses are often drawn with a serene, symmetrical quality. * Begin with a central, elongated oval for the innermost bud. * Draw elegant, teardrop-shaped petals fanning out from the center, often in multiple layers. Lotus petals are typically smooth and symmetrical. * Add a thick stem and large, circular leaves that often float on water. In this tutorial, I aim to demonstrate how to draw a flower using the traditional simplified method for my website, providing detailed steps for various blooms. For example, in this tutorial, I'll show you how to draw a flower, a white cosmos to be exact, explaining each step in detail so you can easily follow along and create your own simple yet realistic drawing.Drawing Flowers for Younger Artists and Preschoolers
Learning how to draw a cute flower for preschoolers and younger artists is a fantastic way to introduce them to the joy of art. This lesson is meant for younger artists, focusing on simplicity and fun rather than perfect realism. We hope you have a lot of fun following along with us! * **Keep it Simple:** For very young children, focus on the most basic shapes. A simple circle for the center and five or six rounded "bumps" for petals is perfectly fine. * **Bold Lines:** Encourage them to use bold, clear lines. Fine motor skills are still developing, so precision isn't the goal. * **Coloring Fun:** The real joy for preschoolers often comes from coloring their creations. Provide crayons, markers, or colored pencils and let them experiment with colors. * **Narrative:** Turn it into a story! "First, we draw a happy circle for the flower's face, then we draw its sleepy petals around it." This makes the process more engaging. * **Variety:** Introduce them to different simple flowers like tulips, daisies, or even a simple apple blossom. The more variety they see, the more their imagination will spark. These easy flower drawing tutorials are perfect for kids and beginners, ensuring a positive and encouraging first experience with art.Advanced Techniques for Realistic Floral Art
Once you've mastered the basics of how to draw a flower, you might want to explore techniques that add more realism and depth to your botanical illustrations. This is where understanding light, shadow, and texture truly comes into play. * **Understanding Light and Shadow (Form):** * **Light Source:** Always establish where your light source is coming from. This dictates where highlights and shadows fall. * **Core Shadow:** The darkest part of the form, where light cannot reach directly. * **Reflected Light:** Light bouncing off surrounding surfaces can subtly illuminate the shadowed areas, preventing them from being completely black. * **Highlights:** The brightest spots where light directly hits the surface. * **Cast Shadows:** Shadows cast by the flower onto the surface it's resting on or other parts of the flower. These help ground your drawing and give it a sense of place. * **Texture and Detail:** * **Petal Veins:** Delicate lines on petals add realism. Observe how they branch out. * **Surface Texture:** Some petals are smooth, others velvety or slightly crinkled. Use your pencil strokes to mimic these textures. * **Stamen and Pistil:** These central reproductive parts of the flower often have intricate details, such as pollen grains or fine hairs. * **Perspective and Overlap:** * **Foreshortening:** When parts of the flower are closer or further away, they will appear shorter or longer. Practice drawing flowers from different angles. * **Layering:** Emphasize the overlapping of petals to create depth. Petals closer to the viewer will partially obscure those behind them. * **Color Theory (if applicable to colored drawings):** * **Hue, Saturation, Value:** Understanding these aspects of color will help you choose and mix colors effectively to capture the vibrancy of real flowers. * **Warm and Cool Colors:** Using a balance of warm (reds, yellows, oranges) and cool (blues, greens, purples) colors can add dimension and life to your drawing. Learning how to draw a perfect flower with these advanced techniques requires patience and observation, but the results are incredibly rewarding.Overcoming Challenges and Fostering Creativity
Every artist, regardless of skill level, faces challenges. When learning how to draw a flower, common hurdles include getting proportions right, making petals look natural, or adding convincing depth. * **Practice, Practice, Practice:** There's no substitute for consistent effort. The more you draw, the more your hand-eye coordination improves, and the more intuitive the process becomes. Dedicate a small amount of time each day to drawing. * **Use References:** Don't be afraid to use real flowers, photographs, or even other artists' work as references. This is not cheating; it's learning. Observe how light hits the petals, how they curl, and how they connect to the stem. * **Break It Down:** If a flower seems too complex, break it down into the simplest shapes first, as discussed in the foundational steps. Tackle one small section at a time. * **Don't Fear Mistakes:** Erasers are your friends! Mistakes are part of the learning process. See them as opportunities to understand what went wrong and how to improve. * **Experiment with Tools:** While a pencil is great for starting, try charcoal, pastels, or even digital drawing tools. Each medium offers a different feel and can inspire new ways of seeing. * **Find Inspiration:** Look at the works of botanical artists, visit botanical gardens, or simply observe flowers in your neighborhood. Tulips, roses, daffodils, hydrangea, snowdrops, apple blossoms – the variety is endless and each offers unique characteristics to explore.The Art of Observation: Drawing Flowers from Nature
One of the most enriching ways to learn how to draw a flower is to draw directly from life. While photographs are convenient, drawing from a live specimen forces you to engage with the subject in a deeper way, observing its three-dimensionality, subtle color shifts, and unique imperfections. * **Choose Your Subject Wisely:** Start with a relatively simple flower, perhaps one with fewer petals or a distinct shape. A daisy or a simple tulip can be a great starting point. * **Observe from Multiple Angles:** Don't just draw it from one flat perspective. Move around the flower, or gently turn it, to understand its form from all sides. Notice how petals overlap and how the stem supports the bloom. * **Pay Attention to Light:** Observe how light falls on the flower. Where are the brightest highlights? Where are the deepest shadows? This is crucial for creating a sense of volume and realism. * **Capture the Essence:** Beyond just copying, try to capture the "personality" of the flower. Is it delicate, robust, cheerful, or elegant? * **Quick Sketches:** Do several quick, loose sketches before committing to a detailed drawing. These warm-up exercises help you understand the overall form and proportions. The more you practice observing and drawing from life, the more your understanding of how to draw a flower will deepen, leading to more expressive and accurate artwork.Your Journey Continues: Beyond the Basic Flower Drawing
Learning how to draw a flower is a continuous journey, not a destination. As you gain confidence with basic techniques and specific blooms, you can branch out into more complex compositions and explore different artistic styles. * **Creating Bouquets and Arrangements:** Instead of drawing a single flower, challenge yourself to draw a small bouquet or a floral arrangement. This involves understanding how different flowers interact, how to create visual balance, and how to manage multiple elements within a single frame. * **Adding Backgrounds and Context:** Place your flowers in a natural setting, like a garden, a vase on a table, or even a whimsical, imagined landscape. This adds narrative and depth to your artwork. * **Exploring Different Mediums:** Don't limit yourself to pencil. Experiment with watercolors to capture the translucent quality of petals, pastels for soft, velvety textures, or pen and ink for crisp, detailed botanical illustrations. Each medium will teach you new ways to approach how to draw a flower. * **Developing Your Style:** As you practice, you'll naturally start to develop your own unique artistic style. This is where your personality shines through in your drawings. Don't be afraid to experiment and let your creativity guide you. On the page, you'll find the main tutorial along with six additional examples, providing a wealth of inspiration and guidance. The world of flower drawing is vast and endlessly inspiring. With dedication and a willingness to learn, you'll soon be able to capture the exquisite beauty of any bloom that catches your eye.Conclusion
Learning how to draw a flower is a delightful and accessible artistic endeavor for anyone, regardless of age or prior experience. We've explored the foundational steps, starting with basic shapes and gradually adding details like leaves and texture. We've also delved into mastering specific blooms like the intricate rose and the cheerful sunflower, offering insights for both beginners and those looking to refine their skills. Remember, whether you're drawing a cute flower for preschoolers or aiming for a realistic botanical illustration, the key lies in observation, practice, and breaking down complex forms into simpler components. The journey of artistic creation is one of continuous learning and joyful discovery. We encourage you to pick up your pencil today and start sketching. Don't be afraid to experiment, make mistakes, and most importantly, have fun! We hope this guide has provided you with the inspiration and practical knowledge you need to confidently draw any flower that captures your imagination. Share your beautiful creations in the comments below, or explore more of our tutorials to continue your artistic adventure!Related Resources:
Detail Author:
- Name : Emanuel Douglas
- Username : yundt.urban
- Email : cbruen@hotmail.com
- Birthdate : 1986-03-29
- Address : 47525 Metz Isle Suite 075 Ashaland, IN 18383
- Phone : 1-262-464-9566
- Company : Homenick, Considine and Simonis
- Job : Fish Hatchery Manager
- Bio : Velit non ut quae possimus id laudantium id ipsa. Natus porro quis saepe iure. Omnis et corrupti expedita sequi.
Socials
linkedin:
- url : https://linkedin.com/in/amani_zieme
- username : amani_zieme
- bio : Possimus deserunt minima officiis explicabo.
- followers : 3107
- following : 1083
tiktok:
- url : https://tiktok.com/@amani.zieme
- username : amani.zieme
- bio : Eligendi omnis dolor corporis velit. Aut et odit aliquam porro.
- followers : 1625
- following : 2378
instagram:
- url : https://instagram.com/amani_official
- username : amani_official
- bio : Sed officia quaerat odit. Est tenetur qui possimus reiciendis. In iure sunt neque vitae.
- followers : 1510
- following : 2181
twitter:
- url : https://twitter.com/zieme2011
- username : zieme2011
- bio : Nihil praesentium nulla illo reiciendis. Itaque nisi esse blanditiis omnis accusantium. Maiores quis quaerat dolor ut.
- followers : 159
- following : 2657
facebook:
- url : https://facebook.com/amani8391
- username : amani8391
- bio : Eos inventore consequatur commodi.
- followers : 4474
- following : 1373
