Henna, or Mehndi, is an ancient art form that has captivated hearts for centuries with its intricate patterns and beautiful symbolism. While the thought of elaborate bridal mehndi designs can be daunting for beginners, the world of simple henna designs offers an accessible and equally stunning entry point into this rich tradition. If you love the look of henna designs on hands but are too scared to give it a go or don’t even know where to start, then this is the perfect post for you.
This guide is designed for beginners to learn how to create simple and elegant henna designs, showcasing the incredible variety available. From delicate floral patterns to trendy geometric motifs, and from tiny finger accents to beautiful full-hand pieces, simple henna designs prove that beauty doesn't always require complexity. We've curated a wealth of inspiration and practical advice to help you embark on your henna journey with confidence and creativity.
Table of Contents
- The Enduring Charm of Simple Henna Designs
- Why Choose Simple Henna Designs?
- Getting Started: Essential Tools and Preparation for Simple Henna
- Mastering Basic Techniques for Simple Henna Designs
- Exploring Stunning Simple Henna Designs: Inspiration for Every Taste
- Making Your Simple Henna Designs Last Longer
- Common Mistakes to Avoid When Applying Simple Henna
- Beyond the Basics: Elevating Your Simple Henna Skills
The Enduring Charm of Simple Henna Designs
As society progresses towards modernity, some prefer simple henna designs over those elaborate extravagant ones which fill up one’s hands. This shift isn't just about convenience; it's about a refined aesthetic that values subtle beauty and personal expression. Simple henna designs offer a sophisticated alternative to traditional heavy patterns, making them ideal for everyday wear, casual gatherings, or even as a chic accessory for a modern outfit.
The beauty of simple henna lies in its ability to make a statement without overwhelming the senses. A single motif, a delicate vine, or a minimalist geometric shape can be just as impactful as a full bridal design. These unique designs can make for a perfect accent, drawing attention to your hands with grace and understated elegance. They are a testament to the idea that less can indeed be more, allowing the natural beauty of the skin to complement the artistry of the henna.
Why Choose Simple Henna Designs?
The appeal of simple henna designs goes beyond mere aesthetics. They offer a multitude of practical benefits that make them a popular choice for both novices and seasoned henna enthusiasts alike. Whether you're looking for a quick artistic fix or a subtle enhancement, simple designs are incredibly versatile.
Perfect for Beginners: Your First Step into Henna Art
For many, the idea of applying henna can be intimidating. The fear of making a mistake or not knowing where to start often deters aspiring artists. This is precisely where simple henna designs shine. They are the perfect starting point for anyone new to the art form. Instead of diving headfirst into complex patterns, you can begin with basic elements: a dot, a simple line, a small petal, or a single leaf. These foundational strokes build confidence and allow you to get a feel for the henna cone and paste. Check out the best henna hand designs for beginners which include simple and easy designs, finger henna designs, front hand henna, back hand henna designs, and leaf henna. Starting small, with tiny petals or crafting a simple flower, you can gradually level up to a stunning array of henna designs with flowers as your skills improve.
Versatility for Every Occasion: From Casual to Celebratory
One of the greatest strengths of simple henna designs is their incredible versatility. Unlike elaborate bridal designs that are typically reserved for grand celebrations, simple patterns can be worn for almost any event. Presenting to you an array of simple, easy, and small henna designs for your front hand that you can get designed for all kinds of celebrations. These beauties aren't picky about where they're placed or for what occasion they're worn. They are perfect for:
- Everyday Wear: A delicate finger design or a small motif on the back of the hand can add a touch of bohemian chic to your daily look.
- Casual Gatherings: Attending a picnic, a friend's birthday, or a family get-together? A simple vine or a single mandala can be a lovely, understated accessory.
- Parties and Festivals: While not as grand as bridal mehndi, simple designs can still be festive and fun, especially when paired with vibrant outfits. They offer a modern twist on traditional mehndi styles, tattoos, and patterns for party-goers.
- Subtle Bridal Accents: For modern brides who prefer minimalism, simple designs can be incorporated into bridal looks, perhaps on the fingertips or as a small ankle design, complementing the overall aesthetic without overwhelming it. Bridal designs, whether Arabic or modern, can be easy and elegant.
Quick Application and Removal: Less Commitment, More Fun
Elaborate henna designs can take hours to apply and dry, requiring significant time commitment. Simple henna designs, however, are much quicker to create. This means less time spent waiting for the paste to dry and more time enjoying your day. Their smaller size also means they tend to fade more quickly and evenly than large, dense patterns, making them perfect for those who like to change their look frequently or aren't ready for a long-term commitment. While you can find thousands of henna designs online, the trick is to make them last longer on your body, but simple designs offer flexibility in terms of wear time.
Getting Started: Essential Tools and Preparation for Simple Henna
Before you dive into creating your first simple henna designs, it's crucial to have the right tools and prepare properly. The quality of your materials significantly impacts the outcome of your design and its longevity.
- Natural Henna Cone: Always ensure you are using a high-quality, natural henna paste. Avoid "black henna" as it often contains PPD (para-phenylenediamine), a chemical that can cause severe allergic reactions, burns, and permanent scarring. Natural henna paste, made from henna powder, essential oils (like eucalyptus or tea tree), and a liquid (like lemon juice or water), stains the skin in shades of reddish-brown to deep maroon.
- Practice Paper and Pen: This is perhaps the most underrated tool. Trace out the outline of your hand onto paper and practice drawing and inking your intricate design before testing it on yourself. This allows you to get comfortable with the pressure of the cone and the flow of the paste without the pressure of working directly on skin.
- Lemon-Sugar Solution: A mixture of lemon juice and sugar dabbed lightly over dried henna paste helps keep the paste moist and allows the dye to penetrate deeper into the skin, resulting in a darker, longer-lasting stain.
- Aftercare Oil: Coconut oil, olive oil, or a specialized henna aftercare balm helps protect the stain and keeps the skin moisturized, preventing premature fading.
Preparation is key. Ensure your skin is clean, dry, and free of any lotions or oils before application, as these can create a barrier and prevent the henna dye from staining effectively.
Mastering Basic Techniques for Simple Henna Designs
The foundation of any beautiful henna design, no matter how complex, lies in mastering basic strokes. For simple henna designs, these fundamental techniques are often all you need to create stunning patterns.
- Dots: The simplest and most versatile element. Vary the size and placement to create clusters, lines, or fill in spaces.
- Lines: Straight lines, curved lines, and wavy lines form the backbone of many designs. Practice drawing lines of consistent thickness and fluidity.
- Swirls and Spirals: These add movement and elegance. Start with a central dot and spiral outwards or inwards.
- Petals and Leaves: Essential for floral patterns. Practice drawing single petals, then combine them to form simple flowers or leaves. Leaf henna designs are particularly popular for their organic appeal.
- Arches and Humps: Used to create borders, scallops, or the tops of mandalas.
The Art of Practice: Building Confidence with Simple Henna
Practice truly makes perfect when it comes to henna. As mentioned, tracing your hand onto paper and repeatedly drawing your desired simple henna designs is invaluable. This isn't just about muscle memory; it's about developing an intuitive understanding of how the paste flows from the cone and how much pressure to apply. When you’re comfortable and ready with your design, let’s get started on your skin. Don't be afraid to experiment on paper with different combinations of dots, lines, and swirls. The more you practice, the more confident and fluid your application will become, leading to cleaner, more precise designs on your skin.
Exploring Stunning Simple Henna Designs: Inspiration for Every Taste
To show you how amazing henna looks, we have found 43 stunning and simple henna designs that prove simplicity doesn't mean sacrificing beauty. We have floral patterns, trendy geometric designs, and more. These examples will inspire you to try your hand at creating your own unique patterns.
Floral Fantasies: Timeless Simple Henna Patterns
Floral patterns are a classic in henna art, and they translate beautifully into simple henna designs. Whether starting small with tiny petals or crafting a simple flower, you can level up to a stunning array of henna designs with flowers. Consider:
- Single Bloom: A solitary, perfectly drawn flower on the back of the hand or wrist.
- Delicate Vine: A thin, flowing vine with small leaves and tiny buds winding up a finger or along the side of the hand.
- Petal Clusters: Small groups of petals arranged in a circular or linear fashion, perfect for filling small spaces or creating borders.
- Leaf Henna Designs: Simple, elegant leaves that can be standalone motifs or part of a larger, minimalist pattern.
Modern Geometric Motifs: Trendy Simple Henna Looks
For those who prefer a contemporary aesthetic, trendy geometric designs offer a sleek and sophisticated alternative. These designs rely on clean lines, shapes, and symmetry. Think about incorporating:
- Minimalist Triangles or Squares: Small, precise shapes placed strategically.
- Dotted Grids: Rows of perfectly spaced dots creating a subtle texture.
- Chevron Patterns: Zig-zag lines that add a dynamic touch.
- Simple Bands: Clean lines forming a bracelet-like design around the wrist or finger.
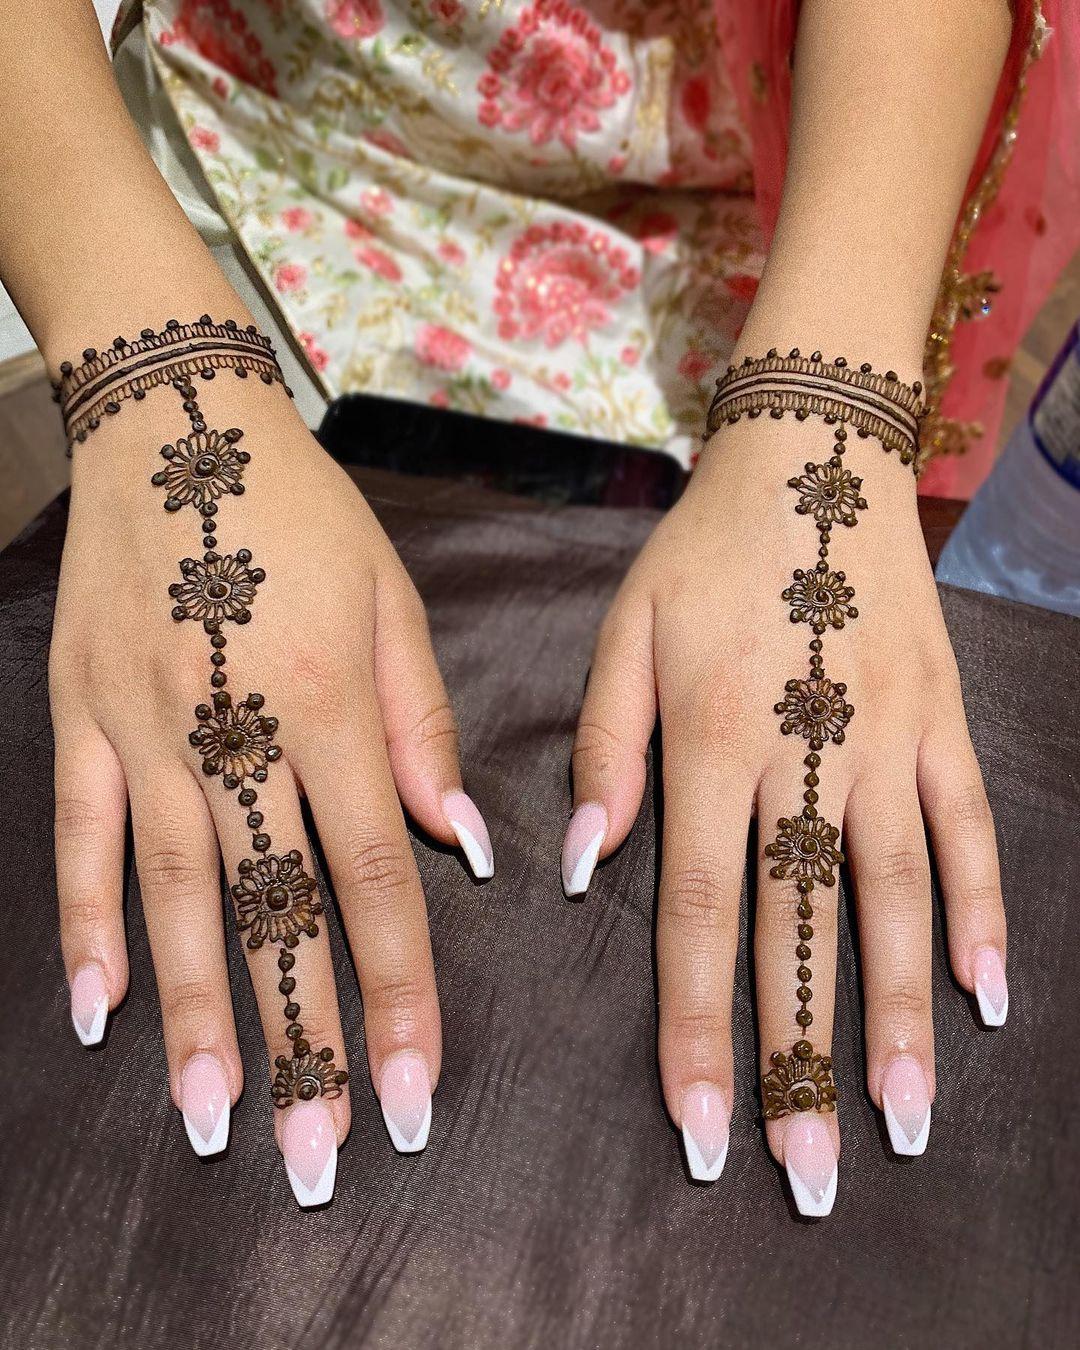
Finger Henna Designs: Delicate Accents
Finger henna designs are incredibly popular for their subtle elegance. They are perfect for those who want a touch of henna without committing to a larger design. Check out the best henna hand designs for beginners which include simple and easy designs, finger henna designs. Some ideas include:
- Tip Designs: Simple dots or small swirls on the fingertips.
- Ring Designs: A delicate band or a small motif around the base of a finger, mimicking a ring.
- Side Finger Patterns: A thin line or a series of tiny dots running along the side of a finger.
- Knuckle Accents: A small star, heart, or dot pattern on the knuckles.
Front Hand vs. Back Hand: Simple Henna Placement Ideas
The placement of your simple henna designs can significantly alter their impact. Both the front and back of the hand offer unique canvases:
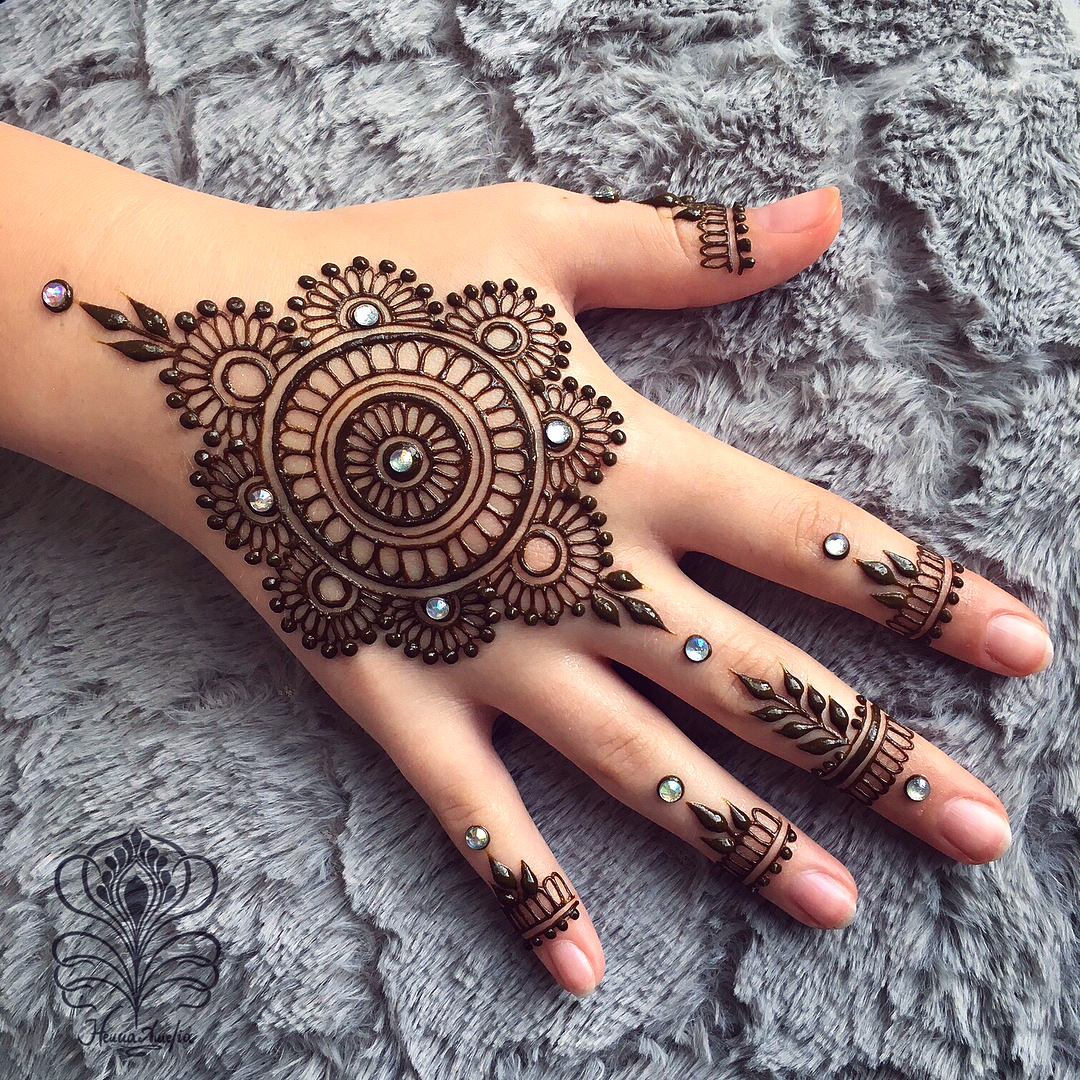
- Front Hand Henna: Presenting to you an array of simple, easy, and small henna designs for your front hand that you can get designed for all kinds of celebrations. The palm offers a smooth, large surface ideal for slightly more elaborate simple designs, like a central mandala with simple finger tips, or a graceful vine extending from the wrist. The skin on the palm is thicker, often resulting in a darker, longer-lasting stain.
- Back Hand Henna Designs: The back of the hand is often preferred for more visible, delicate simple designs. This area is perfect for single motifs, minimalist bracelet designs, or patterns that flow from the wrist to the fingers. The intricate bone structure and veins on the back of the hand can add depth to your design.
Making Your Simple Henna Designs Last Longer
Once you've created your beautiful simple henna designs, you'll want them to last as long as possible. The longevity of your stain depends on several factors, including the quality of the henna, your skin type, and, most importantly, your aftercare routine.
- Keep it Moist: Once the henna paste dries and starts to crack, gently dab it with the lemon-sugar solution. This keeps the paste adhered to the skin, allowing more dye to soak in. Do this every few hours for 6-8 hours.
- Allow Adequate Drying Time: For the best results, leave the henna paste on your skin for at least 6-8 hours, or even overnight if possible. The longer it stays on, the darker the stain will be.
- Scrape, Don't Wash: Once the paste has dried and done its job, gently scrape it off using a blunt object (like a credit card edge or your fingernail). Avoid washing it off with water, especially for the first 12-24 hours. Water can inhibit the darkening process.
- Moisturize Regularly: After removing the paste, apply a natural oil (like coconut oil, olive oil, or a specialized henna balm) to the stained area. This creates a protective barrier and keeps the skin hydrated, preventing the stain from flaking off prematurely.
- Avoid Water Exposure: For the first 24-48 hours, try to minimize contact with water, especially hot water, soap, and chlorinated water. These can strip the top layers of skin and fade the stain quickly. When showering, apply a thin layer of oil or petroleum jelly over the design for protection.
- Stay Warm: Henna stains tend to darken in warmer temperatures. Keeping the area warm (e.g., covering it with a sock or bandage overnight) can help achieve a richer color.
Common Mistakes to Avoid When Applying Simple Henna
Even with simple henna designs, certain pitfalls can hinder your results. Being aware of these common mistakes can help you achieve a better stain and a more satisfying experience:
- Using "Black Henna": This cannot be stressed enough. Always use natural henna. Black henna is dangerous and can cause severe chemical burns and permanent scarring.
- Not Practicing: Skipping the practice stage on paper often leads to shaky lines and uneven designs on the skin.
- Impatience: Rushing the application or removing the paste too soon will result in a light, short-lived stain. Henna art requires patience.
- Poor Quality Henna: Old or poorly stored henna paste will not yield a dark stain. Purchase fresh, reputable henna from trusted suppliers.
- Applying on Oily/Lotioned Skin: Any barrier on the skin will prevent the henna dye from penetrating properly. Always start with clean, dry skin.
- Over-saturating with Lemon-Sugar: Too much liquid can cause the paste to run and blur your simple henna designs. Dab lightly.
Beyond the Basics: Elevating Your Simple Henna Skills
Once you're comfortable with basic strokes and simple henna designs, the world of henna art opens up even further. You can start combining elements, experimenting with different placements, and even adding subtle shading techniques. Consider:
- Combining Motifs: Mix and match floral patterns with geometric elements for unique simple henna designs.
- Varying Line Thickness: Use different pressures on the cone to create thicker outlines and finer details, adding dimension.
- Negative Space: Learn to use the un-hennaed skin as part of your design, creating striking contrasts.
- Exploring Cultural Styles: While focusing on simple designs, you can still draw inspiration from Arabic, Indian, or Moroccan styles, adapting their core elements into simpler forms.
The journey of henna art is continuous. With simple henna designs as your foundation, you have the perfect springboard to explore, create, and express yourself through this beautiful, ancient tradition. Remember, every master was once a beginner, and every intricate design started with a simple line or dot.
We hope this guide has inspired you to pick up a henna cone and start your own artistic journey. Have you tried any simple henna designs? Share your experiences and tips in the comments below! If you found this article helpful, consider sharing it with friends who might be interested in the beauty of henna art. Explore more of our articles for further inspiration and guidance on various beauty and art topics.
Related Resources:

Detail Author:
- Name : Prof. Melany Labadie
- Username : breitenberg.milan
- Email : jett55@hotmail.com
- Birthdate : 1976-12-06
- Address : 505 Perry Pine Apt. 509 New Kristopher, AR 64113
- Phone : 1-573-853-4357
- Company : Weber Ltd
- Job : Washing Equipment Operator
- Bio : Eum quia aut necessitatibus voluptatibus quia eligendi dolorem. Vel quos iste esse cum ratione. Cum et odio soluta corporis ut.
Socials
instagram:
- url : https://instagram.com/steuberu
- username : steuberu
- bio : Placeat vel doloremque sed est eveniet. Placeat ut ratione velit enim. Ex odit blanditiis et optio.
- followers : 1285
- following : 2484
linkedin:
- url : https://linkedin.com/in/una_steuber
- username : una_steuber
- bio : Facere tempora dolores autem modi qui eaque.
- followers : 593
- following : 1263
tiktok:
- url : https://tiktok.com/@una_steuber
- username : una_steuber
- bio : Et maiores nulla nemo sed eius delectus placeat.
- followers : 5429
- following : 1952
twitter:
- url : https://twitter.com/steuberu
- username : steuberu
- bio : Et repellendus iste ab. Tempora sapiente sed dolores voluptates nihil. Sequi accusamus et est similique cumque voluptas rerum.
- followers : 3009
- following : 917
facebook:
- url : https://facebook.com/una_id
- username : una_id
- bio : Sit et quis minus consectetur et officiis et natus.
- followers : 1957
- following : 1563
