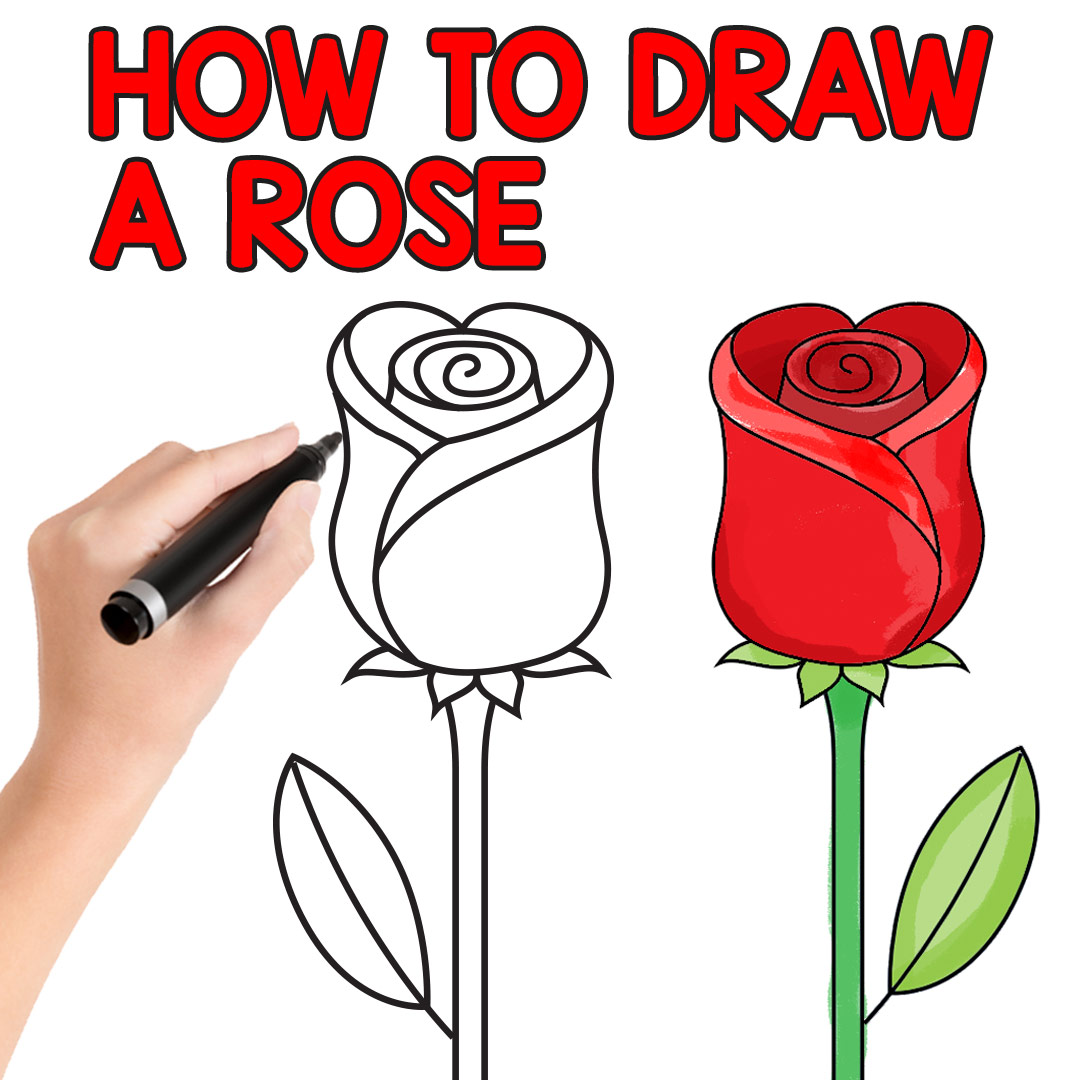
Have you ever gazed upon a beautiful rose and wished you could capture its delicate beauty on paper? Learning how to draw a rose might seem like a daunting task, especially for beginners, but it's a wonderfully rewarding skill that opens up a world of creative expression. Whether you're aiming to create a heartfelt Valentine's Day card, a thoughtful Mother's Day gift, or simply want to indulge in a relaxing artistic pursuit, this comprehensive guide will walk you through the process, transforming intimidation into inspiration.
Roses, often referred to as the quintessential symbol of romance and love, are undeniably beautiful and breathtaking to look at. Their intricate layers of petals and graceful form make them a popular subject for artists. But what if you don't have a green thumb and can't grow them? No problem! You can still create a stunning rose right on your drawing pad. This tutorial is designed to make drawing this magnificent flower super easy, perfect for artists at any level, from kids and toddlers interested in cute, easy drawings to experienced artists seeking to refine their realism. Ready to draw roses that truly impress?
Table of Contents
- Why Learn How to Draw a Rose? Beyond Just Beauty
- Getting Started: Essential Tools for Your Rose Drawing Journey
- Demystifying the Rose: Understanding Its Structure
- The 8-Step Path to Drawing a Rose: From Simple to Stunning
- Step 1: The Foundation – Basic Shapes
- Step 2: Defining the Core – The Central Bud
- Step 3: Layering the Petals – Inner Rings
- Step 4: Expanding Outward – Middle Petals
- Step 5: The Outer Guard Petals
- Step 6: Adding the Stem and Leaves
- Step 7: Refining Your Sketch – Adding Detail and Depth
- Step 8: Bringing it to Life – Shading for Realism
- From Beginner to Budding Artist: Tips for Success
- Common Challenges and How to Overcome Them When Drawing Roses
- Beyond the Basics: Elevating Your Rose Drawings
- The Joy and Reward of Creating Your Own Roses
Why Learn How to Draw a Rose? Beyond Just Beauty
Learning how to draw a rose is more than just acquiring a new artistic skill; it's an experience that offers numerous benefits. As mentioned, roses symbolize love and romance, making a hand-drawn rose a profoundly personal and meaningful gift. Imagine the joy of presenting a loved one with a rose you drew yourself for Valentine's Day or Mother's Day – it speaks volumes that store-bought items simply cannot. Beyond gifting, the act of drawing itself is incredibly therapeutic. Many artists find the process of sketching and refining details to be a deeply relaxing and rewarding experience, a perfect escape from daily stresses. It's a fantastic way to practice mindfulness, focusing your attention on the intricate details of the flower. For any artist, whether a budding enthusiast or an absolute beginner, mastering how to draw a rose is a great skill to have, enhancing your repertoire and building confidence in your abilities.
- Toledo Municipal Court
- Martha Stewart Daughter
- Desert Regional Medical Center
- Dumbo House
- Dog Food Advisor
Getting Started: Essential Tools for Your Rose Drawing Journey
Before you dive into the steps of how to draw a rose, gathering the right tools will set you up for success. You don't need an expensive art studio; just a few basic items will suffice. Here’s what you’ll need:
- Pencils: A range of graphite pencils is ideal. Start with an HB pencil for initial sketches (light and easily erasable), a 2B or 4B for darker lines and shading, and perhaps a 6B or 8B for the deepest shadows if you're going for realism.
- Paper: Any good quality drawing paper will do. A slightly textured paper can hold graphite well, making shading easier.
- Eraser: A kneaded eraser is excellent for lifting graphite gently without smudging, and a standard plastic eraser is good for sharper corrections.
- Blender/Stumps (Optional): These tools, made of rolled paper, are fantastic for blending graphite and creating smooth transitions in your shading, adding a professional touch to your rose.
- Reference Images: While we'll guide you, having a few real rose photos or even a fresh rose nearby can be incredibly helpful for understanding light, shadow, and petal structure.
With these simple tools, you're well-equipped to embark on your journey to drawing a beautiful rose.
Demystifying the Rose: Understanding Its Structure
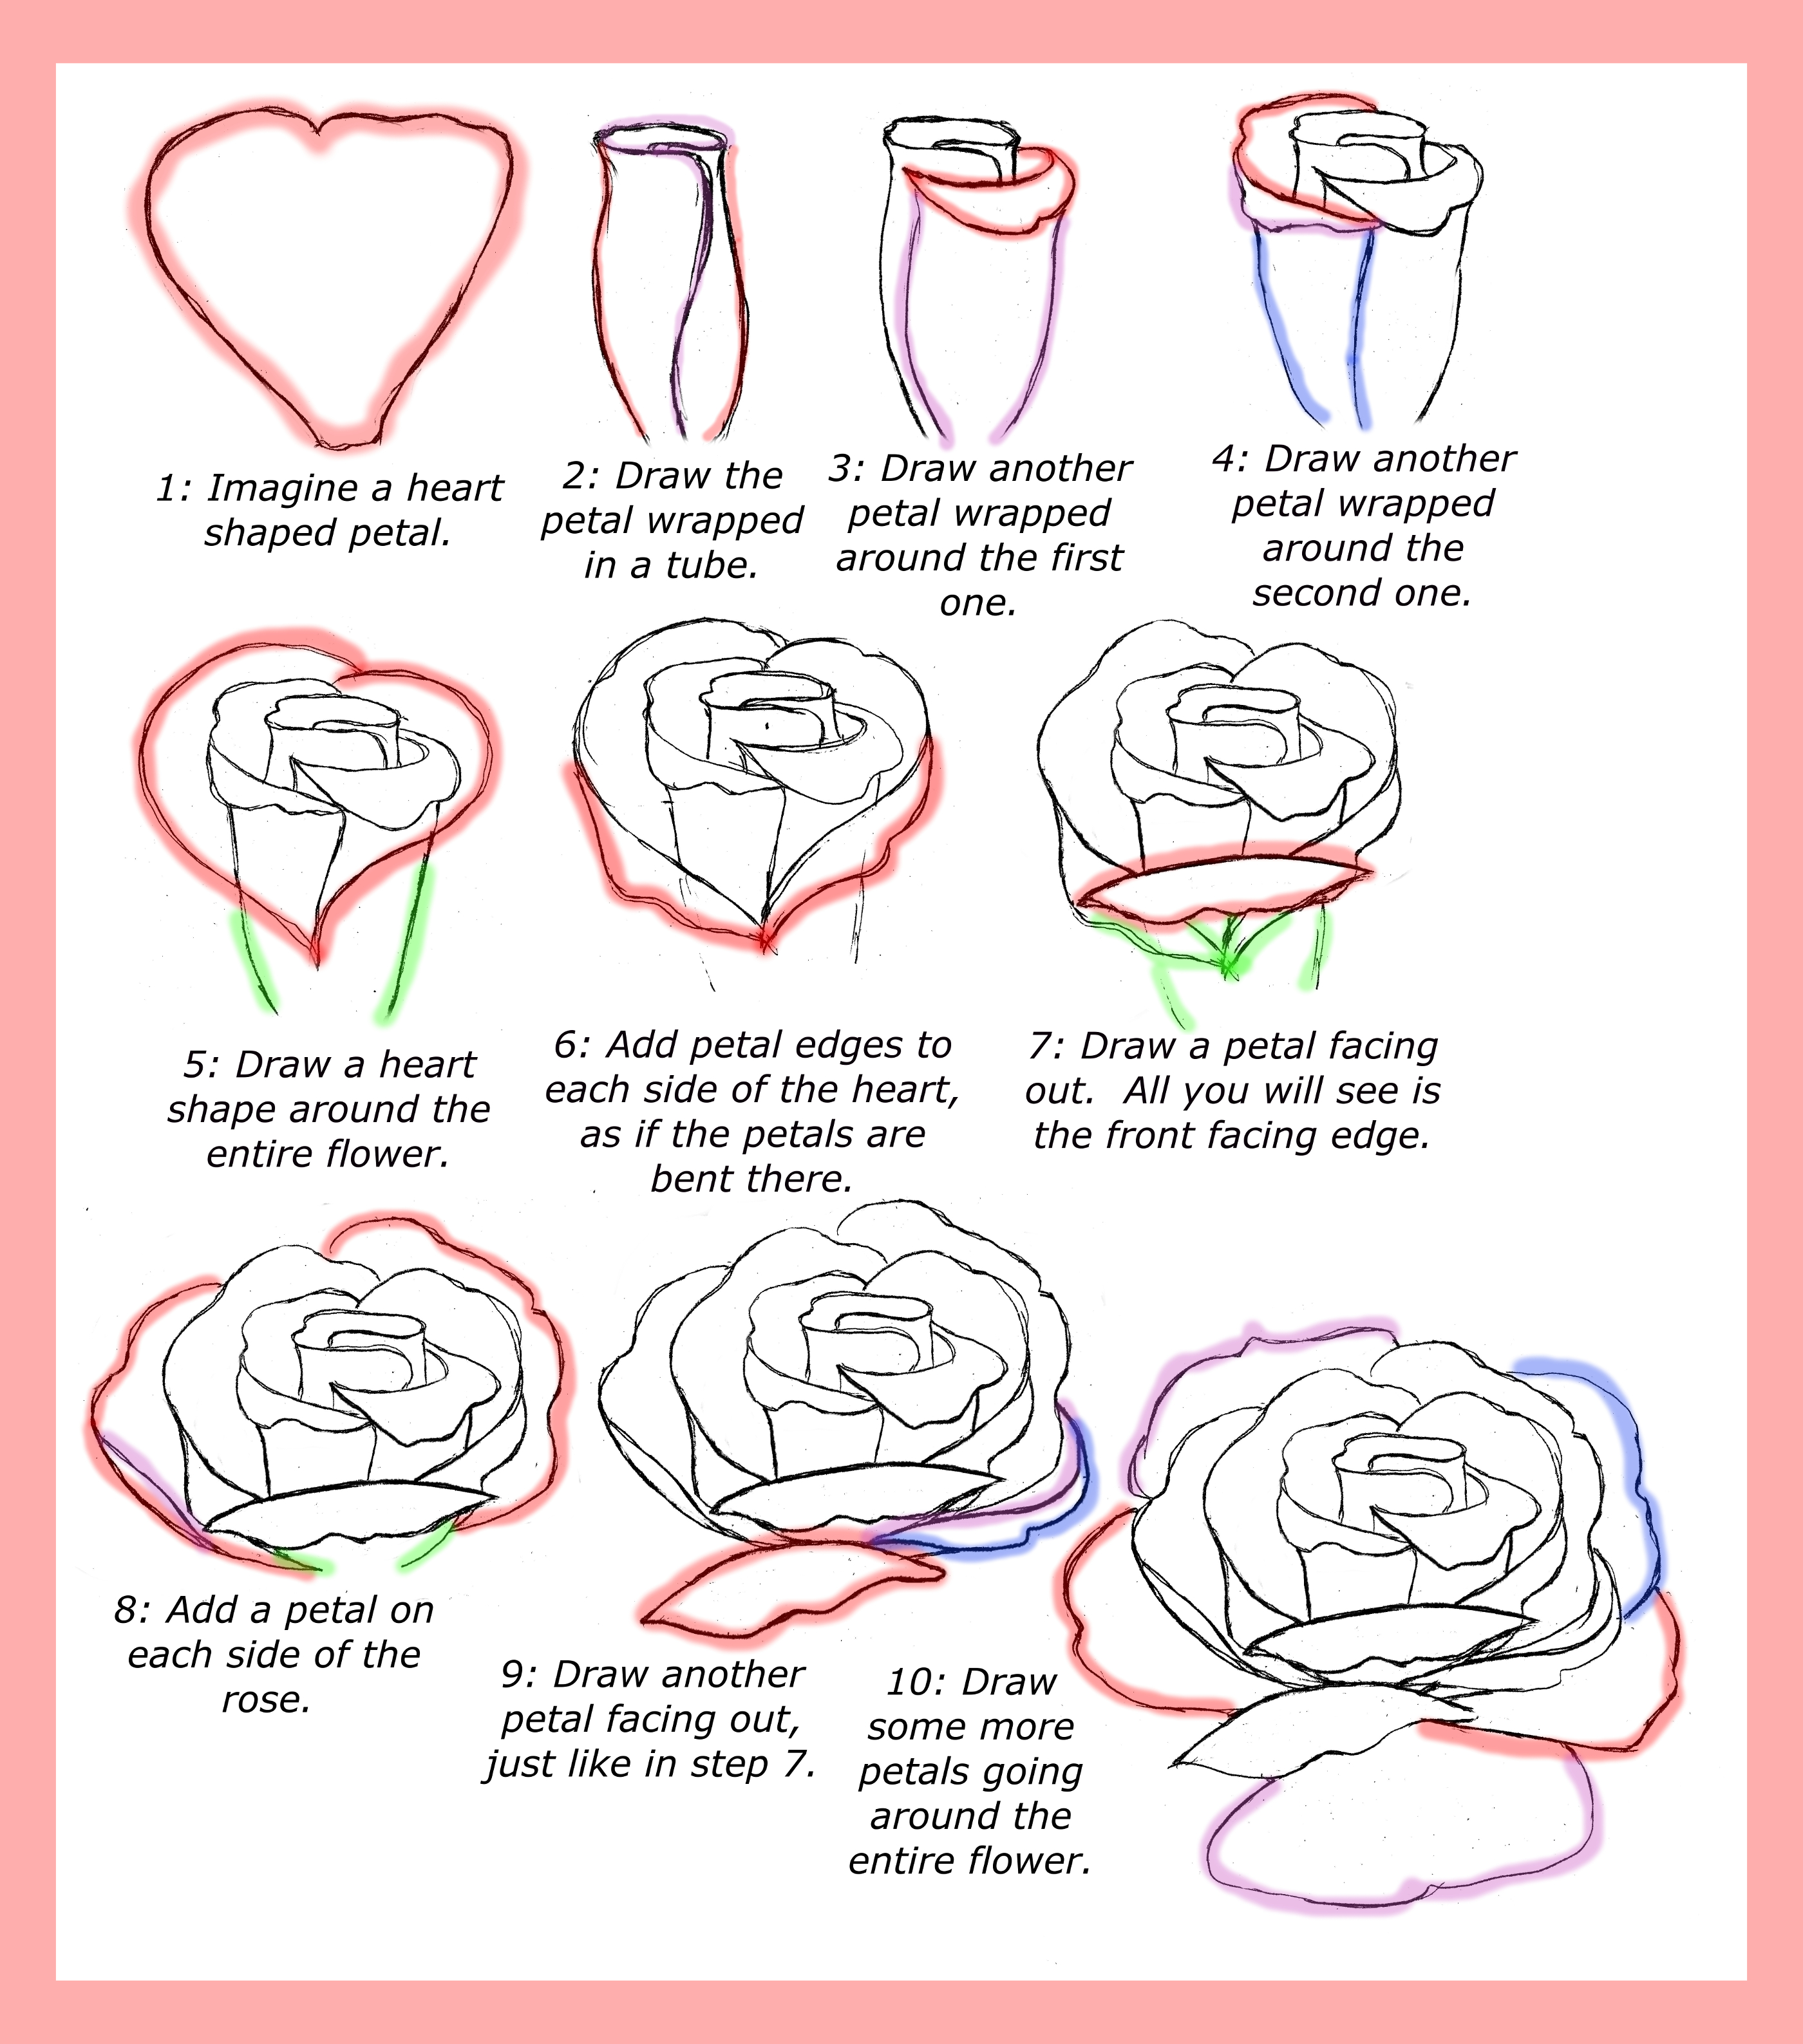
Before we put pencil to paper, let's briefly understand the fundamental structure of a rose. This understanding will make the drawing process much more intuitive. A rose in full bloom, which will be our final drawing, is essentially a collection of overlapping petals arranged in a spiral around a central core. Thinking of it in simple shapes first is key:
- The Core: Often starts as a tight, almost conical bud at the very center.
- Inner Petals: These are tightly curled and overlap significantly, forming a swirling pattern.
- Middle Petals: As you move outwards, the petals become larger and begin to unfurl, showing more of their surface.
- Outer Petals (Guard Petals): These are the largest, most open petals, often slightly flattened or curved downwards, framing the entire bloom.
- Stem and Leaves: The supporting elements, with characteristic serrated leaves and small thorns.
By breaking down the complex beauty of a rose into these manageable components, drawing a rose can seem less daunting and more like an enjoyable puzzle.
The 8-Step Path to Drawing a Rose: From Simple to Stunning
This how-to-draw-a-rose step-by-step tutorial is designed to make the process super easy, perfect for beginners as well as kids. We'll progress from easy designs to complex realism, perfect for artists at any level. Follow along closely, and you'll soon have a rose in full bloom!
Step 1: The Foundation – Basic Shapes
Every great drawing starts with a solid foundation. For our rose, we'll begin with a few simple shapes. Lightly sketch an oval or a slightly irregular circle. This will define the overall outer boundary of your rose. Inside this, sketch a smaller, more central oval or a slightly heart-shaped form. This smaller shape will represent the core or the tightest part of the rose's bud. Remember to use light lines, as these are just guidelines that you'll erase later. This initial step is crucial for establishing the proportion and placement of your rose on the paper.
Step 2: Defining the Core – The Central Bud
Now, let's focus on the heart of the rose. Within the smaller central shape you drew in Step 1, begin to draw the innermost petals. Think of them as a tight spiral or a series of overlapping 'C' or 'U' shapes that curl inwards. This is the part of the rose that is still somewhat closed, giving it that classic, elegant look. You can start with a small, slightly curved line in the center and then add two or three more curved lines around it, mimicking the way petals tightly embrace each other at the very beginning of the bloom. This step is where the rose truly begins to take form.
Step 3: Layering the Petals – Inner Rings
With the core established, it's time to expand outwards. Begin adding more petals around the central bud. These petals will be slightly larger and more open than the innermost ones, but still quite curved and overlapping. Think of them as forming concentric rings around the center. Use flowing, curved lines, making sure each new petal slightly overlaps the one before it. This creates the illusion of depth and the characteristic fullness of a rose. Don't worry about perfection; natural roses have unique, imperfect petals, which adds to their charm.
Step 4: Expanding Outward – Middle Petals
As we move further from the center, the petals become even larger and begin to unfurl more. In this step, you'll add another layer of petals, extending outwards towards the initial large oval you drew. These middle petals will have broader curves and might show more of their surface area. They still overlap, but less tightly than the inner rings. Pay attention to how these petals flow and connect to each other. Some might curve gently upwards, while others might start to fold back slightly at their edges, adding to the rose's organic feel. This is where your rose really starts to gain volume.
Step 5: The Outer Guard Petals
Finally, we'll add the outermost petals, often called guard petals. These are typically the largest and most open petals of the rose, framing the entire bloom. They might extend beyond your initial large oval guideline. These petals often have a more relaxed curve and might even appear slightly flattened or gently folded downwards at their tips. Add two or three of these broad, sweeping petals around the base of your rose, ensuring they connect smoothly to the layers within. Once these are in place, you can gently erase your initial oval guidelines, as the form of your rose should now be clearly defined.
Step 6: Adding the Stem and Leaves
No rose is complete without its supporting elements. Below the bloom, draw a sturdy, slightly curved stem. At the base of the flower, where it meets the stem, draw the small, pointed sepals (the green leaf-like structures that enclose the bud). Then, along the stem, add a few characteristic rose leaves. Remember that rose leaves are typically compound, meaning several smaller leaflets grow from a single stem. They also have serrated edges and often small thorns along the stem. Pay attention to the direction and curve of the leaves to make them look natural and lively.
Step 7: Refining Your Sketch – Adding Detail and Depth
Now that the basic structure is complete, it's time to refine your sketch and add the details that bring your rose to life. Go over your preferred lines with a slightly darker pencil (like a 2B), making them more prominent. Gently erase any remaining light construction lines. This is also the stage to add subtle details:
- Petal Veins: Lightly sketch faint lines on the surface of some petals, following their natural curve, to suggest veins.
- Folded Edges: Indicate small folds or creases on the edges of petals to give them more dimension.
- Shadows: Begin to think about where light would hit your rose. Lightly shade the areas where petals overlap, creating subtle shadows that indicate depth. This initial shading will guide your more detailed work in the next step.
This tutorial explains how to draw a realistic rose step by step, with detailed pencil illustrations as examples for each step. This refinement stage is crucial for that realism.
Step 8: Bringing it to Life – Shading for Realism
This is where your rose truly blossoms into a three-dimensional masterpiece. Shading is key to creating depth, form, and realism. Imagine a light source and apply shading accordingly:
- Identify Light and Shadow: Areas where petals curve away from the light or are overlapped by other petals will be darker. The parts facing the light will be lighter.
- Layering Graphite: Use your softer pencils (4B, 6B) to build up darker tones. Apply light layers first, then gradually increase pressure or add more layers for deeper shadows.
- Blending: Use a blending stump or cotton swab to smooth out your shading, creating seamless transitions between light and dark areas. This helps to give the petals a soft, velvety appearance.
- Highlights: Use your kneaded eraser to gently lift graphite from the brightest areas, creating highlights that make the petals appear shiny and round.
- Stem and Leaves: Don't forget to add shading to the stem and leaves to give them form and texture.
The final drawing will be a rose in full bloom, rich with texture and dimension. Drawing a rose is both a challenge and a pleasure, and this detailed shading brings out its true beauty.
From Beginner to Budding Artist: Tips for Success
Learning how to draw a rose can be intimidating for beginners, but with the right mindset and consistent practice, you'll be drawing roses that impress in no time. Here are some invaluable tips:
- Practice Regularly: Like any skill, drawing improves with consistent practice. Even 15-20 minutes a day can make a significant difference.
- Start Simple, Then Progress: Don't try to achieve hyper-realism on your first attempt. Focus on getting the basic shapes and petal flow right. These 8 drawing guides progress from easy designs to complex realism, perfect for artists at any level.
- Don't Fear Mistakes: Every artist makes "mistakes." View them as learning opportunities. Erasers are your friends!
- Use Reference Photos: Real roses or high-quality photographs are your best teachers. Observe how light hits the petals, how they overlap, and their natural imperfections.
- Experiment with Styles: While we focused on realism, you can also explore drawing cute and easy roses, perfect for kids, beginners, and toddlers. Try different levels of detail and shading.
- Be Patient: Drawing a detailed rose takes time. Don't rush the process. Learning to draw a rose can be a very rewarding and relaxing experience, so enjoy every step.
Common Challenges and How to Overcome Them When Drawing Roses
While this tutorial makes drawing a beautiful flower super easy, you might encounter a few common hurdles when learning how to draw a rose. Knowing these challenges beforehand can help you navigate them more effectively:
- Petal Symmetry vs. Natural Flow: A common mistake is trying to make every petal perfectly symmetrical. Real roses are organic and asymmetrical. Embrace the slight imperfections and varied sizes of petals to make your drawing look more natural.
- Achieving Depth and Dimension: Flat-looking drawings often result from insufficient shading. Remember to think about your light source and create clear distinctions between light, mid-tones, and shadows. Layering your graphite and blending are crucial here.
- Making it Look "Real" vs. Flat: This goes hand-in-hand with depth. Pay attention to the subtle curves and overlaps of petals. Even without heavy shading, the way one petal tucks behind another creates an illusion of three-dimensionality.
- Patience and Persistence: Sometimes, the biggest challenge is simply getting discouraged. Drawing intricate subjects like roses requires patience. If you're feeling frustrated, take a break and come back with fresh eyes. Your persistence will pay off!
Remember, drawing a rose can seem like a daunting task, but with a few simple steps, you can create a beautiful rose sketch. Whether you're a beginner or an experienced artist, this guide aims to simplify the process.
Beyond the Basics: Elevating Your Rose Drawings
Once you've mastered the fundamentals of how to draw a rose, you might want to explore ways to take your artwork to the next level. The possibilities are endless!
- Coloring Techniques: Experiment with adding color. Colored pencils allow for detailed layering and blending, similar to graphite. Watercolors can create soft, ethereal washes, while acrylics or oils offer vibrant, opaque results. Understanding color theory will significantly enhance your colored rose drawings.
- Different Rose Stages: Don't limit yourself to a rose in full bloom. Try drawing a tightly closed bud, a rose just beginning to unfurl, or even a wilting rose with drooping petals for a different emotional impact. Each stage presents unique challenges and opportunities for expression.
- Composing a Bouquet: Once you can draw a single rose, try arranging multiple roses into a bouquet. Consider how they overlap, how light falls on the arrangement, and how to create a sense of balance and harmony. Add other elements like baby's breath or greenery for variety.
- Digital Drawing: If you have access to a drawing tablet and software, translate your traditional skills to the digital realm. Digital tools offer incredible flexibility for layering, blending, and experimenting with colors and textures.
This simple rose sketch tutorial is perfect for beginners and anyone who wants to improve their flower drawing skills. Keep exploring, and your artistry will continue to grow.
The Joy and Reward of Creating Your Own Roses
As Hadley and I have discovered, learning how to draw a rose is not just about the final product; it's about the journey. The satisfaction of seeing a blank page transform into a beautiful, intricate flower is immense. There's a unique sense of accomplishment in knowing you've created something lovely with your own hands. These drawings are perfect for Valentine's Day and Mother's Day, but they also serve as a personal testament to your growing artistic skill. If you don't have a green thumb, you can still create a rose on paper, a timeless symbol of beauty and affection that never wilts. It's a rewarding and relaxing experience that allows you to connect with your creative side and bring beauty into the world, one petal at a time.
Whether you are a budding artist or an absolute beginner, the journey of learning to draw a rose is incredibly fulfilling. With just a few simple shapes and a bit of patience, you can master this beautiful flower. Follow along to learn how to draw this realistic rose easy, step by step, and watch your skills bloom.
We hope this guide has inspired you to pick up a pencil and start drawing! What's your favorite part about drawing flowers? Share your thoughts and experiences in the comments below, or better yet, share your rose drawings with us! Happy drawing!
Related Resources:

Detail Author:
- Name : Aisha Herman
- Username : jkonopelski
- Email : ottilie96@gmail.com
- Birthdate : 1980-04-04
- Address : 4664 Little Vista Suite 518 Trevermouth, MS 91189
- Phone : 805.349.5304
- Company : Adams, Kautzer and Grady
- Job : Gas Pumping Station Operator
- Bio : Corporis quo voluptas perferendis. Sit ullam placeat quis libero magni architecto. Exercitationem fuga perferendis autem quasi eaque ducimus sit.
Socials
twitter:
- url : https://twitter.com/smith1982
- username : smith1982
- bio : Officia velit et odio quibusdam. Natus debitis aliquid maxime adipisci. Maxime recusandae voluptas nobis ad voluptatem aut.
- followers : 1196
- following : 1263
instagram:
- url : https://instagram.com/smith2023
- username : smith2023
- bio : Dolore atque cumque hic et natus ab rerum doloremque. Id enim cumque ipsam.
- followers : 6179
- following : 959
linkedin:
- url : https://linkedin.com/in/maryam1741
- username : maryam1741
- bio : Nesciunt est sint dicta itaque.
- followers : 1764
- following : 1670
tiktok:
- url : https://tiktok.com/@maryam_real
- username : maryam_real
- bio : Itaque est et perspiciatis repellat quae voluptatibus.
- followers : 5328
- following : 2132
facebook:
- url : https://facebook.com/maryam.smith
- username : maryam.smith
- bio : Accusamus perferendis tempora tempore in beatae qui hic.
- followers : 1144
- following : 2663
