Introduction
The Fundamental Form: Understanding the Eye as a Sphere
Beyond the Surface: The Importance of Skull Anatomy
Mastering Perspective in Eye Drawing
Bringing Eyes to Life: Eyelids, Lashes, and Brows
The Soulful Gaze: Capturing Emotion and Expression
Crafting Unique Pupils and Irises
The Power of Contrast and Reflection in Eye Drawing
Specialized Techniques: Anime Eye Drawing and Beyond
Representing Blindness and Other Conditions
The Artist's Toolkit: Essential Resources for Eye Drawing
Highlighting and Accentuating Details
Practice Makes Perfect: Your Journey to Eye Drawing Mastery
Conclusion
Introduction
The human eye is often called the window to the soul, and for artists, mastering eye drawing is paramount to bringing characters and portraits to life. It's where emotion, personality, and depth truly reside, making it one of the most captivating and challenging features to render. Many aspiring artists find themselves grappling with the complexities of eyes, from getting the basic shape right to conveying nuanced expressions. If you've ever found yourself asking, "I'm having issues drawing eyes, so I attempted to take an eye tutorial, anyone have any cheats or tricks to getting eyes to line up properly?", you're certainly not alone.
This comprehensive guide aims to demystify the art of eye drawing, providing you with foundational knowledge, practical techniques, and expert insights to elevate your skills. We'll delve into the anatomy, perspective, and expressive potential of the eye, offering actionable advice to help you draw eyes that truly captivate your audience. Prepare to transform your approach and unlock a new level of realism and emotion in your artwork.
- Mavericks Vs Warriors
- Neil Simon Theatre
- Commercial Travellers Association
- Vrg Grl
- Westfield Garden State Plaza
The Fundamental Form: Understanding the Eye as a Sphere
Before you even think about pupils or irises, the absolute first step in effective eye drawing is to understand its core structure. The eye is not a flat shape on the face; it is, fundamentally, a sphere inside of a socket. This anatomical truth is the bedrock upon which all successful eye renditions are built.
Begin by drawing a simple line, which will serve as your eye level or guide. On this line, draw a 3D sphere. Think of it as a golf ball or a marble. This sphere represents the eyeball itself. Many beginners make the mistake of drawing the eye as a flat almond shape from the outset, which immediately limits its dimensionality and natural appearance. By starting with a sphere, you inherently establish volume and the potential for realistic light and shadow.
Once you have your sphere, the next crucial step is to draw the socket around the sphere. The eye socket, or orbit, is the bony cavity in the skull that houses and protects the eyeball. Understanding its shape and depth is vital. When you came to putting eyes in a drawing, you might find it instructive to look at pictures of skulls to get a sense of how much area the eye socket actually takes up on the face. This isn't just about anatomical accuracy; it's about understanding how the eyelids, brows, and surrounding facial tissue drape over and interact with this underlying structure. This foundational approach ensures your eyes sit naturally within the face, rather than appearing glued on.
Beyond the Surface: The Importance of Skull Anatomy
To truly excel at eye drawing, particularly for realistic or even stylized approaches like anime, a deeper understanding of the underlying skull structure is invaluable. As mentioned, the eye socket dictates much of the eye's appearance. By studying the egg structure of the head and how the eye fits in, your ability to draw eyes will improve significantly. This goes beyond just the socket; it includes the brow bone, the cheekbones, and the bridge of the nose, all of which influence the shadows, highlights, and overall form around the eyes.
Anatomical references are your best friend here. Find and draw from anatomical references, focusing specifically on the skull and facial muscles. This might seem like an extra step for something as seemingly small as the eye, but it provides a robust framework that prevents your eyes from looking flat or disconnected from the rest of the face. It's about drawing what you see, not what you think you see – a principle that applies universally in art but is particularly critical when dealing with complex structures like the human face.
Mastering Perspective in Eye Drawing
Perspective is often overlooked in eye drawing, yet it plays a critical role in conveying depth, direction, and realism. One common mistake beginners make is failing to account for how perspective affects the visible parts of the eye, especially the "whites" (sclera).
For instance, look how much white is shown on the left of the eye on the left compared to the right. Those should be even or maybe reversed due to perspective, causing you to see less of the white on one side depending on the angle. If a character is looking slightly to their left, you will see more of the white on the right side of their eye (closer to the nose) and less on the left side (closer to the ear). Conversely, if they are looking to their right, the opposite will be true. Ignoring this subtle shift immediately flattens the eye and makes it appear unnatural or unfocused.
When drawing a pair of eyes, proper alignment is key. "Anyone have any cheats or tricks to getting eyes to line up properly?" is a common question. The "sphere in a socket" approach helps immensely here. Imagine a horizontal line passing through the center of both eyeballs. Even if the head is tilted, this line will help you maintain consistency. Also, remember that the distance between two eyes is roughly the width of one eye. These proportional guidelines, combined with careful observation of perspective, will help you avoid the dreaded "wandering eye" syndrome in your portraits. Always observe your reference meticulously, paying attention to how much of the sclera is visible from different angles.
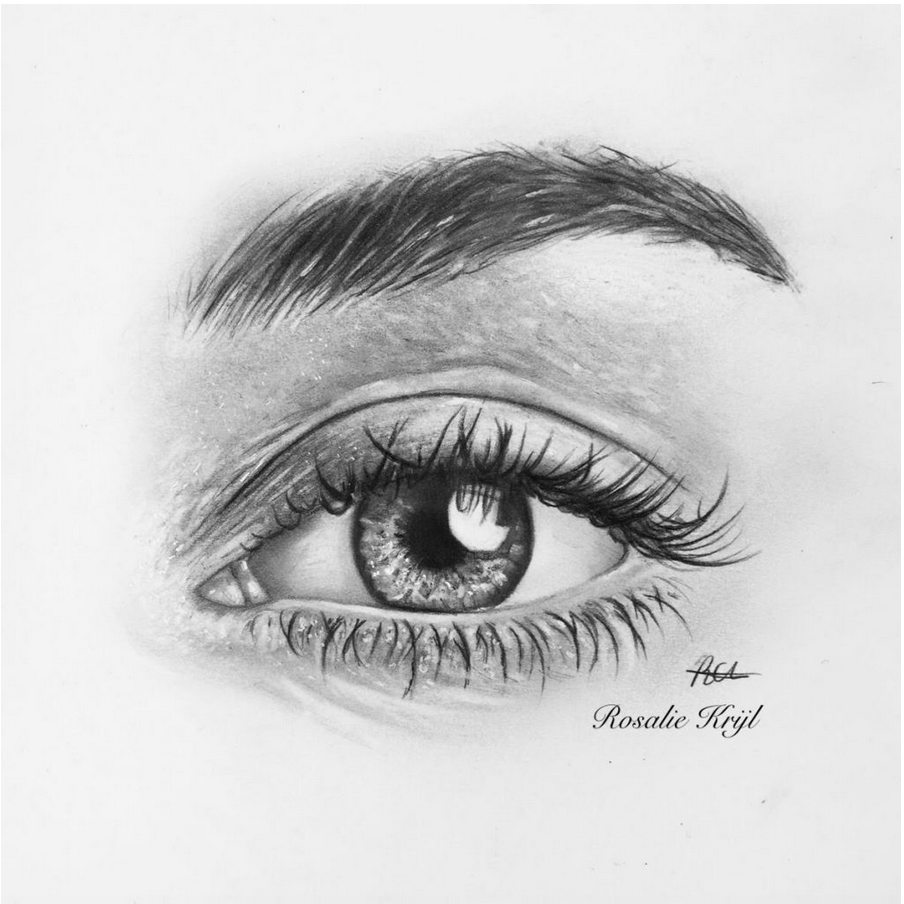
Bringing Eyes to Life: Eyelids, Lashes, and Brows
Once the foundational sphere and socket are established, you can begin to add the defining features that give the eye its unique character. Begin by drawing an eyeball, then draw the eyelid over your eye. Remember, eyelids are not flat lines; they are folds of skin that wrap around the curvature of the spherical eyeball. The upper eyelid typically covers a small portion of the iris, while the lower eyelid often just touches or slightly exposes the bottom of the iris, depending on the expression.
Pay close attention to the thickness of the eyelids. They have volume, particularly where the lashes emerge. The crease of the upper eyelid also varies greatly from person to person and is crucial for conveying age and ethnicity. Lashes, too, are not just simple lines. They grow in clumps, curve outwards, and are thicker at the base, tapering to a fine point. Avoid drawing each lash individually; instead, focus on their overall flow and density.
Eyebrows, while not directly part of the eye, are intrinsically linked to its expression. They frame the eye and contribute significantly to the character's mood. Their shape, thickness, and proximity to the eye can drastically alter the perceived emotion. Observe how they arch, furrow, or raise in different expressions. Integrating the brows naturally with the eye socket and brow bone structure will make your eye drawing feel more cohesive and lifelike.
The Soulful Gaze: Capturing Emotion and Expression
The true magic of eye drawing lies in its ability to convey emotion. A pair of eyes can communicate joy, sorrow, anger, surprise, or contemplation without a single word. What do you guys think is the best approach when practicing drawing expressions? Should you stick with the style and techniques of a few artists, or just randomly draw expressions?
A balanced approach is often best. While studying a few artists whose expressive styles you admire can provide valuable insights and techniques, it's equally important to observe real-life expressions. Look at photographs, watch people, and even use a mirror to study your own face as you make different expressions. Notice how the eyelids, eyebrows, and even the tiny wrinkles around the eyes change. For instance, when someone smiles genuinely, their eyes often crinkle at the corners (crow's feet). When they're sad, the inner corners of their eyebrows might pull down, and their eyelids might droop slightly.
Practice drawing a wide range of emotions, focusing on how the surrounding features of the eye transform. Don't just draw the eye in isolation; try to include the brow and the upper part of the cheek to see how the entire area works together to form an expression. This holistic approach will make your characters feel more authentic and relatable.
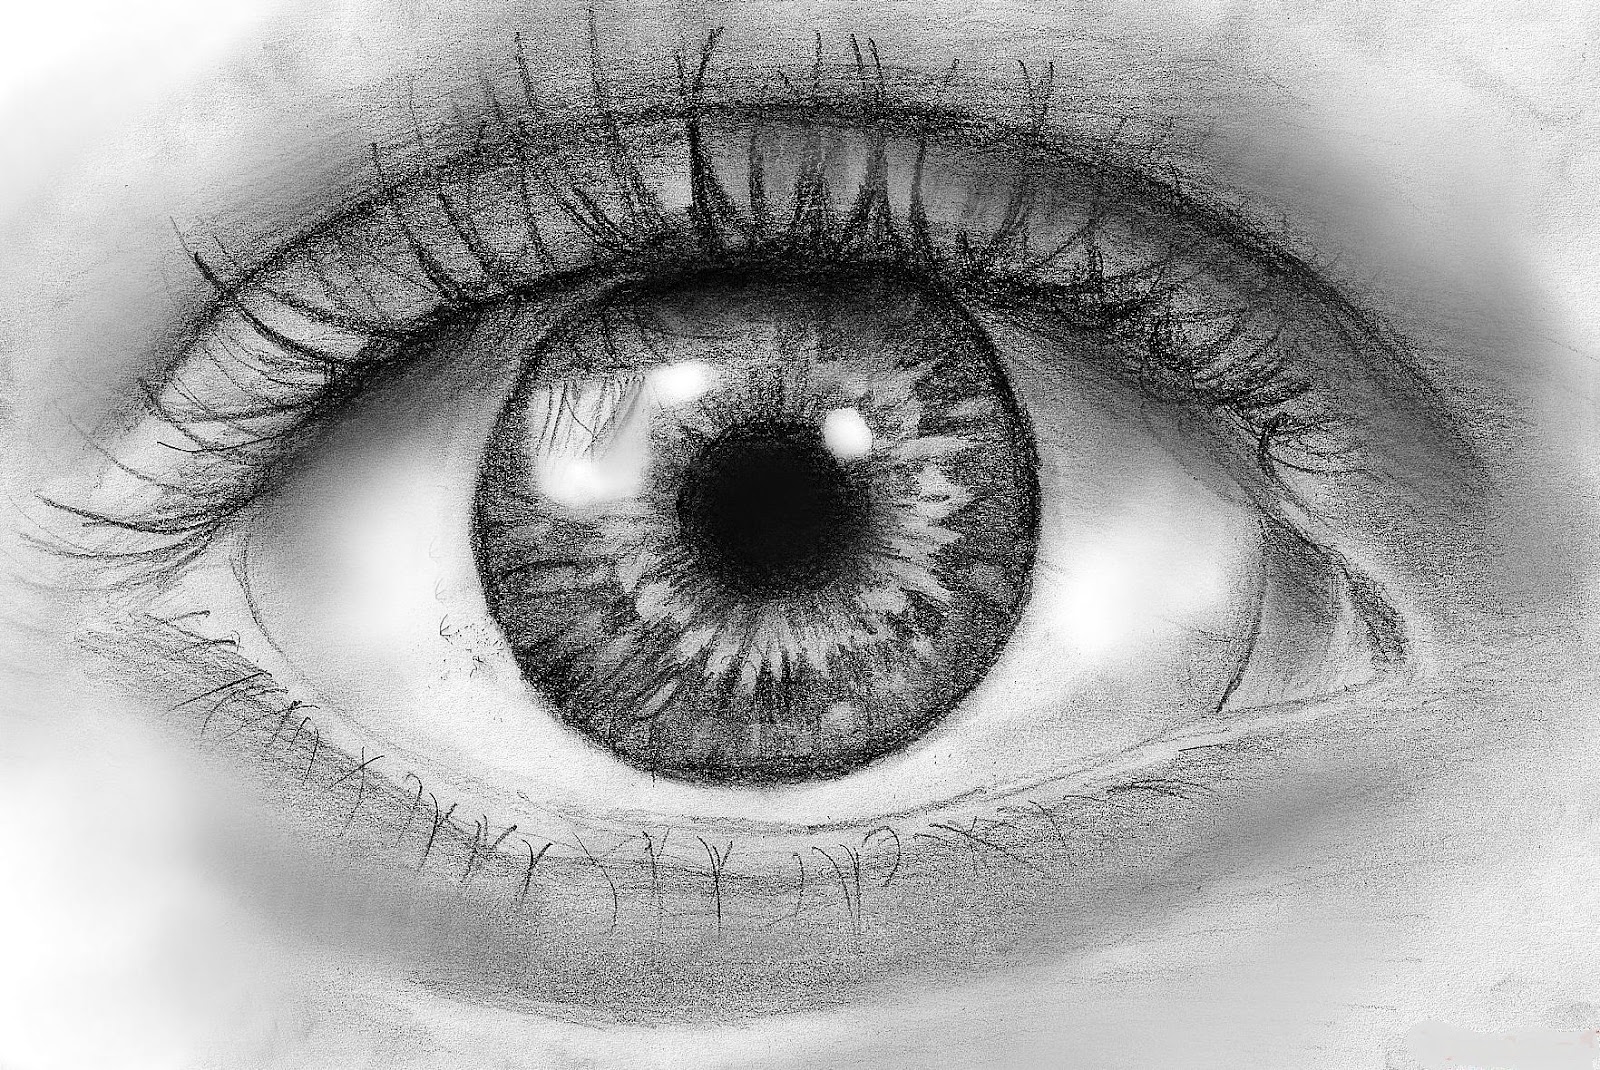
Crafting Unique Pupils and Irises
The iris and pupil are the focal points of the eye, drawing the viewer's gaze. While the pupil is typically a simple black circle (though it can dilate or constrict), the iris offers a canvas for incredible detail and creativity. I saw people drawing those eyes and they're super creative with how they use shape to make a cool eye pupil design. How do I do it myself?
The key lies in understanding the structure of the iris. It's not just a flat disk of color. It has radial patterns, sometimes concentric rings, and often subtle variations in tone and texture. To create unique and captivating irises:
- Layering Colors: Don't just use one flat color. Build up the iris with multiple shades, starting with a base color and adding darker and lighter tones to create depth.
- Radial Lines: Draw fine lines radiating from the pupil outwards. These mimic the natural fibers of the iris.
- Shape Language: While the overall shape is circular, you can play with the internal patterns. Some artists use subtle geometric shapes or abstract patterns within the iris to give it a distinct look, especially in stylized or fantasy art.
- Reflections: The reflection of light on the cornea (the transparent outer layer covering the iris and pupil) is crucial. This highlight gives the eye a wet, living quality and can even tell a story (more on this below).
The Power of Contrast and Reflection in Eye Drawing
To truly make your eye drawing pop, strategic use of contrast and reflection is indispensable. Make sure that the eye is one of the most high contrast parts of the painting to draw attention to it. This means ensuring the darkest darks and brightest brights are concentrated around the eye area.
For instance, the pupil should be the darkest point, a true black. The highlight (specular reflection) on the cornea should be the brightest, often pure white. The contrast between these two points immediately creates depth and draws the viewer's eye. Additionally, the crispness of the lines around the iris and pupil, compared to softer edges elsewhere on the face, further enhances this focal point.
Also, you can use the reflection in the eye to create a story or setting. This is a subtle yet powerful storytelling device. A tiny window reflection can indicate an indoor setting, while a miniature landscape or sky can place the character outdoors. A reflection of another character can imply interaction or relationship. These small details add layers of narrative depth without needing explicit exposition. They make the eye not just a visual element, but a narrative one.
Specialized Techniques: Anime Eye Drawing and Beyond
While the foundational principles of eye drawing remain constant, different artistic styles demand unique approaches. Anime eye drawing, for instance, often exaggerates certain features to convey emotion and character. By studying the egg structure of the head and how the eye fits in, it will improve your anime eye drawing by tenfold, like in Nisio Isin's distinctive style, which masterfully blends anatomical understanding with stylized expression.
Anime eyes are renowned for their large, expressive irises and prominent reflections. They often feature:
- Exaggerated Shape: While still based on the sphere, anime eyes often adopt more stylized, elongated, or rounded shapes.
- Large Irises: The iris typically takes up a much larger portion of the visible eye compared to realistic eyes, allowing for more detailed patterns and color gradients.
- Multiple Highlights: Anime eyes frequently feature several distinct highlights – a large primary one and smaller secondary ones – to give them a sparkling, vibrant quality.
- Simplified Anatomy: While still respecting the underlying skull structure, the details of the eyelids and surrounding muscles are often simplified or implied.
Representing Blindness and Other Conditions
Sometimes, an artist needs to convey a specific condition or characteristic through the eyes. If you wanna “show” that a character is blind, a common artistic convention is to not color in the iris and just have a black or white outline around the iris. This creates a striking visual cue that immediately communicates the character's sight impairment without needing a narrative explanation.
Alternatively, some artists might choose to let them have normal-looking eyes but rely on context, body language, or other visual cues to convey blindness, especially if the character has partial vision or if the artist wants to avoid a potentially stereotypical depiction. Other visual conditions can also be subtly implied:
- Cataracts: A cloudy or milky appearance over the pupil/iris.
- Scars: Subtle lines or distortions around the eye area, affecting the eyelids or brow.
- Fatigue: Dark circles, puffiness, or slightly drooped eyelids.
The Artist's Toolkit: Essential Resources for Eye Drawing
The journey to mastering eye drawing is a continuous one, and thankfully, there's a wealth of resources available to help you. Your drawing of eyes skills are excellent, you should be giving me tips, but on a serious note, you can use Pinterest and YouTube. These platforms are treasure troves of tutorials, time-lapses, and reference images.
- Pinterest: An unparalleled resource for visual references. Create boards dedicated to "eye anatomy," "eye expressions," "different eye shapes," or "anime eyes." You can find countless photos of real eyes, stylized artwork, and step-by-step guides.
- YouTube: Offers a dynamic learning experience. Search for "eye drawing tutorials," "how to draw realistic eyes," or "digital painting eyes." Many professional artists share their processes, offering insights you can't get from static images.
- Anatomical References: As emphasized, drawing from anatomical references is crucial. Look for medical illustrations, anatomical atlases, or even 3D models of skulls and facial muscles.
- Art Books & Courses: Invest in reputable art books on portraiture or figure drawing. Online courses from established artists can also provide structured learning paths.
- Manga Materials (Patreon): For those interested in stylized or anime eyes, checking out manga materials on platforms like Patreon can be incredibly beneficial. Many manga artists offer exclusive tutorials, brushes, and insights into their unique styles.
Highlighting and Accentuating Details
One thing that works for many artists is to find and draw from anatomical references, then, on your drawing, use different color markers, pens, etc., to highlight and accentuate any particular feature. This technique is not just for learning anatomy; it's also a powerful way to bring your finished eye drawing to life.
Highlighting is about directing the viewer's eye and emphasizing form.
- Catchlights: These are the brightest highlights in the eye, usually pure white, reflecting the light source. Their shape and position indicate the direction and type of light.
- Wetness: Subtle highlights along the waterline of the lower eyelid and in the tear duct area give the eye a realistic, moist appearance.
- Skin Texture: Using subtle texture and highlight on the eyelids and surrounding skin can indicate age, skin type, and even emotion (e.g., glistening tears).
- Color Accents: In a black and white drawing, a touch of color in the iris or a subtle tint in the sclera can add vibrancy and depth. In color drawings, using slightly desaturated colors for the sclera and brighter, more saturated colors for the iris makes the eye stand out.
Practice Makes Perfect: Your Journey to Eye Drawing Mastery
Ultimately, the path to mastering eye drawing is paved with consistent practice and keen observation. Whether you choose to stick with the style and techniques of a few artists or just randomly draw expressions, the most important thing is to draw regularly. Every eye you draw, whether it's a quick sketch or a detailed rendering, contributes to your growth.
Remember the core principles: the eye as a sphere in a socket, the importance of underlying anatomy, the subtle shifts of perspective, and the power of contrast and reflection. Experiment with different tools and techniques, from traditional pencils and markers to digital brushes. Embrace the learning process, and don't be discouraged by initial challenges. Your drawing of eyes skills will undoubtedly improve with dedication.
Conclusion
Drawing compelling eyes is a cornerstone of effective character design and portraiture. By understanding the eye as a sphere nestled within a socket, mastering the nuances of perspective, and paying meticulous attention to details like eyelids, lashes, and highlights, you can transform your artwork. We've explored the foundational anatomy, the art of conveying emotion, specialized techniques for styles like anime, and essential resources to fuel your artistic journey.
The journey to mastery in eye drawing is continuous, filled with observation and experimentation. We hope this guide has provided you with valuable insights and practical tips to elevate your skills. What do you think is the most challenging aspect of drawing eyes for you? Share your thoughts and experiences in the comments below, or share this article with fellow artists who might benefit from these insights. Keep practicing, keep observing, and watch as your eyes truly come to life on the page!
Related Resources:

Detail Author:
- Name : Celestino Dach
- Username : kgislason
- Email : hassan19@yahoo.com
- Birthdate : 2001-08-02
- Address : 95136 Augusta Passage Stromanville, NV 49509-3179
- Phone : 804.945.0021
- Company : Robel-Spencer
- Job : Actor
- Bio : Et omnis id accusantium natus. Illum neque amet sunt. Ullam reprehenderit quo asperiores distinctio. Eveniet earum numquam velit rerum aspernatur rerum hic numquam.
Socials
facebook:
- url : https://facebook.com/jamil8501
- username : jamil8501
- bio : Ea architecto quidem ratione dolores.
- followers : 1478
- following : 1830
instagram:
- url : https://instagram.com/jamil.fay
- username : jamil.fay
- bio : Nostrum sint aut reiciendis est ea omnis maxime deserunt. Aut eligendi deleniti mollitia porro.
- followers : 4613
- following : 2234
tiktok:
- url : https://tiktok.com/@jamil_fay
- username : jamil_fay
- bio : Ab sint placeat aut delectus sunt.
- followers : 180
- following : 621
twitter:
- url : https://twitter.com/jfay
- username : jfay
- bio : Voluptatem sequi laboriosam officia cupiditate. Magni nobis dolorem fuga aspernatur eum modi non.
- followers : 4719
- following : 341
