Are you fascinated by the graceful and elegant flamingos, those magnificent pink birds that captivate with their unique charm? Perhaps you've always wanted to bring their beauty to life on paper but didn't know where to start. In this article, we will provide you with a step-by-step guide on how to draw a flamingo, even if you're a complete beginner, transforming your artistic aspirations into a vibrant reality.
Flamingos, with their long legs, graceful necks, and bright pink feathers, are a joy to draw and full of personality. Their distinctive silhouette makes them a popular subject for artists of all levels. Whether you're looking to unwind with a relaxing creative activity or to impress your friends with a stunning piece of art, learning the art of flamingo drawing is an incredibly rewarding endeavor. This comprehensive guide will equip you with all the knowledge and techniques you need to create your very own perfect flamingo picture.
Table of Contents
- Why Embrace Flamingo Drawing? The Allure of Pink Plumage
- Essential Tools for Your Flamingo Drawing Journey
- The Core Principles of Flamingo Drawing: Understanding Their Anatomy
- Step-by-Step Flamingo Drawing Guide for Beginners
- Adding Life to Your Flamingo Drawing: Color and Personality
- Beyond the Basics: Advanced Tips for Your Flamingo Drawing
- Inspiration Galore: 36+ Cute Flamingo Drawing Ideas
- Common Pitfalls and How to Overcome Them in Flamingo Drawing
- Conclusion: Your Artistic Journey with Flamingo Drawing
Why Embrace Flamingo Drawing? The Allure of Pink Plumage
There's something inherently captivating about flamingos. Their vibrant pink hues, often attributed to their diet of brine shrimp and algae, instantly draw the eye. Beyond their striking color, their elegant posture, long, slender legs, and distinctively curved necks give them an almost mythical quality. For artists, this unique combination presents a fascinating challenge and a rewarding subject. The process of flamingo drawing allows you to explore form, line, and color in a way that is both engaging and expressive.
Many aspiring artists, and even seasoned ones, find immense joy in depicting wildlife, and flamingos stand out as particularly charismatic creatures. Their natural grace translates beautifully onto paper, offering endless opportunities for creative interpretation. Whether you're aiming for a realistic portrayal or a whimsical, stylized version, the flamingo's iconic silhouette provides a fantastic foundation. Learning how to draw a flamingo is not just about replicating an image; it's about understanding and appreciating the natural world through your artistic lens, fostering observation skills, and building confidence in your abilities.
Essential Tools for Your Flamingo Drawing Journey
Before you dive into the specifics of how to draw a flamingo, it's helpful to gather your materials. The beauty of art is its flexibility, and flamingo drawing is no exception. You don't need an elaborate studio setup to get started. In fact, you can use any medium you like to do this drawing, from simple pencils to digital tablets. The key is to choose tools that you feel comfortable with and that allow you to express your creativity freely.
Choosing Your Medium: Pencils, Pens, or Digital?
- Graphite Pencils: These are the quintessential starting point for any drawing. A set of pencils with varying hardness (e.g., 2H for light sketching, HB for general lines, 2B-4B for darker shading) will give you versatility. They are excellent for laying down initial shapes and refining details.
- Colored Pencils: If you want to add that iconic pink hue, colored pencils are a fantastic choice. They offer control and allow for layering to build up rich tones.
- Ink Pens: For a bold, graphic look, fine-liner pens or even ballpoint pens can be used. They are great for outlines and adding texture, though they offer less room for error compared to pencils.
- Markers: Alcohol-based or water-based markers can provide vibrant, smooth color. They are ideal for quick coloring and creating strong visual impact.
- Watercolors: For a softer, more ethereal look, watercolors are perfect for capturing the delicate beauty of flamingo feathers.
- Digital Tablets: If you prefer digital art, a drawing tablet and software (like Procreate, Photoshop, or Clip Studio Paint) offer endless possibilities. Digital tools allow for easy corrections, layering, and a vast palette of colors.
Paper and Accessories: Setting the Stage
The type of paper you choose should complement your medium. For pencils, a smooth drawing paper works well. If you're using markers or watercolors, opt for heavier paper designed to prevent bleed-through or buckling. Beyond the main drawing surface, consider these accessories:
- Eraser: A good quality kneaded eraser or vinyl eraser is essential for correcting mistakes and lifting graphite.
- Sharpener: Keep your pencils sharp for precise lines.
- Reference Images: While this guide provides instructions, having a few reference photos of flamingos will help you observe their posture, feather patterns, and expressions.
- Light Source: Good lighting is crucial for seeing your lines clearly and preventing eye strain.
Remember, the best tools are the ones you enjoy using. Don't feel pressured to buy expensive supplies; start with what you have, and upgrade as your skills and interests evolve. The most important tool is your enthusiasm for flamingo drawing.
The Core Principles of Flamingo Drawing: Understanding Their Anatomy
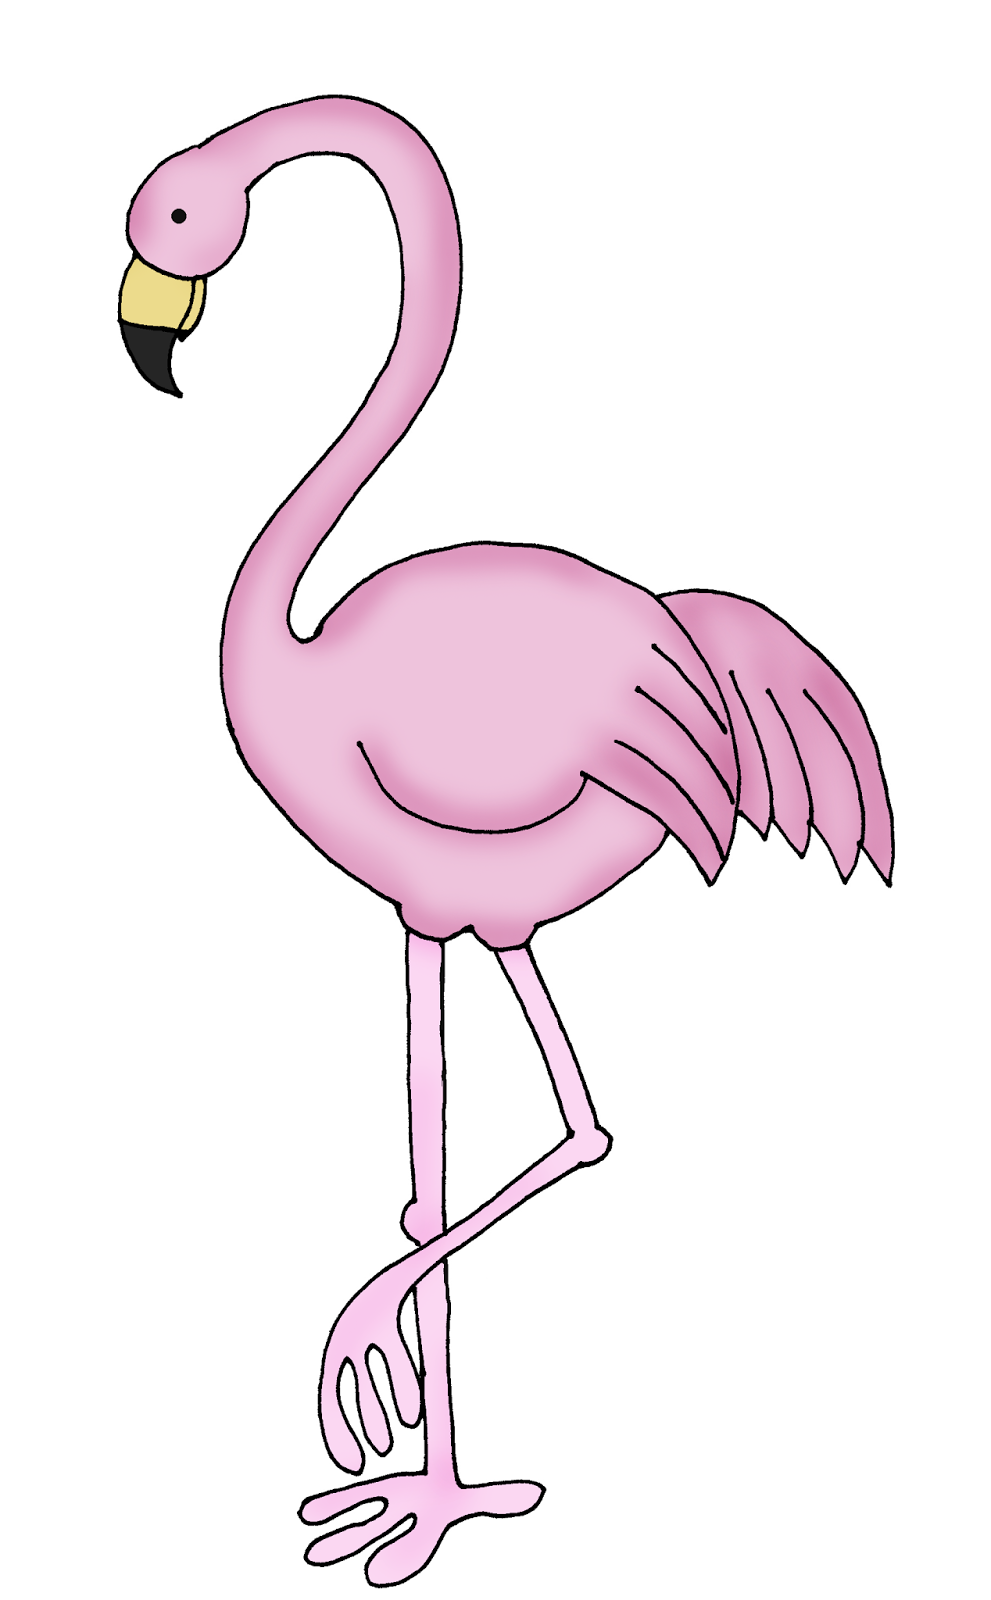
Before we dive into the step-by-step process, understanding the basic anatomy of a flamingo will significantly enhance your flamingo drawing. Flamingos have a very distinct silhouette, characterized by a few key features:
- The Body: Often described as an oval or an egg shape, this forms the main mass of the bird.
- The Neck: Famously long and S-shaped, this is perhaps their most iconic feature. It will help you get that famously curvy neck just right.
- The Legs: Exceptionally long and slender, often depicted with a "knee" (which is actually their ankle) that bends backward. They usually stand on one leg, adding to their unique charm.
- The Head and Beak: Relatively small in comparison to their body, with a distinctive downward-curving beak that is specially adapted for filter feeding.
- The Wings and Tail: Folded neatly against their body when standing, revealing layers of feathers.
When you begin your drawing, think in terms of these basic shapes and their proportions. Don't get bogged down by details initially. Focus on capturing the overall gesture and balance of the bird. This foundational understanding will make the subsequent steps much easier and ensure your flamingo looks anatomically plausible and graceful.
Step-by-Step Flamingo Drawing Guide for Beginners
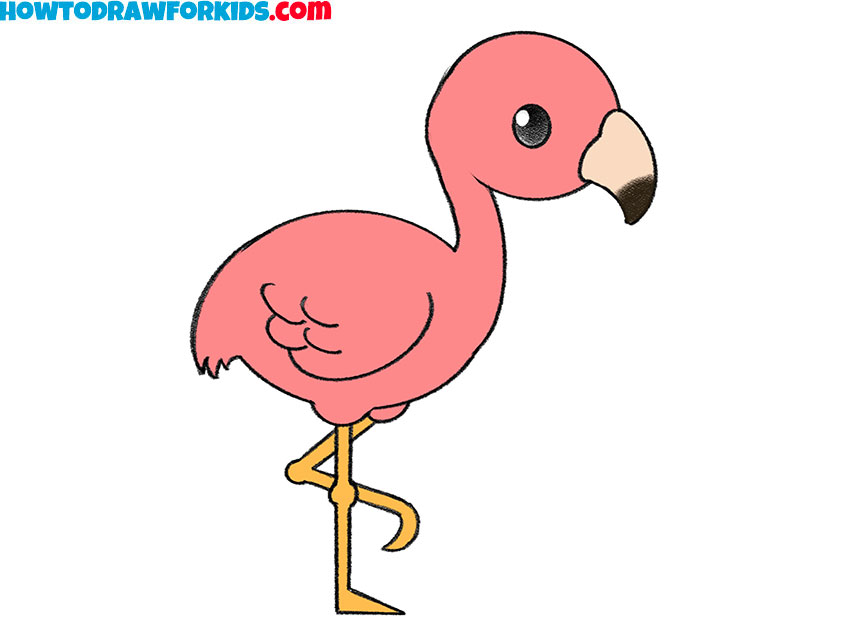
Ready to take your drawing to the next level? If you want to learn how to draw a flamingo, then you’ve found the right guide for you. This easy drawing tutorial is perfect for kids and beginners—complete with tips, visuals, and coloring ideas! By following these simple steps, you too can easily draw a perfect flamingo. You will be able to recreate this beautiful bird in just a few steps. Learn how to draw a great looking flamingo with easy drawing instructions and a video tutorial (though we'll provide text instructions here, imagine the video guiding you). Want to learn how to draw a flamingo easy, without fuss? Follow this clear, easy tutorial and make your beautiful flamingo picture now.
Building the Foundation: Basic Shapes
The secret to a successful flamingo drawing, especially for beginners, lies in starting with simple geometric shapes. Think of it as building blocks for your bird. In this tutorial, easydrawforkids.com (or rather, this guide inspired by such resources) will help you learn.
- Start with the Body: Lightly draw a large oval or egg shape in the center of your paper. This will be the main body of your flamingo. Don't press too hard; these are just guidelines.
- Add the Head: Above and slightly to the left or right of the body (depending on which way your flamingo will face), draw a small circle for the head. Leave enough space between the body and head for the neck.
- Connect with the Neck: Now, for that famously curvy neck! Draw two curved lines connecting the head to the body. Imagine a gentle 'S' shape. The neck should be thick enough to support the head but still appear elegant. This step is crucial for capturing the flamingo's grace.
- Sketch the Legs: From the bottom of the body, draw two long, thin lines extending downwards. Flamingos typically stand on one leg, so you might draw one straight down and the other bent at the "knee" (ankle) with the foot lifted. Remember their long, stick-like appearance.
- Outline the Beak: From the head circle, draw a distinctive, downward-curving shape for the beak. It's thick at the base and tapers to a point, with a noticeable bend in the middle.
At this stage, your drawing should look like a rough stick figure of a flamingo, composed of simple shapes. This is perfectly normal and exactly what we want. It establishes the proportions and pose before you add details.
Refining Details: Neck, Legs, and Feathers
Now that you have the basic structure, it's time to refine your flamingo drawing, adding contours and details that bring it to life.
- Shape the Body and Neck: Go over your initial oval and neck lines, making them smoother and more defined. The body should have a gentle curve, and the neck should flow gracefully. Pay attention to the subtle thickening at the base of the neck where it meets the body.
- Flesh out the Legs: Add a bit of thickness to the legs, making them cylindrical rather than just lines. Define the "knee" joint and the webbed feet. If one leg is lifted, show the bend clearly.
- Detail the Head and Beak: Draw a small circle for the eye on the head. Refine the beak, making sure to capture its unique, almost "scooped" shape. Add the nostril near the base of the beak.
- Add Wings and Feathers: On the upper part of the body, draw the outline of the folded wing. It should be a rounded shape that follows the curve of the body. You can suggest feather layers with light, overlapping lines within the wing and on the body. Don't draw every single feather; just imply texture.
- Clean Up and Erase: Once you're happy with your outline, gently erase all the initial guideline shapes. You should be left with a clean, well-defined flamingo drawing.
I guide you with ease on how to draw a flamingo, adding color and charm to your artwork through multiple drawing methods. This step-by-step approach ensures that even complex subjects like flamingos become manageable and enjoyable to draw.
Adding Life to Your Flamingo Drawing: Color and Personality
The most striking feature of a flamingo is undoubtedly its color. Adding color to your flamingo drawing is where its personality truly shines through. Includes coloring tips and a free printable guide (imagine this guide as your printable!).
- The Iconic Pink: Flamingos aren't just one shade of pink. Their plumage can range from pale, almost white, to vibrant salmon, deep rose, or even reddish-orange. Use a variety of pinks and oranges to create depth and realism. You can start with a lighter base color and build up darker shades in areas where shadows would fall, such as under the wings or on the underside of the neck.
- Beak and Legs: The beak is often a combination of black, white, and sometimes a touch of pink or yellow. The legs are typically a darker pink, red, or even black, depending on the species.
- Eyes: A small black pupil with a lighter iris, sometimes surrounded by a ring of color, will make the eye pop.
- Shading and Highlights: Don't forget to add shading to give your flamingo dimension. Think about where your light source is coming from and add darker tones to the opposite side. Highlights, such as a tiny white dot in the eye or a lighter edge on a feather, will make your drawing sparkle.
- Background: Consider adding a simple background, like water ripples or a hint of marshland, to give your flamingo a natural habitat. This helps to ground the bird in its environment and adds to the overall composition.
Experiment with different coloring techniques – cross-hatching with colored pencils, blending with markers, or washes with watercolors. The goal is to make your flamingo drawing vibrant and full of life.
Beyond the Basics: Advanced Tips for Your Flamingo Drawing
Once you've mastered the basic flamingo drawing, you might be ready to take your drawing to the next level! Here are some tips to add more sophistication and realism to your flamingo art:
- Feather Texture: Instead of just outlining the wing, try to suggest the softness and layering of individual feathers. Use short, overlapping strokes or subtle variations in color to create a feathery texture, especially on the wings and tail.
- Dynamic Poses: Flamingos are known for their varied and sometimes humorous poses. Try drawing them preening, feeding with their heads upside down, or in flight. Observing reference photos of flamingos in different actions will greatly help.
- Reflections in Water: If your flamingo is standing in water, consider adding reflections. This adds depth and realism to your scene. The reflection will be slightly distorted and less detailed than the flamingo itself.
- Environmental Context: Place your flamingo in its natural environment. This could be a serene lake, a bustling marsh, or even a stylized, abstract background. Adding elements like reeds, distant trees, or other flamingos can create a more compelling narrative.
- Light and Shadow Play: Pay close attention to how light hits the flamingo's body. Stronger contrasts between light and shadow will make your drawing appear more three-dimensional and dramatic.
- Experiment with Perspective: Try drawing your flamingo from different angles – looking up at it, down on it, or from a side profile. This challenges your spatial reasoning and adds variety to your portfolio.
Continuous practice and observation are key to improving your drawing skills. Don't be afraid to experiment and try new techniques. Every drawing is a learning opportunity.
Inspiration Galore: 36+ Cute Flamingo Drawing Ideas
Today, we’re thrilled to share 36+ easy and cute flamingo drawing ideas perfect for sparking your imagination! These 15 easy and cute flamingo drawing ideas offer a mix of playful, creative, and adorable designs. Each idea is simple enough for beginners and adds a unique twist to the classic flamingo drawing.
Here are just a few categories and concepts to get your creative juices flowing:
- Minimalist Flamingos: Focus on clean lines and simple shapes. A single outline with a splash of pink can be incredibly effective.
- Cartoon Flamingos: Exaggerate features for a fun, whimsical look. Big eyes, playful expressions, or comical poses.
- Flamingo Patterns: Draw multiple small flamingos to create a repeating pattern, perfect for stationery or fabric designs.
- Flamingo Silhouettes: Draw the dark silhouette of a flamingo against a vibrant sunset background.
- Flamingos with Accessories: Give your flamingo a tiny hat, sunglasses, or a flower crown for a quirky touch.
- Baby Flamingos: These are often grey or white before developing their pink plumage, offering a different color palette.
- Flamingos in Action: Jumping, dancing, preening, or even flying. Capture their movement.
- Flamingo Faces: A close-up of a flamingo's head, focusing on the eye and beak.
- Geometric Flamingos: Construct your flamingo using only geometric shapes like triangles, squares, and circles.
- Flamingos in Different Environments: Besides water, imagine them in a lush garden, or even a fantastical, dream-like setting.
- Flamingo Mandalas: Incorporate flamingo elements into intricate circular designs.
- Flamingo "Doodles": Quick, spontaneous sketches focusing on capturing the essence rather than perfection.
The possibilities are truly endless. Browse online art communities, nature photography, and even children's books for more inspiration. Don't be afraid to combine ideas or put your own unique spin on them. The goal is to enjoy the process and let your creativity soar.
Common Pitfalls and How to Overcome Them in Flamingo Drawing
As with any artistic endeavor, you might encounter a few challenges when learning flamingo drawing. Recognizing these common pitfalls can help you overcome them and improve your skills more efficiently:
- Proportion Problems: The most frequent issue is getting the neck too short, the legs too stubby, or the body too small/large in relation to other parts.
- Solution: Always start with light guidelines and basic shapes. Compare the length of the neck to the body, and the legs to the neck. Use a ruler or your pencil to measure proportions against a reference image.
- Stiff Poses: Sometimes drawings can look rigid or lifeless.
- Solution: Focus on the "flow" of the flamingo. Think about the graceful curves of its neck and body. Use loose, gestural lines in your initial sketch to capture movement before refining.
- Lack of Depth: Flat-looking drawings without a sense of three-dimensionality.
- Solution: Incorporate shading and highlights. Understand where light is hitting the flamingo and where shadows would naturally fall. Overlapping elements (e.g., one leg slightly in front of the other) also create depth.
- Unrealistic Color: Using a single, flat pink for the entire bird.
- Solution: Observe real flamingos. Notice the subtle variations in pink, orange, and even white. Layer colors to create richness and dimension.
- Over-detailing Too Soon: Getting bogged down in feathers or tiny details before the basic form is established.
- Solution: Resist the urge to add details until your foundational shapes and proportions are correct. Think "big shapes first, then small details."
- Frustration and Giving Up: Feeling discouraged if your first attempts aren't perfect.
- Solution: Art is a journey, not a destination. Embrace mistakes as learning opportunities. Take breaks, come back with fresh eyes, and remember that every artist, no matter how skilled, started as a beginner. Celebrate small improvements.
Remember, practice makes progress. Don't be afraid to make mistakes; they are an essential part of the learning process. Keep drawing, keep observing, and most importantly, keep enjoying your artistic journey.
Conclusion: Your Artistic Journey with Flamingo Drawing
You've now embarked on a wonderful artistic adventure, learning the nuances of flamingo drawing. From understanding their unique anatomy to breaking down the drawing process into simple, manageable steps, you have gained the knowledge to bring these magnificent birds to life on your canvas. We've explored essential tools, coloring techniques, and a wealth of inspiration to keep your creativity flowing.
The joy of drawing a flamingo lies not just in the final product, but in the meditative and rewarding process itself. It's an opportunity to connect with nature, refine your observational skills, and express your unique artistic voice. Whether you're a seasoned artist or picking up a pencil for the first time, the elegant flamingo offers an accessible and fulfilling subject.
Now, it's your turn! Pick up your chosen medium and start drawing. Don't be afraid to experiment, make mistakes, and discover your own style. Share your beautiful flamingo pictures with friends and family, or even online with fellow art enthusiasts. We encourage you to continue exploring the vast world of art and to revisit this guide whenever you need a refresher or a burst of inspiration. What other graceful creatures would you like to learn to draw? Let us know in the comments below, and happy drawing!
Related Resources:

Detail Author:
- Name : Mrs. Liana Toy
- Username : eileen04
- Email : angel.gleichner@jaskolski.org
- Birthdate : 1982-03-08
- Address : 7354 Kirk Bypass Stephonton, MT 43640-6049
- Phone : +1-606-685-6937
- Company : Satterfield-Schimmel
- Job : Proofreaders and Copy Marker
- Bio : At tenetur consequatur laborum. A asperiores quam blanditiis natus. Quae eaque eligendi impedit error dolore consequatur. Consequatur illo consectetur recusandae.
Socials
instagram:
- url : https://instagram.com/alta.little
- username : alta.little
- bio : Labore rerum molestias quisquam voluptatem. Et voluptatibus ipsa modi temporibus consequatur.
- followers : 5697
- following : 840
facebook:
- url : https://facebook.com/alta_official
- username : alta_official
- bio : Ut vel incidunt veniam excepturi. Sint aut et corrupti sit est repudiandae et.
- followers : 2189
- following : 355
tiktok:
- url : https://tiktok.com/@alta3758
- username : alta3758
- bio : Pariatur voluptatibus nesciunt quia adipisci.
- followers : 5032
- following : 2904
twitter:
- url : https://twitter.com/little1970
- username : little1970
- bio : Et harum quo velit cum nulla assumenda quam ea. Debitis sed consequatur sequi consequatur autem hic necessitatibus.
- followers : 5580
- following : 1740
linkedin:
- url : https://linkedin.com/in/littlea
- username : littlea
- bio : Amet autem ducimus molestias sequi deleniti.
- followers : 5999
- following : 1466
