Dolphin drawing is more than just putting lines on paper; it's an immersive journey into capturing the essence of one of the ocean's most intelligent and graceful creatures. The allure of these magnificent marine mammals has captivated artists for centuries, inspiring countless renditions that convey their playful spirit, streamlined forms, and profound connection to the aquatic world. Whether you're a budding artist taking your first steps or an experienced illustrator seeking to refine your craft, the process of bringing a dolphin to life through art offers a unique blend of challenge and immense satisfaction.
This comprehensive guide will navigate you through every facet of creating stunning dolphin artwork, from understanding their unique anatomy to mastering the interplay of light and water. We'll explore essential tools, foundational techniques, and advanced tips to help you develop your skills and express your artistic vision. By the end, you'll not only have the knowledge to create captivating dolphin drawings but also a deeper appreciation for the art form itself and the incredible subjects that inspire it.
Table of Contents
- The Allure of Dolphin Drawing: Why These Creatures Inspire Artists
- Essential Tools and Materials for Your Dolphin Drawing Journey
- Getting Started: Basic Shapes and Proportions in Dolphin Drawing
- Adding Depth and Detail: Textures, Shading, and Light
- Mastering the Environment: Water, Light, and Underwater Scenes
- From Sketch to Masterpiece: Digital vs. Traditional Dolphin Drawing
- Common Challenges and Troubleshooting in Dolphin Drawing
- Elevating Your Dolphin Drawing Skills: Practice, Persistence, and Community
The Allure of Dolphin Drawing: Why These Creatures Inspire Artists
Dolphins, with their sleek bodies, perpetual smiles, and incredible agility, have long held a special place in human imagination. Their intelligence, social complexity, and graceful movements through water make them ideal subjects for artistic expression. When embarking on a dolphin drawing, artists often seek to capture not just their physical form but also their spirit – the joy of a breach, the serenity of gliding through the depths, or the curiosity in their eyes. This intrinsic appeal is what makes dolphin drawing a perennially popular and rewarding artistic pursuit. It allows us to connect with nature, explore themes of freedom and harmony, and challenge our abilities to render dynamic forms in a fluid environment.
Understanding Dolphin Anatomy for Accurate Depictions
To create a truly convincing dolphin drawing, a foundational understanding of their anatomy is indispensable. While they appear simple, their streamlined bodies are marvels of evolution designed for efficiency in water. Begin by studying reference images and even videos of dolphins in various poses. Pay close attention to:
- Body Shape: The classic torpedo shape, wider in the middle and tapering towards the tail. Note the smooth, continuous curve of their back and belly.
- Dorsal Fin: Typically triangular or falcate (sickle-shaped), located mid-back. Its size and shape can vary slightly between species.
- Pectoral Fins (Flippers): Located on the sides, these are paddle-shaped and used for steering and balance. Observe how they lie flat against the body when not in use.
- Flukes (Tail Fins): The powerful horizontal tail fin, which is the primary propeller. Note its distinct lobes and the notch in the center. Unlike fish, dolphin flukes are horizontal, not vertical.
- Melon and Beak: The rounded forehead (melon) houses acoustic organs for echolocation. The beak or rostrum varies in length and prominence, giving different species their unique "faces."
- Eyes: Small but expressive, located just behind the melon.
- Blowhole: The single nostril on top of the head, used for breathing.
By internalizing these anatomical features, you can build a more believable and dynamic dolphin drawing, moving beyond a generic shape to a creature that feels alive and authentic. Understanding how these parts interact during movement is key to capturing their grace.
Essential Tools and Materials for Your Dolphin Drawing Journey
The beauty of dolphin drawing is that you don't need an elaborate setup to begin. Basic art supplies can yield fantastic results. However, having the right tools can certainly enhance your experience and the quality of your artwork.
- Pencils: A range of graphite pencils (e.g., HB for general sketching, 2B-4B for darker lines and shading, 2H for light guidelines).
- Paper: Smooth drawing paper or Bristol board works well for detailed work. For quick sketches, a standard sketchpad is fine. Consider paper with a slight tooth for better blending of graphite or colored pencils.
- Erasers: A kneaded eraser is excellent for lifting graphite gently without damaging the paper, and a vinyl eraser for precise corrections.
- Blending Tools: Tortillons (paper stumps) or cotton swabs can help create smooth gradients and blend shading seamlessly.
- Reference Images: High-quality photographs or videos of dolphins are crucial. Look for images that show different angles, lighting conditions, and poses. Online resources like National Geographic, marine biology archives, or even stock photo sites are invaluable.
- Optional (for color): Colored pencils, pastels, markers, or even digital drawing tablets and software (like Procreate, Photoshop, Clip Studio Paint) if you prefer digital art.
Choosing your tools is a personal journey, much like setting up 'basic keyboard controls' for a new system. Experiment to find what feels most comfortable and effective for your style of dolphin drawing.
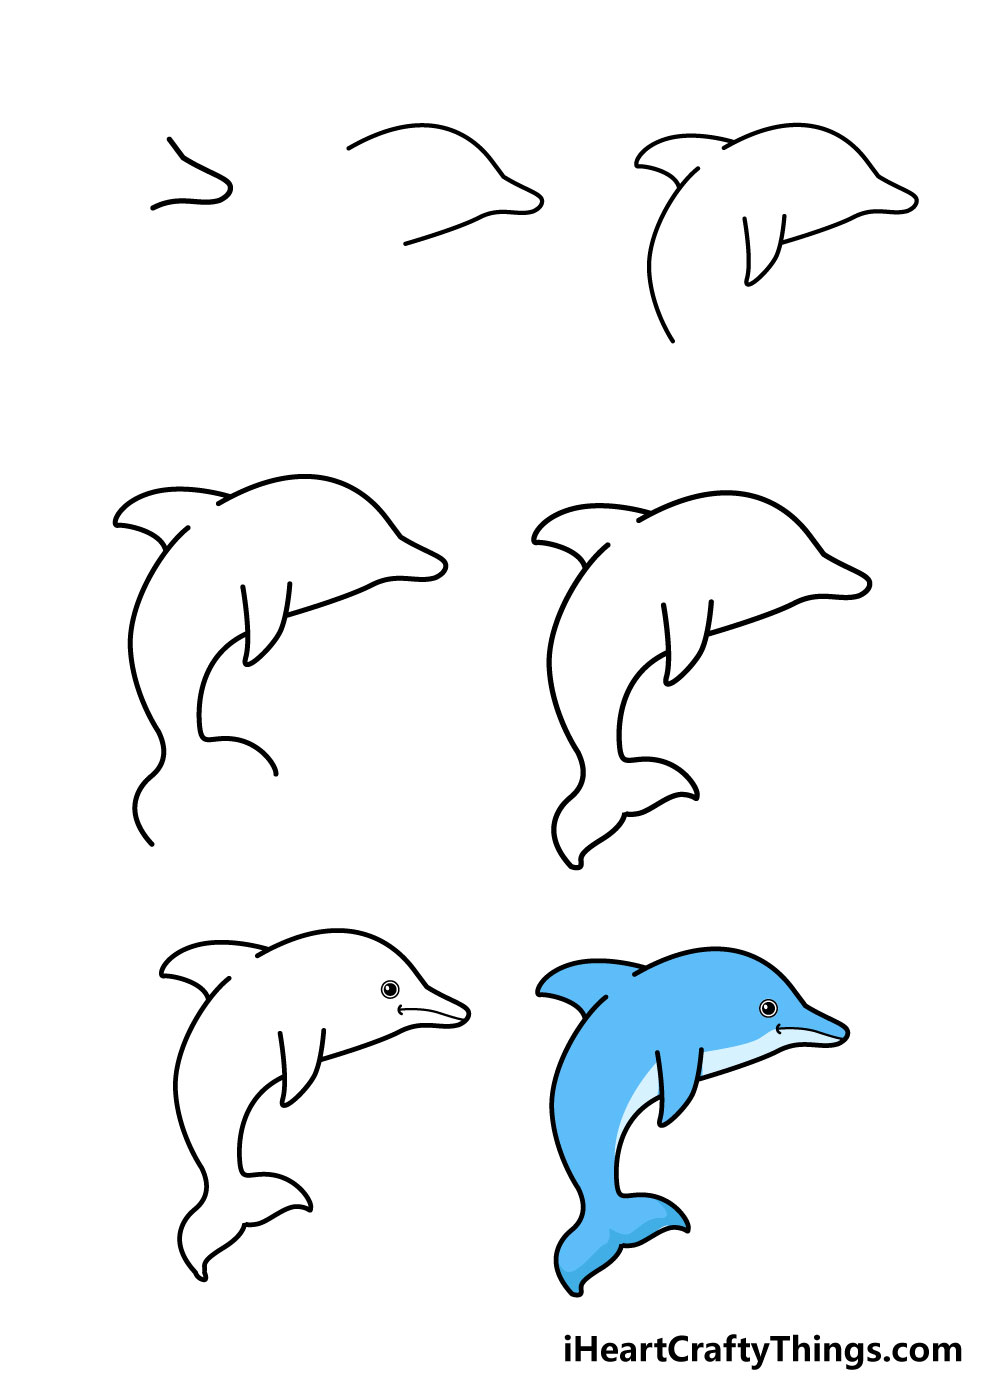
Getting Started: Basic Shapes and Proportions in Dolphin Drawing
Every complex drawing begins with simple shapes. This foundational step is critical for establishing accurate proportions and dynamic poses in your dolphin drawing. Think of it as laying down the blueprint before building the structure.
- The Core Body: Start with two overlapping ovals or circles to define the main body mass. One larger oval for the chest/belly area and a slightly smaller, elongated oval for the rear section, tapering towards the tail.
- Connecting the Shapes: Smoothly connect these ovals to form the basic torpedo shape of the dolphin's body. Pay attention to the elegant curve of the back and the gentle curve of the belly.
- Head and Beak: Add a smaller circle or oval for the head, then extend a line for the beak. Ensure the melon (forehead) has a gentle curve.
- Fins and Flukes: Lightly sketch the positions and basic shapes of the dorsal fin, pectoral fins, and flukes. Remember the horizontal orientation of the flukes.
- Refine and Erase: Once the basic framework is in place, begin to refine your lines, adding details and correcting proportions. Erase your initial construction lines as you go.
This systematic approach ensures your dolphin drawing has a strong structural foundation, making it easier to add details later without losing accuracy.
Capturing Movement: Dynamic Poses in Dolphin Drawing
Dolphins are synonymous with movement. To bring your dolphin drawing to life, you must convey this dynamism. Instead of drawing a static pose, think about the flow and energy of their actions:
- Line of Action: Start with a single, graceful curve that represents the main axis of the dolphin's movement. This line will guide the entire pose, whether it's a leap, a dive, or a turn.
- Twist and Turn: Dolphins rarely move in a straight line. Observe how their bodies twist and turn, especially when breaching or swimming quickly. Use foreshortening to add depth to these dynamic poses.
- Water Interaction: Consider how the water affects their form. A dolphin breaking the surface will have a different body posture than one gliding underwater. Water splashes and ripples can emphasize movement.
- Reference is Key: Study videos of dolphins in motion. Freeze frames can be incredibly helpful for understanding the mechanics of their leaps and turns. Don't be afraid to exaggerate the pose slightly to enhance the sense of motion.
By focusing on the underlying rhythm and flow, your dolphin drawing will transcend a mere representation and truly capture the animal's inherent vitality.
Adding Depth and Detail: Textures, Shading, and Light
Once your basic form is established, it's time to add the elements that give your dolphin drawing volume and realism. This involves understanding how light interacts with their smooth skin and how to create the illusion of three-dimensionality.
- Shading Techniques:
- Hatching and Cross-Hatching: Using parallel lines or intersecting lines to create tone.
- Stippling: Creating tone with dots.
- Blending: Using tortillons, cotton swabs, or even your finger to smooth out graphite or color for seamless transitions.
- Light Source: Always define a clear light source. This will dictate where highlights fall and where shadows are cast. Dolphins are typically darker on their backs and lighter on their bellies (countershading), which helps them camouflage in the water.
- Highlights: Use your eraser or leave areas of the paper untouched to represent the brightest points where light hits the dolphin's wet skin. These are often sharp and reflective.
- Mid-tones and Shadows: Build up your shading gradually, moving from light to dark. Pay attention to the subtle curves of the body and how they create soft shadows. The underside will generally be lighter, but even it will have subtle shadows to define its form.
- Texture: While dolphin skin is smooth, it's not perfectly uniform. Subtle variations in shading can suggest the texture of their skin. For wet skin, consider small, reflective speckles or streaks.
Mastering shading and light is like understanding the 'action replay codes' of visual perception – once you know how light behaves, you can recreate it consistently to bring your dolphin drawing to life with stunning realism.
Mastering the Environment: Water, Light, and Underwater Scenes
A dolphin drawing often feels incomplete without its natural habitat. The interplay of water and light is crucial for creating a convincing scene, whether the dolphin is breaching, swimming at the surface, or diving deep.
- Surface Water:
- Ripples and Waves: Use curved lines and subtle shading to depict the movement of water. Ripples around a surfacing dolphin or the wake behind a swimming one add immense realism.
- Reflections: If the dolphin is partially submerged, observe how its reflection distorts on the water's surface.
- Splashes: For breaching dolphins, dynamic splashes add energy. Think about the direction and force of the water.
- Underwater Light: Light behaves differently underwater. It scatters and diminishes with depth.
- Caustics: These are the dancing patterns of light that filter through the water and reflect off the seafloor or objects. They can be challenging but add incredible realism to underwater scenes.
- Atmospheric Perspective: Objects further away appear lighter, less saturated, and less detailed due to the water column.
- Color of Water: The ocean isn't just blue. It can range from deep indigo to turquoise, emerald green, or even murky brown depending on depth, sediment, and light. Consider the mood you want to convey.
The Psychology of Color in Dolphin Drawing: Mood and Emotion
If you're venturing into colored dolphin drawing, understanding color theory can dramatically impact the emotional resonance of your artwork. Colors evoke specific feelings and can enhance the narrative of your piece.
- Blues and Greens: Naturally associated with water, these colors evoke calm, serenity, and depth. Varying shades can suggest different depths or water conditions.
- Warm Tones (Yellows, Oranges): Used sparingly, warm colors can represent sunlight filtering through the water, or the glow of a sunset reflecting on the surface, adding warmth and optimism.
- Contrasting Colors: Using a complementary color (e.g., a touch of orange against blue) can make elements pop and add visual interest.
- Value and Saturation: The lightness/darkness (value) and intensity (saturation) of colors are as important as the hue. Desaturated colors can convey distance or murkiness, while vibrant colors suggest proximity or clarity.
By consciously choosing your palette, you can transform a simple dolphin drawing into a powerful visual statement, conveying anything from peaceful tranquility to exhilarating motion.
From Sketch to Masterpiece: Digital vs. Traditional Dolphin Drawing
The journey from a rough sketch to a polished dolphin drawing can take various paths, largely depending on your chosen medium. Both traditional and digital methods offer unique advantages and challenges.
- Traditional Drawing:
- Tangibility: The tactile experience of pencil on paper or brush on canvas is deeply satisfying.
- Uniqueness: Each traditional piece is an original, with unique textures and imperfections.
- Materials: Requires physical tools like pencils, paper, erasers, and potentially colored media (pastels, watercolors, acrylics, oils).
- Learning Curve: Mastering traditional media often involves understanding how materials interact physically.
- Digital Drawing:
- Flexibility: Layers, undo/redo functions, and a vast array of brushes offer unparalleled flexibility for experimentation and correction.
- Efficiency: Easy to share, store, and duplicate artwork. No need for physical cleanup.
- Tools: Requires a graphics tablet (like a Wacom or iPad with Apple Pencil) and drawing software (e.g., Procreate, Adobe Photoshop, Clip Studio Paint).
- Learning Curve: Involves learning software interfaces and digital brush dynamics, which can be different from traditional methods.
Ultimately, the choice between traditional and digital dolphin drawing comes down to personal preference, convenience, and the desired aesthetic. Many artists blend both, sketching traditionally and then refining digitally, or vice-versa. The core principles of anatomy, light, and composition remain constant regardless of the medium.
Common Challenges and Troubleshooting in Dolphin Drawing
Every artist encounters hurdles, and dolphin drawing is no exception. Recognizing common difficulties and having strategies to overcome them is key to continuous improvement. Sometimes, despite your best efforts, a drawing session simply 'does not launch' – the inspiration isn't there, or the lines just aren't coming together. This creative block is a common hurdle, much like a software program that refuses to start without an apparent error. When faced with such moments, it's crucial not to give up.
- Proportion Problems: If your dolphin looks "off," revisit your basic shapes and reference images. Use measuring techniques (e.g., comparing lengths and widths with your pencil) to ensure accuracy.
- Stiff Poses: If your dolphin looks static, re-evaluate your line of action. Exaggerate the curves slightly, and consider dynamic angles.
- Flatness: Lack of depth usually stems from insufficient shading or a poorly defined light source. Push your darks, define your highlights, and ensure a full range of values.
- Water Woes: Drawing convincing water is tough. Practice drawing ripples, reflections, and splashes separately. Study how light interacts with water in real-life photos.
- Creative Block: When the inspiration isn't flowing, step away. Look at other artists' work, go for a walk, or simply sketch something entirely different. Sometimes a break is all you need to 'reboot' your creative drive.
Learning from the Masters: Inspirational Dolphin Art and Artists
One of the most effective ways to improve your dolphin drawing skills is to study the work of artists who excel in marine art. Look for artists known for their wildlife illustrations, particularly those focusing on aquatic life. Observe their techniques for rendering water, capturing movement, and depicting light. Don't just copy; analyze their choices in composition, color, and detail. Online art communities and platforms like ArtStation, DeviantArt, and Instagram are excellent places to discover contemporary artists. Museums and galleries also showcase historical marine art. By immersing yourself in quality artwork, you'll gain new perspectives and find inspiration to push your own boundaries in dolphin drawing.
Elevating Your Dolphin Drawing Skills: Practice, Persistence, and Community
The journey to mastering dolphin drawing, like any skill, is one of continuous learning and dedication. There are no shortcuts, but consistent effort yields remarkable results.
- Consistent Practice: Regular sketching is paramount. Even 15-30 minutes a day can make a significant difference over time. Focus on specific aspects, like drawing fins, heads, or dynamic poses.
- Seek Constructive Feedback: Share your dolphin drawing with trusted friends, fellow artists, or online art communities. A fresh pair of eyes can spot areas for improvement you might have missed. Be open to criticism and use it as a tool for growth.
- Experimentation: Don't be afraid to try new techniques, tools, or styles. What works for one artist might not work for you, and vice-versa. Experimentation is how you discover your unique artistic voice.
- Stay Curious: Continue to learn about dolphins themselves. Their biology, behavior, and habitats can inspire new ideas and add depth to your artwork. Watch documentaries, read books, or visit aquariums.
- Community Engagement: Join online forums or local art groups. Engaging with a community of artists can provide motivation, support, and opportunities to learn from others. Just as a system needs its 'firmware updates' to run smoothly, your artistic skills require consistent practice and learning to stay sharp. Regularly updating your 'firmware' – your knowledge base and techniques – ensures your art remains fresh, relevant, and capable of capturing the ever-evolving nuances of the world, especially when it comes to the intricate details of dolphin drawing.
Remember, every masterpiece began as a blank page. Your commitment to practice and your passion for these incredible creatures will be your greatest assets in your dolphin drawing journey.
Conclusion
Dolphin drawing is a
Related Resources:


Detail Author:
- Name : Mrs. Liana Toy
- Username : eileen04
- Email : angel.gleichner@jaskolski.org
- Birthdate : 1982-03-08
- Address : 7354 Kirk Bypass Stephonton, MT 43640-6049
- Phone : +1-606-685-6937
- Company : Satterfield-Schimmel
- Job : Proofreaders and Copy Marker
- Bio : At tenetur consequatur laborum. A asperiores quam blanditiis natus. Quae eaque eligendi impedit error dolore consequatur. Consequatur illo consectetur recusandae.
Socials
instagram:
- url : https://instagram.com/alta.little
- username : alta.little
- bio : Labore rerum molestias quisquam voluptatem. Et voluptatibus ipsa modi temporibus consequatur.
- followers : 5697
- following : 840
facebook:
- url : https://facebook.com/alta_official
- username : alta_official
- bio : Ut vel incidunt veniam excepturi. Sint aut et corrupti sit est repudiandae et.
- followers : 2189
- following : 355
tiktok:
- url : https://tiktok.com/@alta3758
- username : alta3758
- bio : Pariatur voluptatibus nesciunt quia adipisci.
- followers : 5032
- following : 2904
twitter:
- url : https://twitter.com/little1970
- username : little1970
- bio : Et harum quo velit cum nulla assumenda quam ea. Debitis sed consequatur sequi consequatur autem hic necessitatibus.
- followers : 5580
- following : 1740
linkedin:
- url : https://linkedin.com/in/littlea
- username : littlea
- bio : Amet autem ducimus molestias sequi deleniti.
- followers : 5999
- following : 1466
